Asset Import Pipeline: Maya/Blender → UE5/Unity
-

Written byDenys Zadoienyi
-

Updated on22.06.2026
-

Time to read26 min
- What the Asset Import Pipeline Actually Is
- Why Asset Import Pipelines Break — and Why It’s Always the Same Reasons
- Format Decisions First: FBX, USD, and glTF in 2026
- Pre-Export Discipline: Maya
- Pre-Export Discipline: Blender
- Importing into Unreal Engine 5: Settings, Interchange, and Nanite
- Importing into Unity: Settings, Scale, and Axis Traps
- UV Channels, Lightmaps, and What Lumen Changes
- LOD and Collision Setup for Import
- Asset Import Settings: Technical Matrix
- How Nasty Rodent Handles Asset Delivery
- Import Pipeline Approaches: Comparison by DCC and Engine
- Conclusion: The Pipeline Is a Contract
The asset import pipeline — the structured workflow that takes geometry from a DCC tool into a real-time engine — is where a significant portion of game art production time disappears, and almost none of it needs to.
“Editorial illustration created for visual reference purposes. It does not represent a real project, client work, or official software screenshot unless stated otherwise.”
Scale that’s off by a factor of 100. Normals that flip on import. Collision meshes that don’t register. Materials that arrive as flat grey. LODs that don’t chain. UV channel 1 that never existed. These failures are not random — they are the same failures, in the same places, on many projects that haven’t standardized their pipeline. An art director who has managed three mid-core productions has seen every item on that list at least twice.
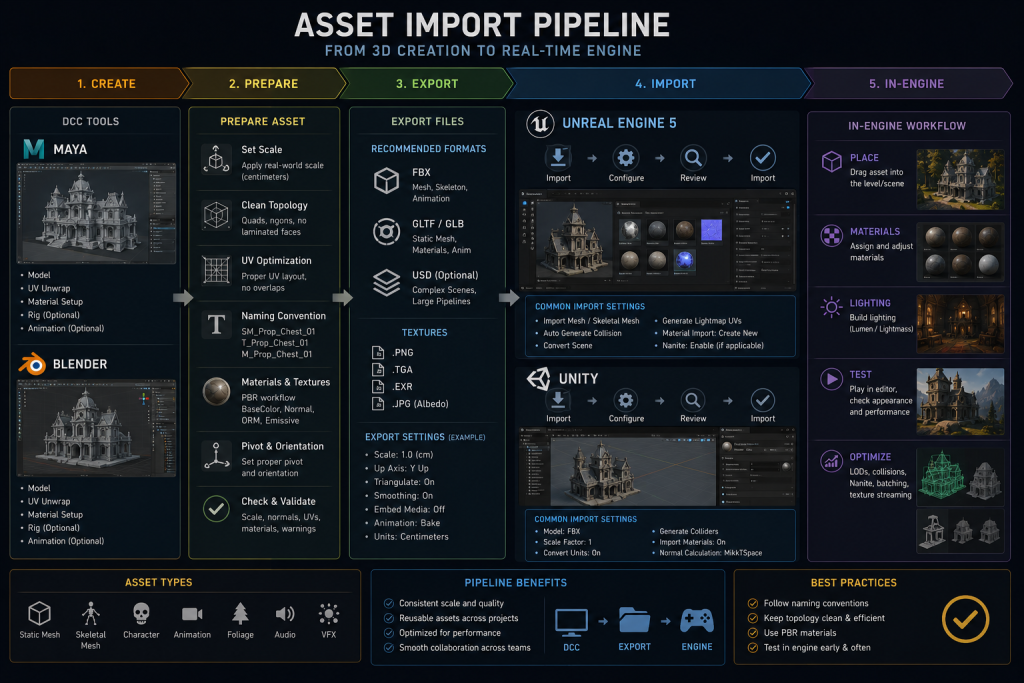
This guide covers the complete asset import pipeline for the two most common DCC-to-engine paths in professional game development: Maya and Blender into Unreal Engine 5 and Unity. The focus is on production-grade execution — the specific export settings, naming conventions, and engine import configurations that eliminate the failures before they compound across hundreds of assets.
What the Asset Import Pipeline Actually Is
The asset import pipeline is the defined sequence of steps, settings, and conventions that moves geometry, materials, UVs, LODs, and collision data from a DCC application into a game engine in a state that requires no corrective work after import.
That last clause is the operative one. An asset that arrives in the engine and requires manual scale correction, UV reconstruction, LOD setup, or material reassignment has not completed the pipeline — it has been handed off mid-process to whoever picks it up next, which is usually an engineer or technical artist who had other work scheduled.
A well-defined asset import pipeline has four properties:
Deterministic. The same export settings and mesh configuration always produce the same import result. No surprises on Monday after Friday’s batch import.
Documented. Every convention — naming structure, scale baseline, UV channel assignment, LOD threshold, collision prefix — is written down and shared with every team member and vendor producing assets. Undocumented conventions exist only in the institutional memory of whoever set them up.
Verifiable. There is a test asset — a reference cube, a known-good character, an approved environment prop — against which any new pipeline configuration can be validated before being applied to a production batch.
Consistent between sources. When assets come from multiple DCC tools (Maya for characters, Blender for props, for example) or from external vendors, the pipeline produces equivalent results regardless of origin. This is the hardest property to maintain and the one that breaks most often in outsource workflows.
Why Asset Import Pipelines Break — and Why It’s Always the Same Reasons
Before addressing how to configure the pipeline correctly, it is worth establishing why it fails so predictably. The failures cluster around four structural causes, not user error.
Coordinate System Mismatch
Maya, Blender, Unreal Engine, and Unity do not share a coordinate system. Maya uses Y-up. Blender uses Z-up. Unreal uses Z-up with X-forward. Unity uses Y-up with Z-forward. FBX files carry coordinate system metadata, but how that metadata is interpreted at import — and whether the exporting application applies a corrective transform before writing the file — varies by tool version and export preset.
The result: assets that rotate 90 degrees on import, or arrive mirrored, or have their forward direction pointing the wrong way. This is not an edge case. It is the default behavior if export settings are not explicitly configured to handle axis conversion.
Scale System Mismatch
Blender’s default unit system uses meters (1 Blender unit = 1 meter). Unreal Engine uses centimeters as its base unit. Unity also uses meters, but its FBX importer applies a 100× scale factor to assets exported from Blender under default settings, producing objects that are either microscopic or enormous in the scene.
The fix for each engine path is specific and must be applied consistently across all assets in the project. Mixing fixes — applying the scale correction in Blender on some assets and in the import dialog on others — produces a scene where objects are at inconsistent scales relative to each other.
Pre-Export Geometry State
Both Maya and Blender carry non-destructive transform data — scale, rotation, and construction history — that is not baked into the mesh geometry itself. When a mesh with unapplied transforms is exported, the FBX file contains the raw geometry plus a separate transform node. Depending on how the engine reads that transform, the imported mesh may be rotated, scaled, or offset from origin in ways that do not match what the artist intended.
Clearing this state before export — Delete History and Freeze Transforms in Maya, Apply All Transforms in Blender — is a pre-export requirement, not a optional cleanup step.
Missing or Incorrectly Configured UV Data
Game engines require specific UV configurations that DCC tools do not enforce by default. UV Channel 0 is the primary texture channel. UV Channel 1 — required for lightmap baking in Unity and in UE5 projects using baked lighting — must be non-overlapping, with every polygon occupying a unique space in the 0–1 UV square. Assets produced without UV Channel 1, or with overlapping UVs on that channel, either import with engine-generated lightmap UVs of unknown quality or simply fail lightmap baking.
Format Decisions First: FBX, USD, and glTF in 2026
Before configuring export settings, the pipeline needs a format decision. The three relevant formats for game asset import in 2026 are FBX, USD, and glTF. Each has a distinct role.
FBX: Still the Production Standard for Most Pipelines
FBX remains the most widely supported format for game asset import into both UE5 and Unity. It handles static meshes, skeletal meshes with skeleton and skinning data, animation clips, blend shapes, LOD levels (via naming convention), and custom collision geometry — all in a single file or as a batch. For the Maya-to-engine path, FBX is the default and the most mature choice.
The FBX format’s weaknesses are well-documented: it is a closed Autodesk format, its specification has changed across versions in ways that affect compatibility, and its material translation between applications is unreliable by design (materials defined in Maya’s viewport are not the same as materials defined in UE5’s material editor). For the import pipeline, this means FBX should be used to carry geometry, UV, LOD, and collision data — not to carry materials. Materials are built or adjusted in the engine after import.
USD: The Format Gaining Traction at Scale
Universal Scene Description (USD), originally developed by Pixar and now maintained as an open standard, is gaining adoption in larger game studios for its ability to represent complex multi-layer scene data that multiple departments can edit non-destructively. Polyphony Digital (Gran Turismo) implemented USD in their production pipeline specifically for its composability — the ability to edit data in different tools without losing information.
For UE5, USD import is supported via both the native USD Stage editor and the Interchange Framework. For Unity, USD support exists but is less mature in practice. For mid-core productions that are not already running a complex multi-department pipeline, USD introduces overhead without commensurate gain. The practical guidance: use FBX for asset-level import now, evaluate USD for pipeline-level adoption if multi-department collaboration on scene data is a genuine production requirement.
glTF: The Right Choice for Specific Cases
glTF (GL Transmission Format) is efficient, open, and increasingly competitive for static asset import into UE5 via the Interchange Framework. For assets that will be imported as static meshes without skeletal data, glTF offers cleaner material metadata than FBX and better support for PBR material properties directly embedded in the file. Its weakness is skeletal mesh and animation support, which remains less reliable than FBX for complex rigs.
The practical decision in 2026: FBX for skeletal meshes and animation. FBX or glTF for static meshes, with glTF an increasingly viable option when using UE5’s Interchange Framework and the asset’s material data needs to carry over cleanly.
Pre-Export Discipline: Maya
Maya is the industry-standard DCC for AAA character and environment production. Its FBX export path to both UE5 and Unity is mature, but it requires explicit configuration to produce clean imports.
Geometry Cleanup Before Export
Delete History. In Maya, every operation applied to a mesh — extrude, bevel, subdivision, deformer — leaves construction history nodes attached to the object. These nodes can produce unexpected behavior on import, particularly with skinned meshes. Before exporting, select all objects and execute Edit > Delete by Type > History. This is not optional for production assets.
Freeze Transforms. Any mesh that has been moved, rotated, or scaled at the object level — not at the component level — carries those transforms in its object data rather than its geometry. Modify > Freeze Transformations bakes the current position, rotation, and scale into the geometry and resets the transform values to identity (0, 0, 0 for translate and rotate; 1, 1, 1 for scale). Assets exported without frozen transforms arrive in the engine with transform offsets that produce unexpected pivot behavior and break instancing.
Pivot to origin. The pivot point of each mesh should be placed deliberately before export — usually at the mesh’s intended assembly origin, not at the world origin and not at a random point in space. For modular environment pieces, the pivot determines how the piece snaps to a grid. A wall section with its pivot at the bottom-left corner will behave differently when placed in the engine than one with its pivot centered.
Maya FBX Export Settings for UE5 and Unity
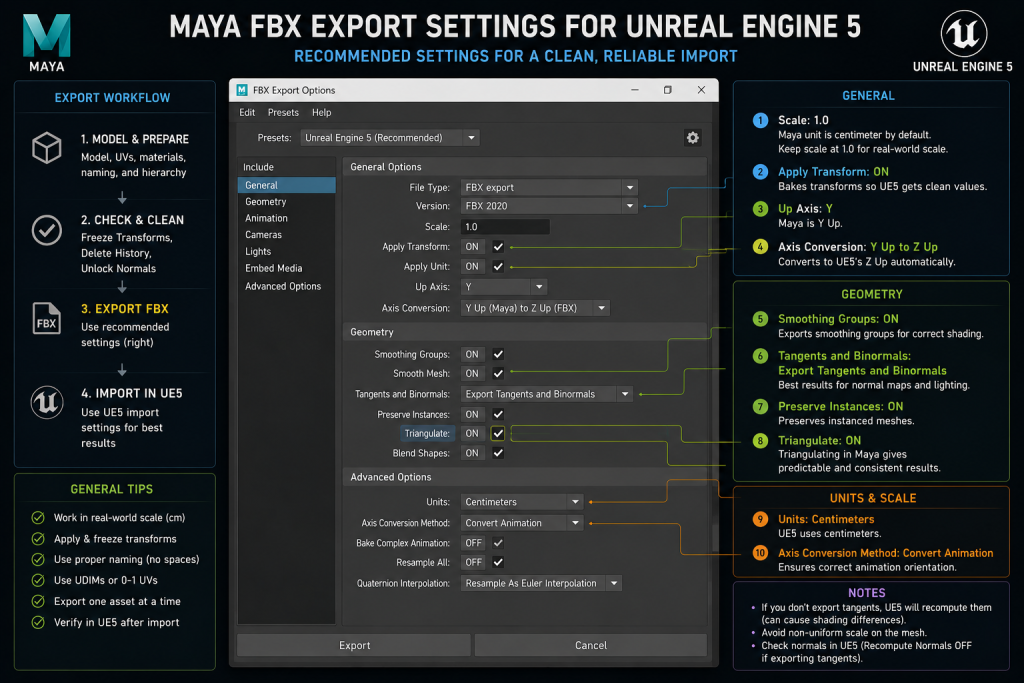
“Editorial illustration created for visual reference purposes. It does not represent a real project, client work, or official software screenshot unless stated otherwise.”
| Setting | UE5 | Unity | Notes |
| Smoothing Groups | ✅ Enabled | ✅ Enabled | Controls how normals are interpreted on import |
| Tangents and Binormals | ✅ Enabled | ✅ Enabled | Export tangent data from Maya rather than computing in engine |
| Triangulate | ✅ Recommended | ✅ Recommended | Engine will triangulate regardless; doing it in Maya gives predictable results |
| Scale Factor | 1.0 (centimeters) | 1.0 (centimeters) | Maya uses cm by default, matching UE5’s base unit |
| Up Axis | Y (Maya default) | Y | FBX spec carries axis data; UE5 and Unity handle the conversion |
| Animation | Only if exporting animation | Only if exporting animation | Disable for static mesh exports to reduce file size |
| Embed Media | ❌ Disabled | ❌ Disabled | Do not embed textures in the FBX; reference them separately |
Maya-specific note for UE5: UE5 reads collision geometry named with the UCX_ prefix (for convex shapes), UBX_ (box), and USP_ (sphere). These collision meshes must be separate objects, must be convex, and must be selected and exported together with the parent mesh in the same FBX file. The naming convention is UCX_MeshName_00, UCX_MeshName_01 for multiple hulls. If the mesh is named SM_Wall_01, the collision mesh should be UCX_SM_Wall_01_00.
The Send to Unreal plug-in (available via the Unreal Engine Marketplace) provides a direct Maya-to-UE5 bridge that automates the export-import cycle, placing assets directly into the specified UE5 project directory. For iterative workflows where the same asset is exported and reimported multiple times during production, Send to Unreal eliminates the manual drag-and-drop step and reduces the risk of incorrect import settings being applied during iteration.
Did you know that…?:
The UCX_, UBX_, and USP_ collision naming convention dates back to early Unreal Engine production workflows and has remained unchanged through UE3, UE4, and UE5. It was designed to let artists define physics collision entirely in the DCC tool — without any per-asset configuration inside the engine — and continues to do exactly that today.
Pre-Export Discipline: Blender
Blender’s FBX exporter to game engines has improved significantly across recent versions, but the coordinate system and scale mismatches between Blender and both UE5 and Unity are structural issues that require explicit, per-pipeline solutions.
The Scale Problem
Blender’s default unit system uses meters (1 unit = 1 meter). Unreal Engine uses centimeters (1 unit = 1 cm). Unity uses meters but applies a scale adjustment to FBX imports that produces a 100× scaling issue under default Blender export settings.
The correct approach is to pick one solution and apply it consistently across the entire project. Three options exist:
Option A — Scene scale in Blender: Set Blender’s unit scale to 0.01 in Scene Properties (so 1 Blender unit = 1 cm). This makes Blender’s internal scale match UE5’s base unit. Models authored at character height (~1.8 units) will arrive at 180 cm in UE5 — correct. The tradeoff: Blender’s viewport dimensions display in centimeter values, which is unfamiliar for artists accustomed to working in meters.
Option B — FBX export scale: Set the FBX export scale to 100 (or use “FBX Units Scale” in the Apply Scalings dropdown). The geometry remains modeled at meter scale in Blender but exports at 100× to match UE5’s centimeter base. This is the most common approach for UE5-specific pipelines.
Option C — Import scale in engine: Set the import scale to 1.0 in UE5’s import dialog or in Unity’s model import settings. This corrects the scale at the engine side rather than the export side. The risk: this must be applied consistently to every asset imported, and it is easy to forget on one-off imports.
Validation method: Before processing a production batch, export a known reference cube (1 Blender unit × 1 Blender unit × 1 Blender unit, intended to represent 1 meter) and verify it imports at 100 cm in UE5 or 1 meter in Unity. If it doesn’t, the scale pipeline is misconfigured.
The Axis Conversion Problem
Blender uses Z-up as its world axis. UE5 uses Z-up with X-forward. Unity uses Y-up with Z-forward. The FBX exporter handles this through the “Forward” and “Up” axis settings in the export dialog. For UE5, the standard settings are: Forward = -Y Forward, Up = Z Up. For Unity: Forward = -Z Forward, Up = Y Up.
The additional complication for Unity is the infamous rotation issue — assets exported from Blender with default settings arrive in Unity with a -90 degree rotation on the X axis. The standard fix is to apply the transform in Blender before export (Object > Apply > All Transforms, or Ctrl+A → All Transforms in Object Mode). This bakes the current rotation into the geometry so Unity’s importer receives identity-rotation data.
For skeletal meshes and armatures: transform application should follow the project’s rigging pipeline. Applying transforms incorrectly on a rigged mesh can introduce skeleton, animation, or retargeting issues during import. Consult the project’s character TD or technical artist before applying transforms to any asset with an armature.
Blender FBX Export Settings for UE5 and Unity
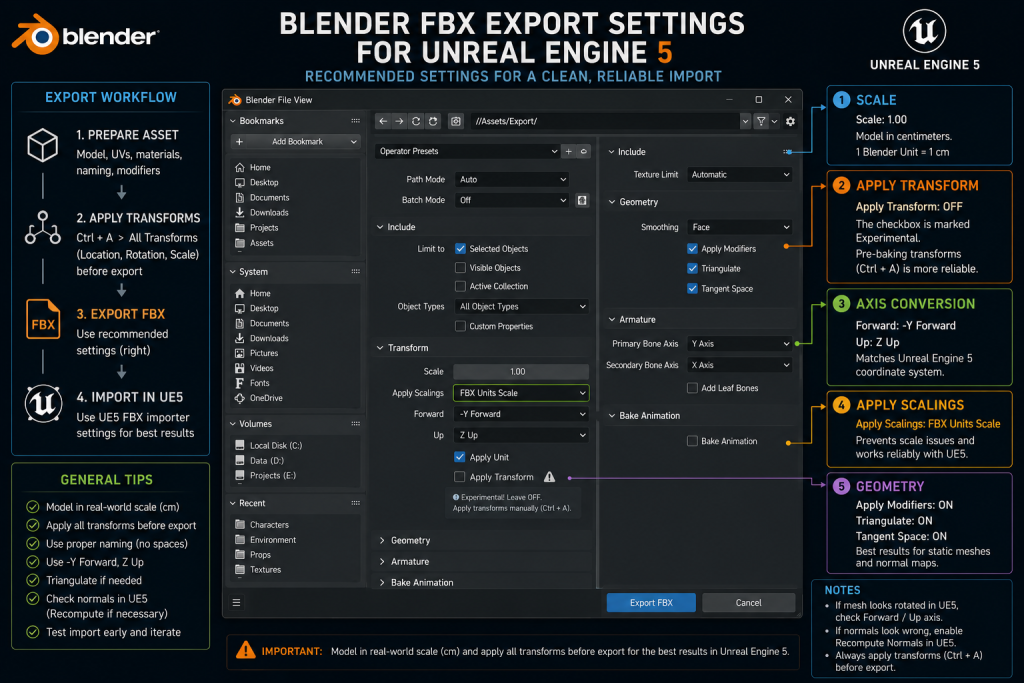
“Editorial illustration created for visual reference purposes. It does not represent a real project, client work, or official software screenshot unless stated otherwise.”
| Setting | UE5 | Unity | Notes |
| Apply Scalings | FBX Units Scale | FBX Units Scale | Embeds scale correction in the FBX file |
| Forward Axis | -Y Forward | -Z Forward | Corrects axis orientation per engine |
| Up Axis | Z Up | Y Up | Corrects axis orientation per engine |
| Apply Transform | ❌ Off (use Apply All Transforms before export) | ❌ Off (use Apply All Transforms before export) | The checkbox is marked Experimental; pre-baking transforms is more reliable |
| Triangulate | ✅ Enabled | ✅ Enabled | Consistent results vs engine triangulation |
| Tangent Space | ✅ Enabled | ✅ Enabled | Export tangent data when required by the target pipeline; otherwise engine-standard MikkTSpace generation is acceptable |
| Custom Properties | ❌ Disabled | ❌ Disabled | Reduces FBX file complexity |
| Embed Textures | ❌ Disabled | ❌ Disabled | Reference textures separately; do not embed |
Blender-specific note for skeletal meshes: For characters being exported to UE5 or Unity, export the skeleton and mesh together once (with the full FBX containing armature and mesh). For subsequent animation exports, export only the armature with animation baked and import as a new animation asset targeting the existing skeleton. This keeps the skeleton consistent and prevents the “mismatched skeleton” import error that occurs when skeleton data is included in every animation FBX.
Importing into Unreal Engine 5: Settings, Interchange, and Nanite
The Legacy Importer vs. Interchange Framework
UE5 has two import systems: the Legacy FBX importer (the pre-UE5 system that remains the default for FBX) and the Interchange Framework (the new format-agnostic pipeline introduced in UE5.0 and actively developed through UE5.7). Understanding which one is active — and what each provides — is essential for configuring the import pipeline correctly.
According to Epic’s official Interchange documentation, Interchange is a customizable, format-agnostic import pipeline that processes assets through a configurable pipeline stack. It handles glTF and USD by default. FBX support via Interchange is currently marked as Experimental in UE5.7 and must be enabled via console command. For production pipelines relying on FBX, the Legacy importer remains the stable choice.
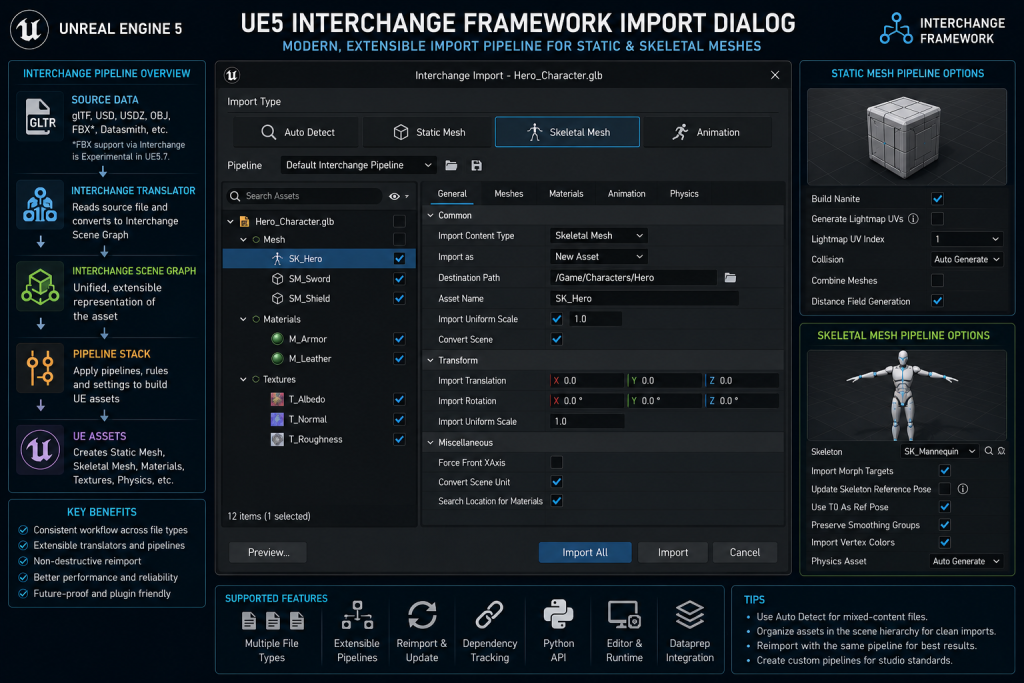
“Editorial illustration created for visual reference purposes. It does not represent a real project, client work, or official software screenshot unless stated otherwise.”
The practical implication: for FBX-based Maya and Blender pipelines, use the Legacy importer unless there is a specific reason to adopt Interchange. For glTF-based static mesh imports, Interchange is the recommended path and is enabled by default.
UE5 Static Mesh Import Settings
When importing static meshes (environment props, architectural pieces, terrain details) via the Legacy FBX importer:
Auto Generate Collision: Enable for simple geometry where a generated convex hull is acceptable. Disable when the FBX contains custom UCX_ collision geometry — if both are enabled, UE5 will generate additional collision on top of the imported custom collision, producing unexpected physics behavior.
Generate Lightmap UVs: Disable for projects using Lumen (UE5’s default global illumination). Lumen is a fully dynamic GI system and does not use lightmap UVs. Enabling this option for a Lumen project adds a UV channel that will never be used, wastes memory, and adds unnecessary import time on large batches. Enable only for projects using baked static lighting with Lightmass.
Combine Meshes: Disable. This combines all objects in the FBX into a single Static Mesh asset. For environment batches where individual modular pieces are exported in a single FBX for organizational convenience, this setting destroys the modular structure. Every piece arrives as one monolithic mesh that cannot be individually placed, replaced, or LOD-managed.
Import Materials / Import Textures: Disable both. UE5’s FBX material importer creates basic material assets from Maya’s viewport materials — these are not PBR materials and are not usable in production. Materials are built in UE5’s Material Editor as master materials with configurable material instances. Importing FBX-defined materials generates garbage assets that clutter the Content Browser and typically need to be deleted immediately.
Nanite and Import Workflow
Nanite — UE5’s virtualized geometry system — changes one specific aspect of the import workflow: for eligible static mesh assets (opaque, non-animated geometry), Nanite can be enabled directly in the Static Mesh Editor’s Details panel after import, without any change to the export or import settings.
What Nanite does not change: the pre-export preparation requirements, the UV channel conventions, the naming conventions, or the collision setup. A mesh intended for Nanite still needs clean UVs, properly named collision geometry (if custom collision is needed), and correctly frozen transforms before export. Nanite processes the geometry after import — it does not retroactively fix export errors.
One specific Nanite interaction with UV: Epic’s documentation notes that when Build Nanite is enabled during import and Generate Lightmap UVs is also enabled, UE5 adds a significant amount of data for lightmap UV generation on high-density meshes. For Lumen projects, disabling Generate Lightmap UVs before enabling Nanite reduces import time and asset file size without any visual consequence.
Importing into Unity: Settings, Scale, and Axis Traps
Unity’s model import pipeline is configured per-asset in the Inspector’s Model tab, and these settings are persistent — they are stored in the .meta file alongside the asset and applied on every reimport.
Unity Model Import Settings for Maya and Blender Assets
Scale Factor: This is the primary control for resolving scale mismatches. For Maya assets, Scale Factor is typically left at 1.0 when the project pipeline has been standardized and validated against Unity’s world scale conventions — Unity treats 1 unit as 1 meter, and Maya’s centimeter-based geometry usually requires no additional correction when this convention is established consistently. For Blender assets, the correct Scale Factor depends on the Blender version, FBX export settings, and which scale correction (if any) was applied before export. Scale Factor adjustments should be validated against the project’s reference asset before being applied globally — not used as an ad-hoc correction tool applied differently across individual imports.
The consistent recommendation from Unity’s official documentation is to export to FBX from all DCC tools and manage scale in the import settings rather than in the application, for maximum predictability. However, the more robust approach for production is to resolve scale in the DCC tool before export, so that the Scale Factor in Unity is always 1.0 across all assets from all sources — and, critically, so that every imported mesh has a clean (1, 1, 1) Transform Scale in Unity’s scene hierarchy. Non-unit scale on imported prefabs breaks physics colliders and prefab instancing in ways that are tedious to diagnose and costly to fix at scale.
Bake Axis Conversion: When enabled, Unity applies an additional coordinate system rotation to resolve the axis difference between the DCC tool and Unity’s Y-up system. For Blender assets where the axis conversion was handled via the forward/up axis settings in the Blender FBX exporter, disable this — double-applying the conversion produces incorrect results.
Import Normals: Set to “Import” for assets where normals were explicitly authored in the DCC tool (using Maya’s Normal Edit tools or Blender’s Custom Split Normal Data). Set to “Calculate” only for quick-iteration imports where normal quality is not a concern. For production assets, always import normals from the source.
Read/Write Enabled: Enabled by default. Disable for static mesh assets that will never be modified at runtime — this reduces runtime memory usage by preventing Unity from keeping a CPU-side copy of the mesh data.
Per Unity’s official documentation on importing from 3D applications, proprietary file formats (.blend, .ma, .mb) should not be used for production pipelines — Unity converts them to FBX in the background when it detects them, which requires the source application to be installed and produces less predictable results than an explicit FBX export.
UV Channels, Lightmaps, and What Lumen Changes
UV channel configuration is one of the most consistently mismanaged aspects of the asset import pipeline, and the requirements changed meaningfully with UE5’s introduction of Lumen.
The Two-Channel Standard
Game engines for real-time rendering typically require two UV channels per mesh:
UV Channel 0 (texture UVs): The primary texture mapping channel. Overlapping UVs are permitted and often desirable here — tiling surface textures on large architecture meshes rely on overlapping UVs to repeat the texture without requiring enormous texture resolution. This channel is authored by the artist in the DCC tool.
UV Channel 1 (lightmap UVs): A non-overlapping UV channel where every polygon occupies a unique, non-overlapping space within the 0–1 UV square. This channel is used for lightmap baking — pre-computing static lighting and storing it in a texture that is applied at runtime. The quality of the lightmap UV directly affects the quality of baked lighting; islands that are too small produce low-resolution lighting; overlapping islands produce lighting artifacts where different surfaces share lighting data.
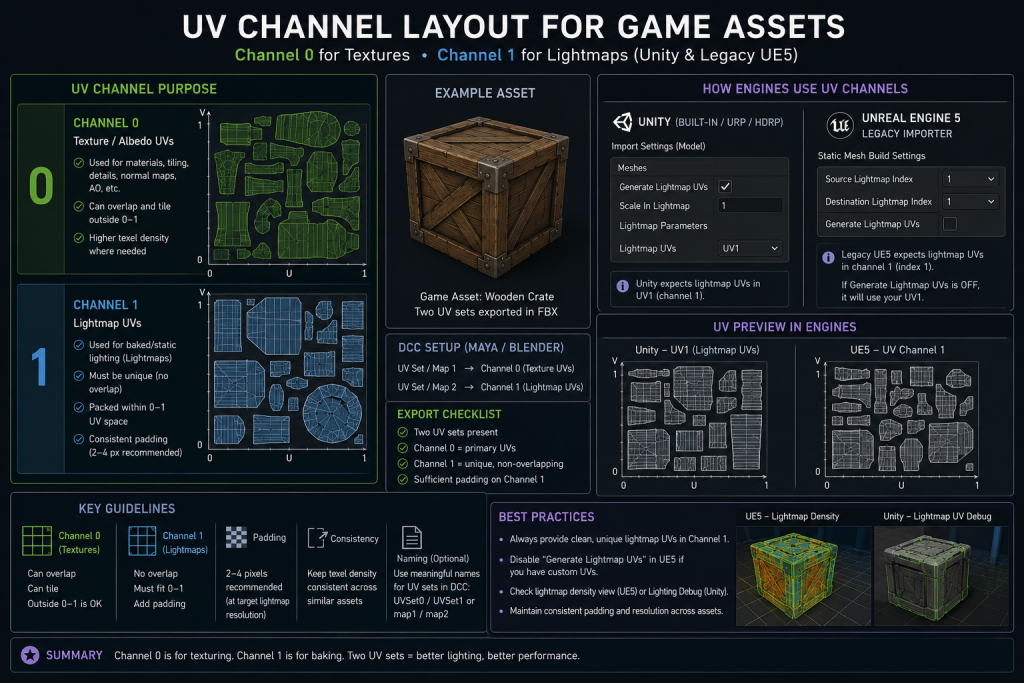
“Editorial illustration created for visual reference purposes. It does not represent a real project, client work, or official software screenshot unless stated otherwise.”
What Lumen Changes
Lumen is UE5’s default global illumination system and is fully dynamic — it computes lighting at runtime rather than baking it into lightmap textures. In Lumen-only pipelines, UV Channel 1 is often unnecessary for lighting. The lightmap UV channel is irrelevant to Lumen’s own operation, though many studios maintain it for compatibility, fallback lighting workflows, or cross-platform requirements.
This has two practical implications:
First, the Generate Lightmap UVs option in UE5’s import dialog should be disabled for Lumen projects. Generating lightmap UVs on import adds processing time, increases asset file size, and produces a UV channel that will never be used.
Second, in Lumen-only UE5 pipelines, manual UV Channel 1 authoring for environment assets is often an area where time can be reallocated — redirected to UV Channel 0 quality and texel density consistency. Whether to maintain UV Channel 1 depends on the project’s cross-platform requirements and whether any baked lighting fallback is needed.
The exception: if the project targets platforms or configurations where Lumen is disabled (mobile, very low-end hardware, specific console configurations), UV Channel 1 remains necessary for any baked lighting approach. For cross-platform productions that include both Lumen-capable and non-Lumen targets, UV Channel 1 should be maintained.
For Unity projects, which do not have a Lumen equivalent and rely on baked or real-time GI approaches that may use lightmaps, UV Channel 1 remains relevant.
LOD and Collision Setup for Import
LOD Naming Convention
Both UE5 and Unity recognize LOD levels from a single FBX file when the mesh objects follow a specific naming convention. For both engines, the convention is suffix-based:
- MeshName_LOD0 — highest detail level
- MeshName_LOD1 — first reduction
- MeshName_LOD2 — second reduction
- MeshName_LOD3 — lowest detail / silhouette-only
When objects named with these suffixes are imported together (either as separate objects in a single FBX or as separate FBX files imported in sequence), both UE5 and Unity automatically configure the LOD chain without manual assignment in the engine.
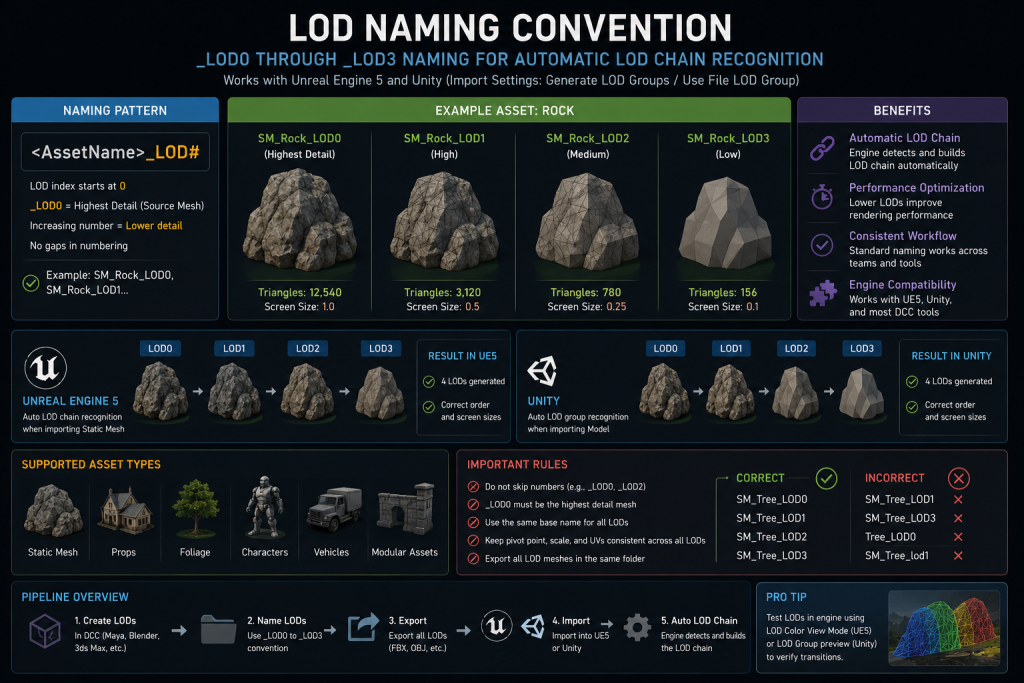
“Editorial illustration created for visual reference purposes. It does not represent a real project, client work, or official software screenshot unless stated otherwise.”
For UE5 Nanite-enabled assets: Nanite replaces the manual LOD chain for static opaque geometry. Assets enabled for Nanite do not require hand-authored LOD levels. However, a Nanite fallback mesh is generated automatically for hardware that does not support Nanite. For non-Nanite assets — animated meshes, masked materials, foliage at high density — the manual LOD chain remains necessary.
Collision Mesh Naming for UE5
UE5 reads collision geometry from the imported FBX using prefix-based naming. The three relevant prefixes:
- UCX_MeshName — convex hull collision. The most common type. Can be split into multiple hulls: UCX_MeshName_00, UCX_MeshName_01, etc. All hulls must be convex — UE5 will round out concave shapes automatically, producing unexpected physics behavior.
- UBX_MeshName — box collision. Used for objects where a simple axis-aligned bounding box is the correct physics representation.
- USP_MeshName — sphere collision. Used for spherical objects.
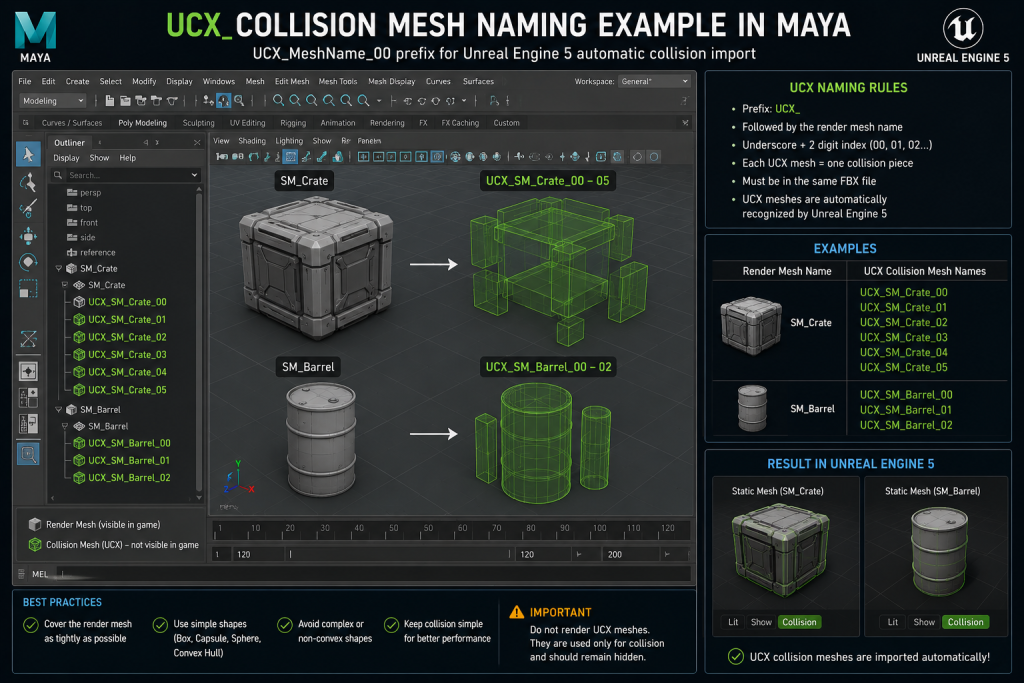
“Editorial illustration created for visual reference purposes. It does not represent a real project, client work, or official software screenshot unless stated otherwise.”
Import setting requirement: When importing a mesh with custom UCX_ collision, Auto Generate Collision must be disabled in the import dialog. If auto-generation is enabled, UE5 generates collision on top of the imported custom collision, producing double collision geometry that affects physics performance and accuracy.
The collision objects must be exported in the same FBX file as the source mesh. In Maya, select both the mesh and all associated collision objects before executing the FBX export. In Blender, include all collision objects in the export selection.
Asset Import Settings: Technical Matrix
| Parameter | Maya → UE5 | Blender → UE5 | Maya → Unity | Blender → Unity | Red Flag |
| Scale | Maya uses cm; no conversion needed | Set scene scale to 0.01 or export scale to 100 | Scale Factor = 1.0 | Scale Factor = 1.0 if scale applied in Blender | Inconsistent fix between assets in same batch |
| Axis | FBX carries Maya’s Y-up; UE5 handles conversion | Set Forward = -Y Forward, Up = Z Up | FBX carries Maya’s Y-up | Set Forward = -Z Forward, Up = Y Up | Rotated meshes on import |
| Transforms | Delete History + Freeze Transforms before export | Apply All Transforms (Ctrl+A) before export | Delete History + Freeze Transforms | Apply All Transforms | Non-zero rotation or non-unit scale on imported mesh |
| Smoothing | Enable Smoothing Groups | Enable Tangent Space | Enable Smoothing Groups | Enable Tangent Space | Faceted shading; incorrect normal display |
| LOD naming | _LOD0, _LOD1… suffix | _LOD0, _LOD1… suffix | _LOD0, _LOD1… suffix | _LOD0, _LOD1… suffix | LOD chain not recognized; manual assignment required |
| Collision (UE5) | UCX_MeshName_00 prefix, Auto Gen OFF | UCX_MeshName_00 prefix, Auto Gen OFF | MeshCollider, primitive colliders, or AssetPostprocessor automation — no prefix convention | MeshCollider, primitive colliders, or AssetPostprocessor automation — no prefix convention | Double collision from auto-gen + custom (UE5); missing collision component (Unity) |
| Lightmap UV | CH1 required for baked lighting; disable for Lumen | CH1 required for baked lighting; disable for Lumen | CH1 required | CH1 required | Missing CH1 on baked-lighting project; Lumen waste on CH1 gen |
| Materials | Disable Import Materials; build in UE5 | Disable Import Materials; build in UE5 | Disable Import Materials; build in Unity | Disable Import Materials; build in Unity | Grey mesh or cluttered material assets from FBX-defined materials |
How Nasty Rodent Handles Asset Delivery
The pipeline failures described in this guide — scale mismatches, missing UV channels, unresolved transforms, incorrectly named collision — show up consistently when external art teams deliver assets without a standardized pipeline. They are not quality failures in the artistic sense. A technically incorrect mesh can be visually excellent. The problem is downstream: every incorrectly configured asset requires someone on the receiving studio’s side to diagnose and fix it before it can be integrated, and at production scale that cost compounds.
When we deliver assets at Nasty Rodent, the first conversation we have with every studio’s technical lead is about their pipeline specification: what scale baseline they’re using, which UV channel conventions are in force, whether the project is Lumen or baked, what collision naming standard they’ve adopted, and which engine version they’re building against. We treat that spec as a hard contract, not a guideline.
For studios building out or standardizing their asset import pipeline, we can produce game-ready asset workflows with delivery specs attached — including LOD chains, UV configuration documentation, and collision geometry — or consult on how external art feeds into your cross-discipline production workflow across environment, character, and UI pipelines. Our work on titles including Ready Or Not, Squad, Mutant Year Zero: Road to Eden, and Starship Troopers: Extermination has meant operating inside well-defined technical pipelines where asset integration failures are not an option.
Import Pipeline Approaches: Comparison by DCC and Engine
| Path | Format | Scale Default | Axis Default | Main Pitfall | Recommended Fix |
| Maya → UE5 | FBX | cm = cm, no issue | Y-up FBX, UE5 handles | Collision not named / auto-gen conflict | UCX_ naming + disable Auto Generate Collision |
| Blender → UE5 | FBX | 1 unit = 1m vs UE5 cm | Z-up vs UE5 Z-up (compatible) | 100× scale or 0.01× scale on import | Set scene scale 0.01 OR export scale 100; pick one |
| Maya → Unity | FBX | cm; Unity handles | Y-up = Unity Y-up | Frozen transforms missing | Delete History + Freeze Transforms mandatory |
| Blender → Unity | FBX | 1 unit = 1m; Unity 100× issue | Z-up vs Unity Y-up | Rotation –90° X on import + scale 100× | Apply All Transforms before export; FBX Units Scale |
| Any DCC → UE5 via Interchange | glTF/USD | Format-defined | Format-defined | Experimental FBX; use legacy for FBX | Use Interchange for glTF; legacy importer for FBX |
Conclusion: The Pipeline Is a Contract
A well-defined asset import pipeline is not a technical nicety — it is a production contract between every team member and vendor contributing assets to the project, and the engine that has to run them.
When scale conventions are undefined, every artist picks their own approach and the scene becomes a scale negotiation. When UV channel requirements are not communicated upfront, lightmap errors surface during lighting passes when rework is expensive. When collision naming is undocumented, assets integrate without physics geometry and the technical artist has to author collision after the fact, for hundreds of assets.
The cost of documenting the pipeline once — a reference checklist, a validated test asset, a one-page export guide for each DCC tool — is measured in hours. The cost of not documenting it is measured in rework cycles across the entire production.
If your studio is building or standardizing a pipeline for an upcoming environment or character art push, a 48-hour pipeline audit is how we start: send us your current asset spec and engine configuration, and we’ll map the integration points between your pipeline and ours, surface the failure modes we’ve seen in similar configurations, and document a handoff protocol that eliminates rework on delivery.
Send us your pipeline spec → | Or schedule a technical call with our art lead directly.