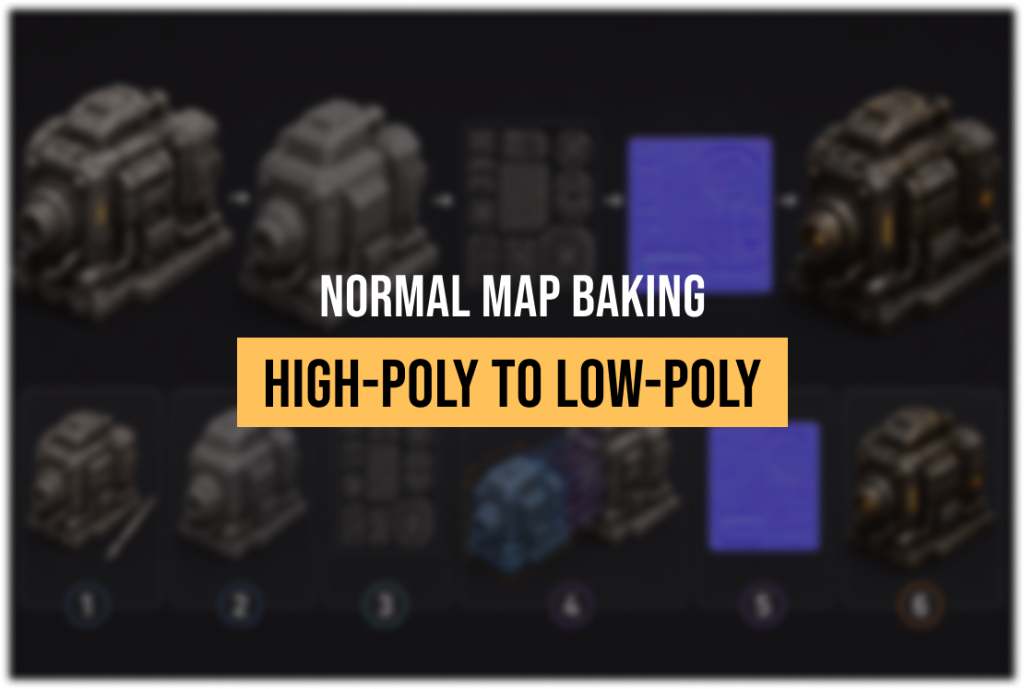
High-Poly to Low-Poly Baking: Normal Maps for Game Engines
-

Written byDenys Zadoienyi
-

Updated on05.06.2026
-

Time to read21 min
- What the Bake Actually Does
- Preparing the High Poly: What Matters and What Does Not
- Building a Low Poly That Bakes Cleanly
- UV Layout: The Rules That Actually Matter for Baking
- Cage, Explode Method, or Bake Groups — Which to Choose
- Tangent Space: The Silent Killer of Cross-Studio Pipelines
- The Most Common Baking Errors — and What Actually Causes Them
- Beyond Normal Maps: AO, Curvature, and What the Other Bake Outputs Do
- How Baking Fits Into the Mid-Core and AAA Art Pipeline
- How We Handle Baking at Nasty Rodent
- Normal Map Baking Quick Reference
Every production-ready game asset hides a history. Under the 15,000-triangle weapon model or the 20,000-triangle character is a sculpt that might have contained millions of polygons — and somewhere between that high-poly source and the engine-ready mesh, a bake happened. A normal map was generated that carries the surface information of the dense sculpt, encoded into a texture the real-time renderer can read at near-zero cost.
“Editorial illustration created for visual reference purposes. It does not represent a real project, client work, or official software screenshot unless stated otherwise.”
For an art director, the bake is often invisible when it goes right and extremely visible when it goes wrong. Seam lines that follow UV borders. Dark spots at 90-degree corners. Reflections that behave incorrectly in the engine even though the normal map looks fine in the baker. These are not random — every baking error has a specific mechanical cause, and understanding the mechanics is what separates artists who fix bakes by intuition from those who fix them in one pass.
This guide covers the full high-poly to low-poly baking workflow from a production standpoint: what the projection actually does, how to prepare both meshes, the rules for UVs and smoothing groups that determine whether a bake is clean, and a systematic breakdown of the errors that show up most often in mid-core and AAA pipelines.
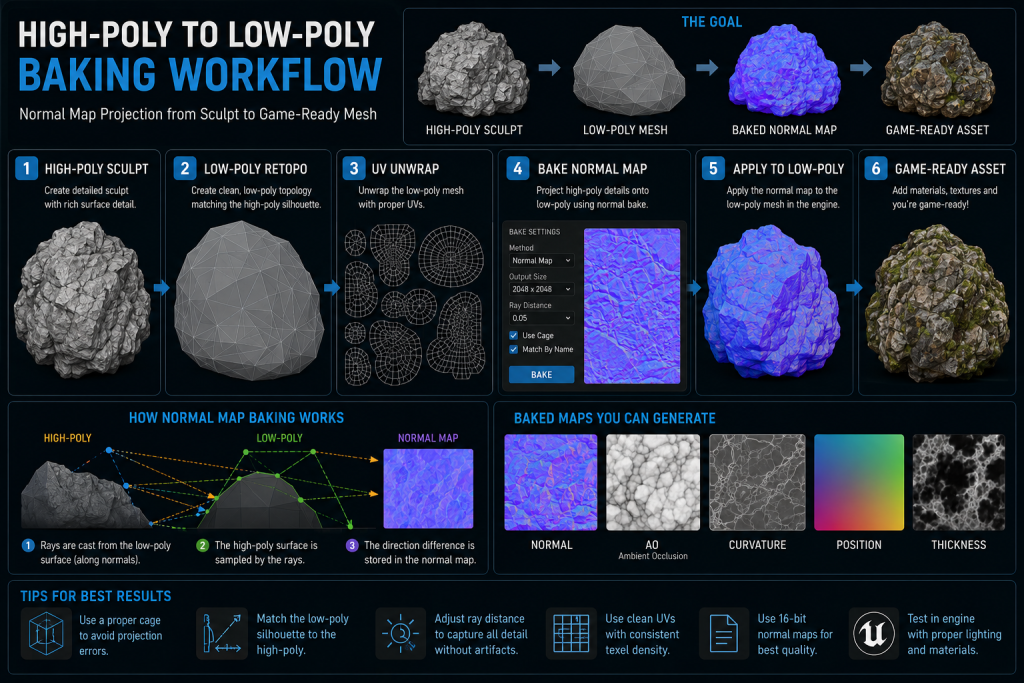
What the Bake Actually Does
Before optimizing a baking workflow, it is worth being precise about what happens mechanically during a bake.
The baker casts rays outward from the surface of the low-poly mesh — specifically, from a cage, which is an inflated copy of the low-poly that envelops the high-poly source. Each ray travels inward until it intersects the high-poly surface. At the intersection point, the baker records the direction the high-poly surface is facing — its surface normal — and writes that directional information into the corresponding pixel of a texture, using the low-poly’s UV coordinates to determine where in the texture that pixel lives.
The result is a normal map: a texture where each pixel encodes a surface normal direction as an RGB value, in the tangent space of the low-poly mesh. When the low-poly is rendered in a game engine, the engine reads that directional data per-pixel and uses it to calculate lighting as if the surface had the high-poly’s geometry — without the geometry being present.
Did you know that…?
A normal map does not store geometry — it stores the direction each pixel’s surface normal is pointing, encoded as an RGB color. The flat blue-purple appearance of a normal map in neutral areas is not a visual quirk; it represents normals pointing straight forward (0, 0, 1 in tangent space), which is the baseline state with no surface deflection.
Two things follow from this mechanism that are worth making explicit:
The normal map cannot change the silhouette. It encodes surface direction, not depth. A flat plane with a normal map of a bolt head will light correctly but will not push outward. The silhouette of the game asset is determined by the low-poly geometry alone.
The cleanliness of the bake depends primarily on the low-poly preparation, though high-poly readability, bevel quality, and detail scale still matter. The high-poly is the source of information. How cleanly that information transfers depends most directly on the UV layout, smoothing configuration, and cage setup of the low-poly. The majority of baking errors are low-poly problems, not high-poly problems — but a high poly with unreadable detail, absent bevels, or poor scale calibration will produce a weak bake regardless of how clean the low poly is.
Preparing the High Poly: What Matters and What Does Not
The high poly’s primary job is to contain the surface detail you want to transfer. Beyond that, the rules are surprisingly permissive.
High-poly topology is generally more permissive than low-poly production topology. The high poly never goes into the game engine. Clean edge flow is rarely required, and ZBrush sculpts, boolean hard-surface models, and photogrammetry captures all work as high-poly bake sources without significant cleanup. That said, severe mesh errors — self-intersections, problematic non-manifold geometry, or heavily corrupted boolean results — can still produce projection artifacts depending on the baker and the asset type. The permissiveness of high-poly topology applies to edge flow and polygon type, not to fundamental mesh integrity.
Scale must match the low poly. If the high poly is significantly larger or smaller than the low poly, projection rays will miss their targets. Both meshes should be at the same scale and overlapping (or positioned for explode-method baking — more on this below).
Bevels matter more than most artists initially expect. The baker records changes in surface direction, not depth. A face that is completely parallel to the low-poly surface below it contributes nothing to the normal map — the projection captures no directional change. This is why high-poly models for hard-surface assets need chamfers and bevels at every edge that should read as a defined transition in the bake. A hard-surface prop with no beveled edges will bake flat regardless of how many polygons the high poly has.
As Marmoset’s baking documentation notes, the baker “only sees changes in direction, not depth” — which is also why a bolt head that protrudes 10mm and one that protrudes 2mm produce similar-quality normal map results. Exaggerating the depth of fine details is generally not necessary; what matters is that the angular transition at the edges is present and readable.
Detail size has a hard lower limit. Details smaller than one pixel at the bake resolution will not be captured correctly. If a fine mechanical detail — a thin channel, a small rivet — is smaller than one pixel in the UV layout at the target texture resolution, it will bake as noise or disappear entirely. For details at risk of being too small, either increase the bake resolution, increase the UV area allocated to that region, or exaggerate the scale of the detail in the high poly.
Building a Low Poly That Bakes Cleanly
The low poly is where most baking decisions are made — and where most baking errors originate.
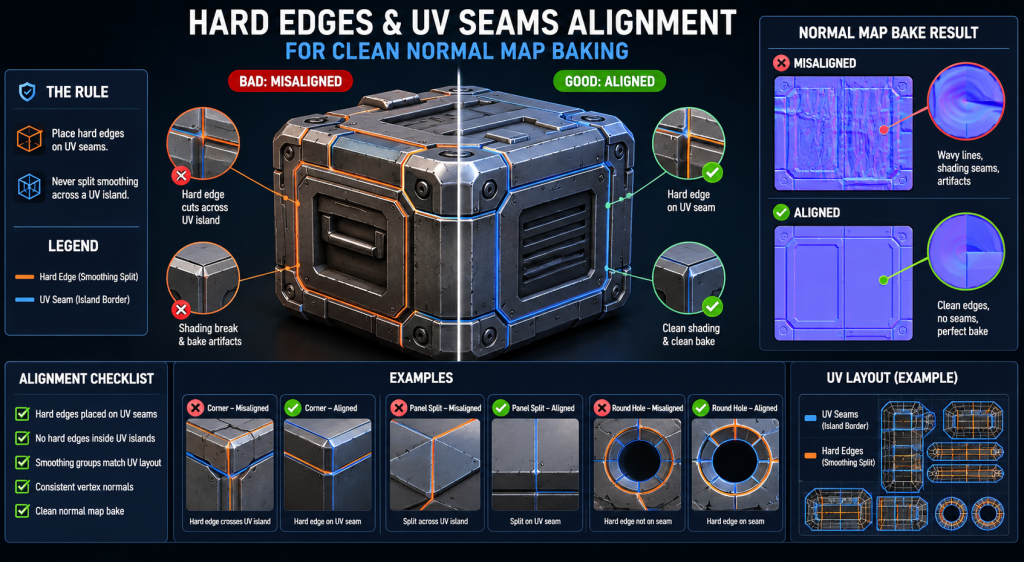
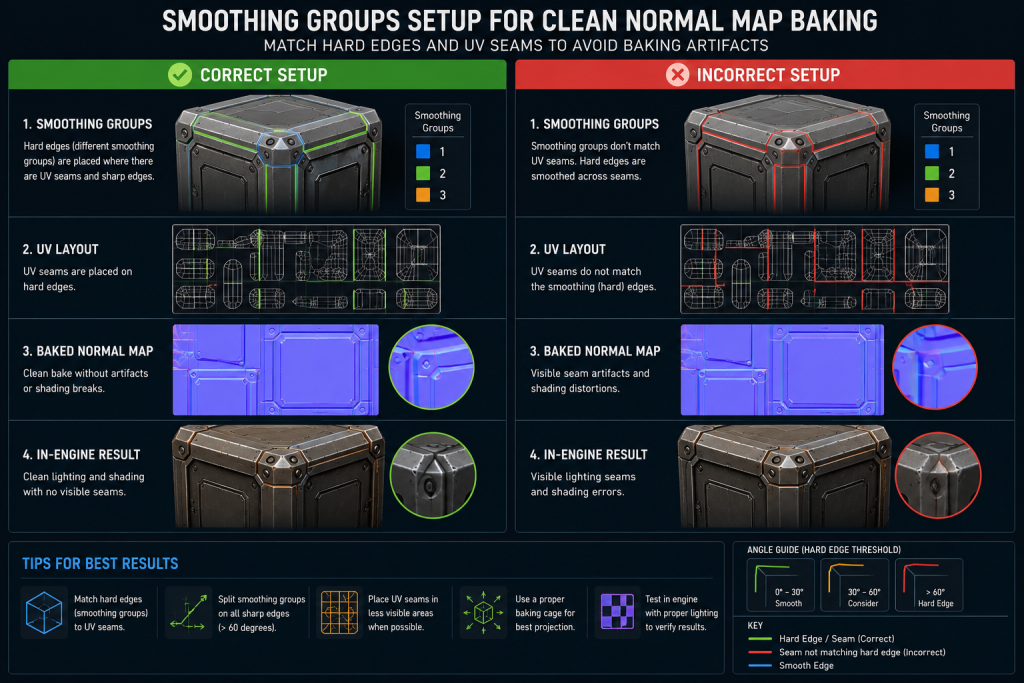
Smoothing Groups and Hard Edges
Smoothing groups (in 3ds Max) and hard/soft edge assignments (in Maya and Blender) control the vertex normals of the low-poly mesh. These vertex normals tell the engine how to interpolate lighting across the surface, and they also directly affect how the normal map bake looks — because the baker bakes relative to the vertex normals of the low poly.
The core rule: wherever you have a hard edge, you should split the UVs. In hard-surface workflows, UV seams also generally benefit from matching hard edges, which keeps the low-poly shading consistent and reduces gradient extremes in the normal map. That said, organic assets, mirrored UV layouts, and some strategic packing approaches may intentionally place UV seams without corresponding hard edges — the Polycount Texture Baking wiki states the hard requirement clearly: “for tangent-space normal mapping, split the UVs for every hard edge.” The reverse is not an absolute rule. Violating the first direction — hard edge without UV split — is the single most common cause of seam artifacts in game asset baking.
The mechanical reason: a hard edge means the vertex normals are split at that edge — two vertices at the same position with different normals. The baker writes different normal map values to each side of that edge. If the UVs are not split there, both sides write to adjacent (or overlapping) UV space, and the conflicting values create a visible seam line in the texture. The seam becomes visible in the engine wherever the surface is lit.
“Editorial illustration created for visual reference purposes. It does not represent a real project, client work, or official software screenshot unless stated otherwise.”
How you apply smoothing depends on the asset type. Hard-surface assets — weapons, vehicles, mechanical props — benefit from hard edges at every significant angle change, which keeps the low-poly shading consistent and gives the normal map clean gradient-free areas to work with. Character and organic assets often work better with full smooth shading (one smoothing group), allowing the normal map’s gradients to do more work, which reduces the number of UV seams on the mesh.
The rule for 90-degree corners: a hard edge or a supporting bevel. A surface transitioning from vertical to horizontal at 90 degrees with a soft edge will produce visible shading distortion in the engine, even with a clean normal map. Either split the edge as hard (and cut the UV), or add a small bevel to the high poly and smooth it in the low poly — the bevel gives the baker an angular transition to encode, and the soft edge on the low poly avoids the seam penalty.
UV Layout: The Rules That Actually Matter for Baking
UV preparation for baking is not the same as UV preparation for texturing. Baking adds specific requirements that are not always covered in standard UV workflow guides.
“Editorial illustration created for visual reference purposes. It does not represent a real project, client work, or official software screenshot unless stated otherwise.”
Padding is non-negotiable. Each UV island needs sufficient space between it and its neighbors to prevent color bleeding across UV borders during baking, and to prevent texture filtering artifacts in the engine. A common production baseline: roughly 4px for 1024×1024 textures, 8px for 2048×2048, and 16px for 4096×4096 — though actual requirements vary by engine, mip bias settings, and texture packing approach. Insufficient padding is one of the most reliable ways to get subtle seam artifacts that appear fine at full resolution and become visible as the texture mipmaps down at distance.
UV borders must align with hard edges. As covered above — every hard edge needs a UV split. The inverse also applies: if you have a UV seam without a hard edge, you may get a shading discontinuity at that seam in the engine, because the tangent space on either side of the seam will differ.
Orient UV islands to minimize gradient direction. For organic surfaces that use a single smoothing group, the normal map will contain gradients across the mesh. UV islands that are rotated at odd angles relative to the mesh’s main geometric direction can produce mismatched gradients that become visible under specular lighting. Aligning islands so that the mesh’s primary bending direction corresponds to the vertical axis of the UV helps the normal map encode gradients consistently.
Mirrored UVs work for baking in most pipelines, but require care with the AO map — ambient occlusion bakes the local occlusion of the mesh, so a mirrored surface will have the same AO baked from the right side’s geometry rather than the left side’s. For symmetrical assets this is usually acceptable; for assets with different occlusion on each side, use a separate UV set or combine two AO passes.
Cage, Explode Method, or Bake Groups — Which to Choose
The cage and explode method both solve the same problem: preventing projection rays from hitting the wrong geometry on a complex multi-part asset. Understanding when each is appropriate is a fundamental production skill.
The cage is an inflated copy of the low poly that envelops the high poly. The baker uses the cage’s surface as the origin point for rays, ensuring each ray starts just outside the high poly and projects inward cleanly. The cage handles assets where geometry is close together or overlapping — character hands, complex mechanical assemblies, assets with internal cavities. Marmoset Toolbag’s painter control allows per-vertex cage adjustment, which is the correct approach for complex areas where a global offset would cause projection errors on other parts of the mesh.
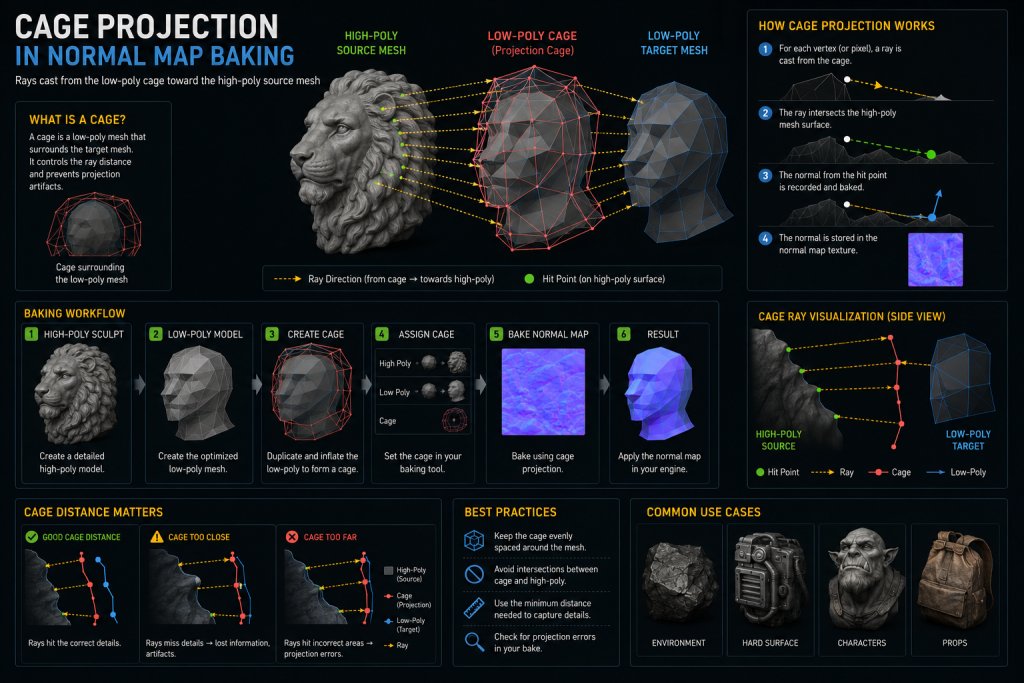
“Editorial illustration created for visual reference purposes. It does not represent a real project, client work, or official software screenshot unless stated otherwise.”
The explode method physically separates parts of the mesh in UV/world space before baking, so that adjacent or overlapping parts cannot interfere with each other’s projection. This is faster to set up for many hard-surface assets and avoids the need to manually adjust cage offsets. The drawback is that AO baking with exploded meshes may require a second AO pass with the parts in their original positions to capture inter-part occlusion correctly.
Bake groups (Marmoset Toolbag’s Bake Groups, Substance Painter’s Match by Name) solve the problem at the tool level — you assign which high-poly surfaces correspond to which low-poly targets, and the baker only casts rays between matched pairs. This is the most precise approach for complex assets and removes the need for both cage adjustment and exploding. For a production pipeline handling large prop and weapon batches, bake groups or name-matching is the recommended default because it scales well and reduces per-asset setup time.
Floaters — high-poly detail geometry that floats slightly above the low-poly surface rather than being integrated into it — are a legitimate technique for adding fine mechanical detail (bolts, panel lines, screws, rivets) without complicating the low-poly topology. The bake captures the floater’s surface contribution in the normal map. The limitation: floaters break height and position map outputs, and AO passes may require the floater geometry to be removed. Floaters also require the cage to encompass them, which can create projection problems if the cage offset is too small. For weapon and vehicle production where high-detail variants must share a base low-poly, floaters offer significant production efficiency — but they require a disciplined naming and organization convention to avoid bake group errors.
Tangent Space: The Silent Killer of Cross-Studio Pipelines
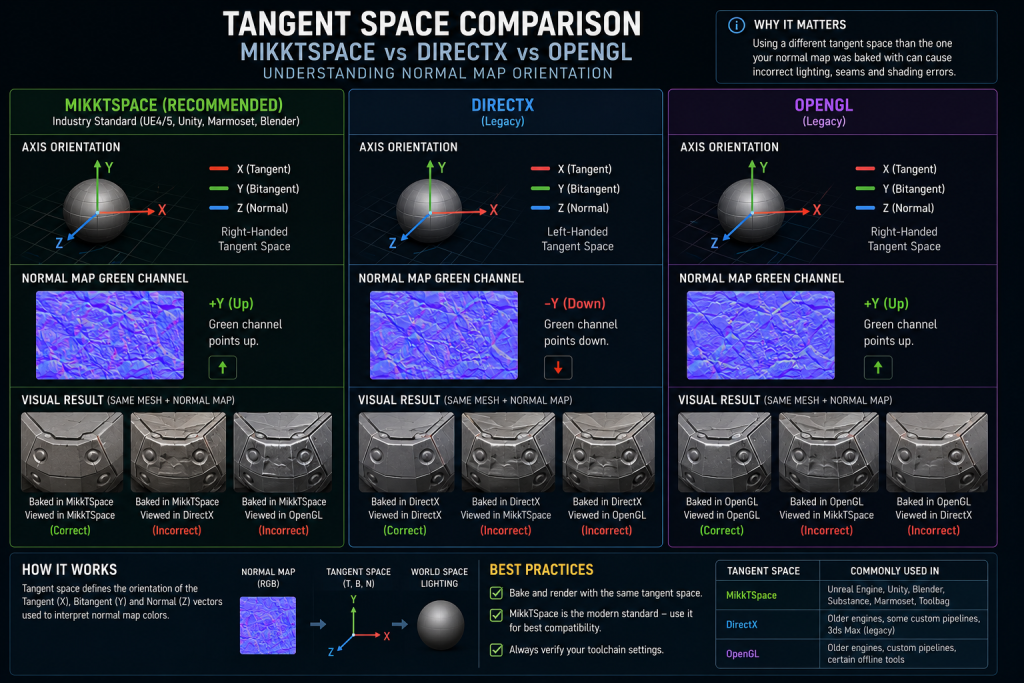
Tangent space is the most technically consequential baking decision most artists never consciously make — and the source of a specific class of errors that is particularly painful in outsource pipelines.
A tangent-space normal map encodes surface normals relative to the surface of the mesh, using a coordinate system (the tangent basis) that is derived from the UV layout. The tangent basis is not standardized — different bakers and different engines calculate it differently, which means a normal map baked in one tool can look incorrect in another if the tangent spaces do not match.
“Editorial illustration created for visual reference purposes. It does not represent a real project, client work, or official software screenshot unless stated otherwise.”
The three scenarios that matter for production:
MikkTSpace (also written MikktSpace) is the tangent space standard used by Unreal Engine, Unity, Blender, and most modern baking tools. 3ds Max (from version 2021+) and Maya also support MikkTSpace natively, which resolved an older generation of pipeline mismatches where baking in a DCC and delivering to Unreal would produce incorrect results. The underlying solution is the same regardless of tool: a synced pipeline where the DCC, the baking tool, and the engine all use the same tangent space convention. If you are baking in Marmoset Toolbag and delivering to UE5, both default to MikkTSpace and the workflow is straightforward. Marmoset’s baking tutorial explicitly recommends: “bake your normal map with the same tangent space that your renderer uses” — and for UE5/Unity pipelines, MikkTSpace is that standard.
DirectX vs OpenGL Y-channel orientation is the most common cross-pipeline mismatch and is entirely separate from the tangent basis question. DirectX normal maps (used by Unreal Engine by default) expect the green channel to point up (+Y). OpenGL normal maps (used in some other workflows) expect the green channel to point down (-Y). Visually: the wrong orientation makes the lighting look inverted — bumps become dents, dents become bumps, particularly visible under raking light angles. The fix is a single channel flip in the exporter or baking tool settings. This is the error that most commonly surfaces when an outsource studio delivers assets using a different export convention than the client’s engine target.
Custom tangent spaces in older or proprietary engines may differ from both MikkTSpace and standard DirectX/OpenGL conventions. For any project targeting an in-house engine, the technical artist contact at the client studio needs to specify the tangent space requirements explicitly in the asset brief — this is not something that can be safely assumed from the engine name alone.
The practical recommendation for outsource production: establish tangent space convention in the first asset brief, bake a test asset and deliver it for engine review before scaling into a full batch. Discovering a tangent space mismatch after 200 assets are baked is an avoidable problem.
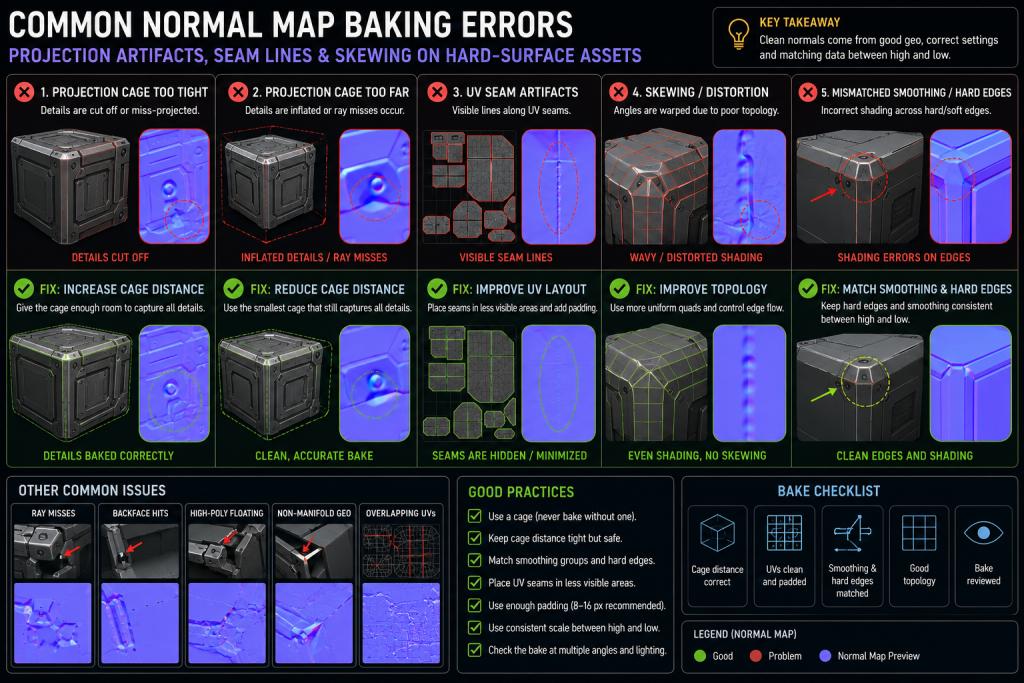
The Most Common Baking Errors — and What Actually Causes Them
“Editorial illustration created for visual reference purposes. It does not represent a real project, client work, or official software screenshot unless stated otherwise.”
| Error | Visual Symptom | Actual Cause | Fix |
| Seam lines | Bright or dark lines following UV borders | Hard edges without matching UV splits, or UV splits without matching hard edges | Align hard edges and UV seams; add padding |
| Dark spots / black areas | Dark patches at corners or deep concavities | Cage too small — rays terminate inside the mesh before hitting the high poly | Increase cage offset; use Paint Offset for problem areas |
| Projection errors | High-poly details appearing in wrong locations | Parts of the low poly receiving rays intended for adjacent geometry | Use bake groups, explode method, or per-part cage adjustment |
| Skewing / gradient distortion | Surface detail looks stretched or twisted | Low-poly vertex normals pointing in a direction inconsistent with the UV layout | Add supporting edges, adjust vertex normals, or use averaged normals |
| Inverted lighting | Bumps appear as dents, surface reads “inside out” | Y-channel mismatch — baker and engine using opposite green channel conventions | Flip green channel in bake export settings or engine import |
| Banding / stepping | Subtle stripes across gradients in final render | Baking at 8-bit depth on surfaces with long gradients | Bake at 16-bit; convert to 8-bit at final delivery stage |
| Details not captured | Fine surface features absent from normal map | Detail smaller than 1 pixel at bake resolution | Increase texture resolution or increase UV space for that region |
| Shading inconsistency at LOD | Asset looks correct on LOD0, broken on LOD1 | Hard edges not matching UV seams hold up less well at lower mip levels | Use hard edges at UV seams; validate at reduced resolution before delivery |
The last error in that table is one that surfaces specifically in AAA production and is rarely mentioned in general baking guides. When an asset uses hard edges without matching UV splits — a technically “working” bake at full resolution — the shading degrades faster at lower mip levels because the pixels on each side of the unmatched border have farther to travel before blending. For assets that will be used at distance or in LOD chains, the hard edge + UV split rule is not optional.
Beyond Normal Maps: AO, Curvature, and What the Other Bake Outputs Do
A production bake typically generates several maps simultaneously, each serving a specific role in the texturing workflow.
Ambient Occlusion (AO) captures the degree to which each surface point is occluded from ambient light — areas deep in crevices receive less ambient light and appear darker. AO is used as a multiplier in texturing to add depth and grounding to surface details that the normal map defines directionally but does not shade absolutely. It is also a valuable input for smart materials in Substance Painter, where it drives effects like dirt accumulation, rust, and edge wear.
Curvature maps record surface convexity and concavity — edges that curve outward (convex) versus inward (concave). The output is typically a grayscale map where midpoint gray is flat, brighter values are convex edges, and darker values are concave recesses. Curvature is the primary input for edge-wear effects in texturing: a curvature-driven edge highlight looks physically correct because it is derived from the actual geometry rather than hand-painted.
Height / Displacement records the actual distance from the low-poly surface to the high-poly surface at each baked point. Height maps have a different relationship to the cage than normal maps — the cage offset determines the mapping range. A very tight cage produces a height map with a compressed range; a loose cage spreads the range but may introduce projection errors. Height maps are used for parallax occlusion mapping in engine, and as displacement inputs in rendering and DCC tools.
Position and Thickness maps serve more specialized pipeline purposes. Position maps (also called world-space position maps) record where each point on the mesh sits in 3D space, and are used to drive gradient effects in texturing — for example, making the top of a prop a different color than the bottom. Thickness maps record how much geometry is present behind each surface point, used in subsurface scattering shaders and for stylized backlit effects.
For hard-surface weapon baking workflow in mid-core and AAA productions, the standard minimum bake output is typically Normal, AO, and Curvature — the three maps that together give a texturing artist the surface direction, occlusion, and edge information needed to build a complete material set. Position and Height are added when the project specifically requires parallax mapping or the asset brief calls for advanced texturing techniques.
How Baking Fits Into the Mid-Core and AAA Art Pipeline
Understanding where baking lives in a production schedule is as important as understanding the technical requirements.
The high poly is produced first. This is either a ZBrush sculpt (for organic characters, creatures, terrain), a subdivision-based hard-surface model (props, weapons, vehicles using Maya, 3ds Max, or Blender with SubD modifiers), or a boolean/CAD-derived model cleaned up for baking. The high poly is the production’s creative source of truth for surface detail.
Retopology and low-poly optimization follow. The low poly defines the in-engine geometry — its polycount, edge flow, and silhouette accuracy. For character work, retopology is typically manual to ensure correct deformation at joints. For hard-surface assets, the low poly is usually constructed by hand alongside the high poly, or derived from the high poly through controlled decimation and cleanup. The 3D character retopology and baking pipeline involves both the topology decisions and the UV preparation as a unified step — UV layout is typically finalized on the low poly before the high poly is completed, ensuring the UV budget matches the texture resolution targets before baking begins.
UV layout is completed before baking. This seems obvious but is worth stating: the bake cannot happen without finalized UVs. In rushed production schedules, baking is sometimes attempted with provisional UVs, which means any UV revision after the bake invalidates the maps. The correct sequence is topology → UV layout → UV review and approval → bake. A UV change after approval requires a full rebake.
Baking is a milestone checkpoint. A clean bake is a prerequisite for texturing — if the normal map has unresolved artifacts, the texturing artist will either work around them (losing time) or deliver with the artifacts present. In a structured production pipeline, baked maps are reviewed and signed off before texturing begins. This is particularly important in outsource contexts where the baking and texturing may be handled by different artists or different studios.
For retopology for game-ready assets and the relationship between mesh cleanup and bake quality — specifically how supporting edge placement affects both deformation performance and baking outcomes — the underlying principle is the same: decisions made during retopology directly determine what the bake can and cannot produce.
How We Handle Baking at Nasty Rodent
In mid-core and AAA asset production, baking is not a step that gets improvised — it is a stage with defined technical requirements, review criteria, and escalation paths when something does not meet the bar.
When we build props, weapons, and environment assets for UE5 pipelines, the bake brief establishes tangent space convention, target texture resolution, required output maps, and engine-specific export format before the first mesh goes into the baker. A first-pass bake at test resolution is reviewed against the asset brief and the art direction before any large-batch work begins — catching projection errors, padding issues, or smoothing mismatches at the single-asset stage rather than discovering them across a full batch.
More detail on our production approach is below.
Normal Map Baking Quick Reference
| Topic | Production Standard |
| Hard edges | Required at every UV seam; recommended wherever angle exceeds ~45° on hard-surface |
| UV seams | Required at every hard edge; ensure sufficient padding (8–16px at 2K–4K) |
| Tangent space | Match baking tool and engine; MikkTSpace for UE5/Unity default |
| Y-channel | DirectX (+Y up) for UE5; OpenGL (−Y up) for some other workflows — confirm per project |
| Cage | Should just enclose the high poly; use Paint Offset for tight areas |
| Bake resolution | Bake at highest feasible resolution; downscale for delivery |
| Bit depth | 16-bit during baking; convert to 8-bit at final delivery if required |
| Detail minimum size | Must be ≥1 pixel at bake resolution to be captured correctly |
| Test bake | Always bake at 1024×1024 first to catch errors quickly before full-res pass |
| LOD validation | Validate bake at 512 or 256 to catch seam artifacts that appear at lower mip levels |