What Is Retopology in 3D Modeling: Production-Ready Workflow
-

Written byDenys Zadoienyi
-

Updated on13.05.2026
-

Time to read15 min

- What Is Retopology in 3D Modeling?
- Why High-Poly Meshes Fail in Real-Time Engines
- Manual vs. Auto Retopology: When to Use Each
- The Production Retopology Workflow: From Sculpt to Game-Ready Mesh
- Tools: ZRemesher, Maya Quad Draw, and TopoGun Compared
- What Good Retopology Looks Like: Edge Flow Principles
- How Retopology Fits the Nasty Rodent Delivery Standard
Every 3D artist reaches the same moment: you’ve spent three days sculpting a character in ZBrush. The surface reads beautifully – every skin pore, every fabric fold, every seam exactly where it should be. You export it to your game engine. The editor chokes. The rig won’t bind correctly. The animator tells you the mesh deforms like a deflating balloon.
That’s not a pipeline failure. That’s a missing step – retopology.
If you’re an AAA art director managing character production across a multi-platform project, this moment is a review cycle you can’t afford. Retopology isn’t optional scaffolding. It’s the structural decision that determines whether your hero asset survives the handoff from ZBrush to engine – or costs you three more passes to fix.
This guide covers what retopology is at the mesh level, why high-poly geometry fails in real-time engines, which tools your pipeline should use and when, and what a production-ready retopology workflow looks like on an AAA character.
What Is Retopology in 3D Modeling?
Retopology is the process of rebuilding a 3D mesh with new, optimized geometry that follows the same surface shape as the original – but with intentional edge flow, controlled polygon density, and topology designed for animation, real-time rendering, and UV unwrapping.
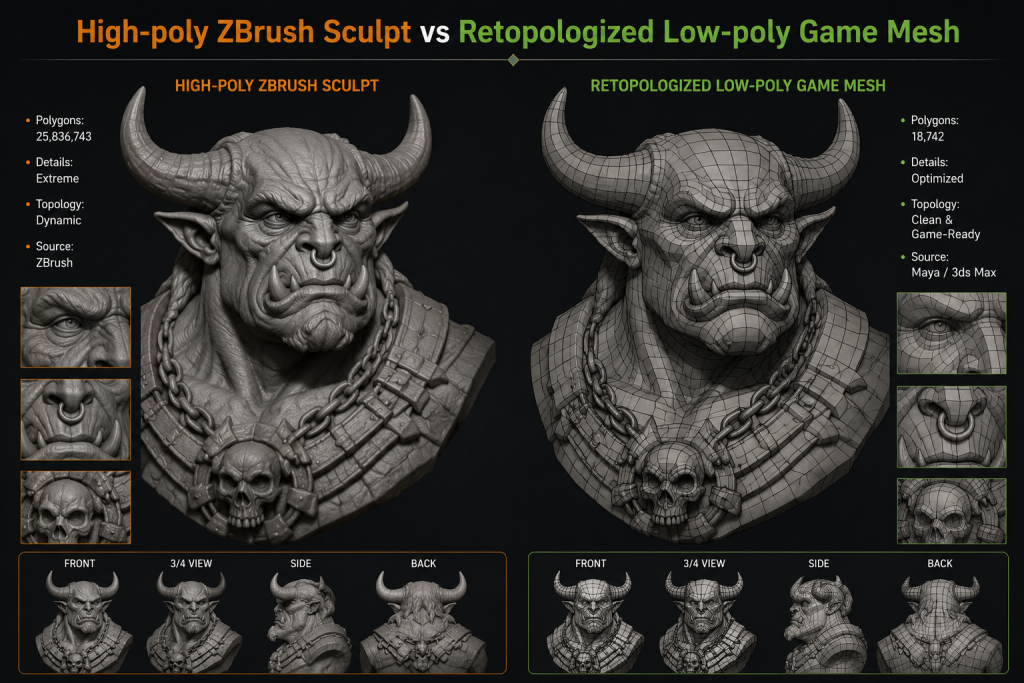
“Editorial illustration created for visual reference purposes. It does not represent a real project, client work, or official software screenshot unless stated otherwise.”
The word breaks down literally: re (again) + topology (the arrangement of a mesh’s vertices, edges, and faces). You’re not sculpting new form – you’re rebuilding the infrastructure underneath it.
When a character artist finishes a ZBrush sculpt, the result might contain 10–30 million polygons. That mesh carries no concern for how edges should travel around a shoulder joint, how loops should circle the mouth for lip-sync animation, or how many triangles a console GPU can push per frame. Retopology answers all three questions simultaneously by creating a new low-polygon mesh that wraps the high-poly surface, borrow its silhouette and surface detail, and is engineered for production use.
At Nasty Rodent, retopology sits at the hinge of every character delivery. The sculpt defines what the character looks like. The retopology defines whether it will survive everything that comes after – rigging, animation, baking, engine integration, and platform performance review.
A clean retopo pass takes a senior artist 1–3 days per hero character. A bad one costs the same time twice: once to do it, once to fix the downstream failures it caused.
Why High-Poly Meshes Fail in Real-Time Engines
This is the question that makes retopology non-negotiable for game production.
A ZBrush sculpt is a display mesh – geometry optimized for surface representation in a sculpting viewport. A game engine needs a production mesh – geometry optimized for runtime performance, skeletal deformation, texture baking, and level-of-detail streaming.
The gap between the two is fundamental, not incidental.
The polygon count problem
Real-time engines operate under a hard frame budget. A modern AAA console title allocates roughly 8–10 milliseconds per frame to GPU rendering. Every triangle on screen competes for that budget.
The practical polycount range for game-ready characters:
- Hero characters (AAA PC/console): 80,000–120,000 triangles – this is the range reported in technical presentations from studios working on current-generation titles
- Secondary characters and NPCs: 30,000–50,000 triangles
- Standard game engines (PC/console props and interactive assets): 10,000–30,000 quads
A 10-million-polygon ZBrush sculpt is two orders of magnitude over budget before a single bone is added. Nanite changes this calculation for static environment geometry – but characters, with their skeletal deformation requirements, remain outside Nanite’s full production support through UE5.4 and substantially so in 5.5. The character pipeline still requires retopology.
The edge flow problem
Skeletal animation depends on geometry that deforms predictably. When a shoulder rotates, edge loops need to travel around the joint in rings that allow the skin to compress and stretch naturally. When a mouth opens, concentric loops around the lips let the mesh stretch and close without pinching or tearing.
A sculpt’s topology is driven by the brush – not by anatomy or deformation logic. Stroke-based geometry creates irregular triangles, chaotic edge flow, and dense areas in the wrong places. Bind this to a rig and you get geometry that crumples, collapses, or shears at the joints. No amount of weight painting fixes bad edge flow – the fix is always retopology.
The UV and baking problem
After retopology, the low-poly mesh gets UV-unwrapped, and texture maps – normal, ambient occlusion, roughness – are baked from the high-poly sculpt onto the low-poly surface. These baked maps transfer the visual detail of the 10-million-polygon sculpt onto a 100K-triangle mesh, giving the engine a production asset that looks high-fidelity without the rendering cost.
Clean retopology is a prerequisite for clean baking. Chaotic topology produces UV islands that are impossible to unwrap without distortion, which introduces baking errors – visible seams, stretched normals, shading artifacts – that a texture artist cannot fix without restarting the unwrap. Hard edges without seams create baking artifacts along the edge that are equally unfixable.
The downstream cost of poor retopology compounds: one bad mesh generates a bad UV, which generates a bad bake, which generates a bad texture pass, which generates an additional review cycle. In a 200–500 asset environment pipeline, that multiplier is significant.
Manual vs. Auto Retopology: When to Use Each
The industry works with three retopology modes. Understanding when each applies is a production planning decision, not just a tool preference.
Manual retopology
The artist draws new polygons directly over the high-poly surface, placing every vertex, edge, and loop intentionally. This is the slowest method – 1-5 days per complex character – and the highest quality for deformation-critical assets.
Manual retopology is non-negotiable for:
- Hero characters requiring skeletal animation and full facial rig
- Clothing and cloth simulation where fold behavior depends on edge direction
- Hands – one of the most technically demanding zones, absorbing 8–12% of a character’s total polygon budget
- Faces – the highest-density zone, receiving 15–25% of the character’s polygon budget, with loops engineered for lip sync, brow movement, and eye deformation
The investment is justified because failures downstream cost more than the time saved by skipping it.
Auto retopology
Algorithms generate a new mesh automatically based on target polygon count and surface curvature. The output is fast – minutes instead of days – but the quality of edge flow is unpredictable, particularly around deformation zones.
Auto retopology is appropriate for:
- Static environment props – rocks, rubble, architectural details – where deformation is not a factor
- Base mesh generation – creating a starting point that a senior artist then refines manually
- Background characters and NPCs at high distance from camera, where topology precision has minimal visual impact
- Photogrammetry scans destined for static use in environments
Auto retopology is not appropriate as a final pass for animated characters. The edge flow produced by algorithms cannot reliably place loops at anatomically correct deformation points.
Hybrid workflow
The practical AAA approach: use auto retopology to generate a base mesh, then correct manually in the zones that matter – face, hands, major joints. This saves 30–50% of manual retopo time while maintaining production quality at the critical deformation points.
The Production Retopology Workflow: From Sculpt to Game-Ready Mesh
This is the sequence used in mid-core/AAA character pipelines.
Step 1: Sculpt finalization and polycount planning
Before retopology starts, the art director or lead artist confirms the polycount budget for the asset. This is not done during retopology – it is defined by the asset spec at the start of production. By the time retopology begins, the artist knows the triangle target and the platform constraints, all aligned with the project’s visual target and style guide.
Questions resolved at this stage:
- Is this a hero character or secondary NPC?
- What’s the target platform (PC, console, mobile)?
- What animation complexity does the rig require?
- Are there LOD requirements, and at what distances?
Step 2: Edge loop planning
Before drawing a single polygon, the artist maps the critical edge loop positions mentally (or sketches on a reference render). For a character head:
- Concentric loops around the eyes
- Concentric loops around the mouth
- Loops following the nasolabial fold
- Cheekbone loop directing geometry toward the ear
- Loops at the chin defining jaw deformation

“Editorial illustration created for visual reference purposes. It does not represent a real project, client work, or official software screenshot unless stated otherwise.”
This planning stage prevents structural retopology errors that would require a complete restart. Fifteen minutes of planning saves a day of rework.

Step 3: Retopology execution
The artist works surface-by-surface, typically starting with the face, then neck and torso, then limbs, then extremities. The mesh is built as all quads, with triangles introduced intentionally only at pole points where edge loops must terminate.
Key execution rules:
- Poles (5+ edge vertices) are placed away from deformation zones – not at joints, not at the mouth corners, not at the eye corners
- Triangle counts are allocated by visual priority – face and hands receive higher density, back of calves and flat torso sections receive lower density
- Symmetry is used throughout – the artist works one side only, mirroring in real time, resolving the centerline last
- Every hard edge gets a seam during UV preparation – this is established during retopology, not discovered later
Step 4: Topology review
The completed low-poly mesh is reviewed by the art lead or art director before UV unwrapping begins. The review checks:
- Edge flow logic at all major deformation zones
- Polycount within spec (±5% tolerance is typical)
- Absence of n-gons in the production mesh
- Pole placement away from animation-critical areas
- Surface snapping – no vertices floating off the high-poly surface
This is the gate. Issues found here cost hours. The same issues found after baking cost days.
Step 5: UV unwrapping
The retopologized mesh is unwrapped, with seams placed along hard edges and natural breaks in the surface. UV islands are packed for maximum texel density, oriented for consistent anti-aliasing behavior (horizontal and vertical edges where possible).
Step 6: Baking
The high-poly sculpt and the low-poly retopologized mesh are aligned, and texture maps are baked from one to the other – normal map, ambient occlusion, curvature map, and optionally thickness and cavity. The bake transfers the visual information of the 10-million-polygon sculpt onto the UV space of the production mesh as part of a standard 3D character workflow – read our comprehensive guide on 3D character pipeline for UE5.
A clean bake with no artifacts confirms the retopology and UV work were correct. Baking errors are always diagnosed upstream – in the topology, the UV seams, or the cage.
Tools: ZRemesher, Maya Quad Draw, and TopoGun Compared
The three tools specified in the BRIEF are the most relevant for a mid-core/AAA studio pipeline. Here’s how they fit into production:
ZBrush ZRemesher – auto retopology inside the sculpting app
ZRemesher generates a new quad-based mesh from a ZBrush sculpt in seconds. The artist can control polygon density with ZRemesher Guides – painted curves drawn over the mesh that direct the algorithm’s edge flow.
Where it excels: rapid base mesh generation, organic hard-surface cleanup, initial retopo of secondary props and NPCs. For a hero character, ZRemesher produces a base that requires significant manual correction at the face and hands – but it removes the early structural pass that would otherwise take hours.
Where it falls short: ZRemesher cannot reliably place concentric loops around the mouth or eyes without guide painting, and even with guides, the result requires manual cleanup. The output is a starting point, not a deliverable for animation-heavy characters.
NR pipeline note: we use ZRemesher for environment prop base meshes and NPC bodies, with manual correction as a second pass. For hero character faces, we retopologize manually from the start.
Maya Quad Draw – the manual retopology standard for AAA
Maya’s Quad Draw tool lets artists draw quads directly onto a live surface (the high-poly mesh set as a reference). The workflow is brush-based: click to place vertices, drag to extend edges, double-click to create faces. Edge loops are extended interactively.
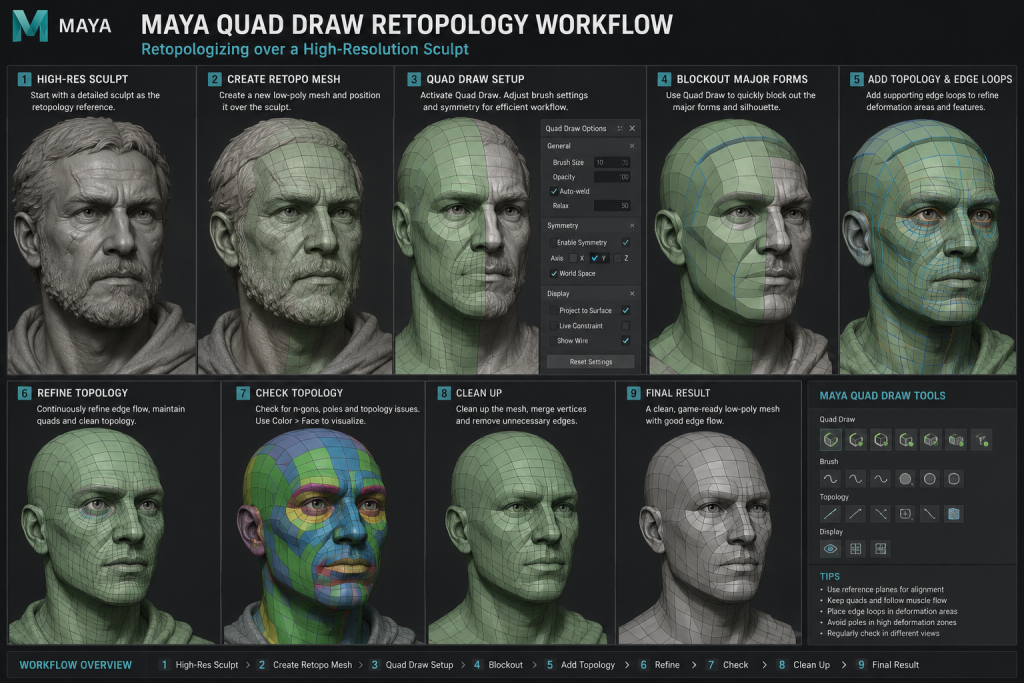
“Editorial illustration created for visual reference purposes. It does not represent a real project, client work, or official software screenshot unless stated otherwise.”
From the Polycount community and production practitioners: Quad Draw in Maya is widely regarded as the most efficient manual retopology tool for character work. Its advantage is that it operates inside the full Maya environment – no import/export between applications, immediate access to the full modeling toolset, and results that go directly into the rigging and UV pipeline.
Where it excels: hero character retopology requiring precision, complex organic forms, characters with detailed clothing and accessories. The workflow integrates directly with Maya’s rigging pipeline without format conversion.
Where it falls short: large, heavy reference meshes can slow the Quad Draw viewport. Some artists find the vertex snapping behavior on extremely dense sculpts inconsistent. These are manageable issues, not blockers.
NR pipeline note: Maya Quad Draw is our primary tool for hero character retopology. The integration with our existing Maya → Substance → UE5 pipeline eliminates the format conversion steps that dedicated standalone tools introduce.
TopoGun 3 – dedicated standalone retopology
TopoGun is a standalone application built specifically for retopology and map baking. Version 3, released in 2024 after nearly eight years of development, introduces a mixed manual and semi-automated workflow: artists draw Guide Lines on the reference mesh to define edge flow, and TopoGun generates topology following those guides. A new Patch tool lets artists sketch major surface regions by anatomical landmark, which TopoGun then fills with quad topology automatically.
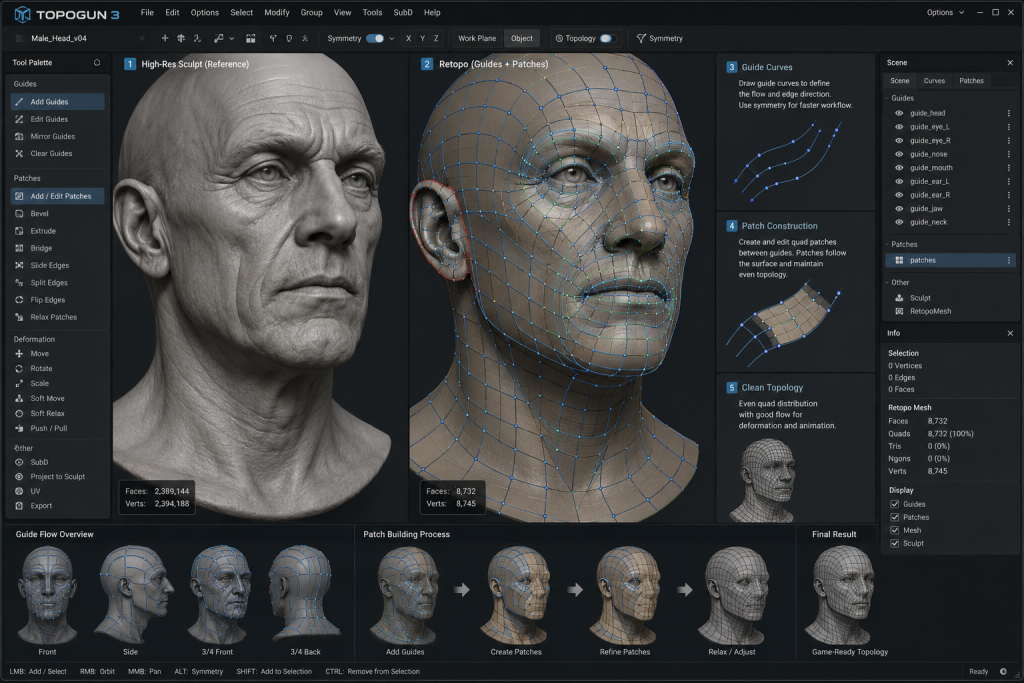
“Editorial illustration created for visual reference purposes. It does not represent a real project, client work, or official software screenshot unless stated otherwise.”
TopoGun 3 also handles baking inside the same application – normal maps, ambient occlusion, and other texture maps baked from high-res to low-res in a single pass.
From 80.lv’s coverage of TopoGun 3: the update adds Slice, Cut, Circle, and Shell tools for different mesh types, and the Mask tool for isolating specific surface regions during retopology.
Where it excels: performance with extremely dense meshes – TopoGun’s viewport handles heavy reference geometry more gracefully than Maya in some configurations. The built-in baking pipeline reduces the number of application switches in the workflow. Guide-based semi-automated retopology is faster than fully manual for experienced users.
Where it falls short: TopoGun is a standalone application – results need to be exported back into Maya or another DCC for rigging and animation work. The integration overhead matters in team pipelines. TopoGun 3’s community is smaller than Maya’s, which affects troubleshooting resources.
NR pipeline note: TopoGun is valuable for artists who prefer a dedicated retopology environment, particularly for dense organic assets where Maya’s viewport performance degrades. We treat it as a complement to Quad Draw, not a replacement.
Tool Decision Matrix
| Use case | Recommended tool | Why |
| Hero character face, hands | Maya Quad Draw (manual) | Precision, direct pipeline integration |
| Hero character body | Maya Quad Draw or TopoGun 3 | Speed with quality control |
| NPC / secondary character | ZRemesher + manual correction | Speed, acceptable quality with cleanup |
| Environment props (static) | ZRemesher | Full auto, no deformation requirement |
| Photogrammetry scans (static) | ZRemesher or TopoGun 3 | Dense source geometry handled well |
| Baking alongside retopo | TopoGun 3 | Built-in baking pipeline |
| Cloth simulation assets | Manual (any tool) | Direction of fold geometry is critical |
What Good Retopology Looks Like: Edge Flow Principles
For an art director reviewing retopology work, these are the signals that distinguish production-ready topology from a mesh that will cause problems.
All-quad base mesh. The production mesh should be all quadrilaterals, with triangles appearing only at termination poles. A mesh full of triangles was either auto-retopologized without cleanup or modeled without topology in mind. Triangles subdivide unpredictably and shade inconsistently at deformation zones.
Loop concentration follows deformation priority. The face receives the highest density. Joints – shoulders, elbows, knees, knuckles – receive enough loops to deform without volume collapse. Flat, non-deforming surfaces receive the minimum necessary for silhouette accuracy. If the polycount is uniformly distributed, the retopology is wrong.
Poles are placed intentionally. A 5-edge vertex (pole) is a topological redirect – a point where two edge loops merge or diverge. These are necessary in any mesh, but their placement determines whether the mesh deforms cleanly. Poles at the corner of the mouth, at the inner corner of the eye, or at a joint will cause pinching and shading artifacts under deformation. Poles belong in flat, non-critical areas.
No floating vertices. Every vertex in the low-poly mesh must snap to the high-poly surface. Floating vertices create normal map baking errors and surface bumps in the final render. This is a technical review item, not an artistic judgment.
Silhouette holds at the polycount budget. At the polygon count target, the mesh’s silhouette should match the sculpt at normal gameplay camera distances. If the silhouette breaks – jagged edges on curved surfaces, visible faceting on limbs – the polycount is insufficient or the geometry is concentrated in the wrong areas.
How Retopology Fits the Nasty Rodent Delivery Standard
Retopology is embedded in every 3D character delivery from Nasty Rodent – not a separate service, not an optional step. When a client sends us a ZBrush sculpt or a high-poly from their internal team, our 3D pipeline delivers:
- Retopologized game-ready mesh within the agreed polycount spec
- UV-unwrapped and seam-placed for baking
- Normal map baked from source sculpt, validated for artifacts
- Topology review documentation on request – edge flow rationale for the art director’s sign-off
Our clients on mid-core and AAA titles – including productions with Whimsy Games, Offworld Industries, Galaxy 4 Games, Benner Games, The Bearded Ladies Consulting, and Reburn – receive character assets that arrive in the engine and rig without integration surprises. If your production pipeline includes a 3D character backlog that needs retopology and baking as part of the delivery – whether hero characters, NPCs, or environment-specific assets – you can see how we work in our portfolio or get in touch to discuss your spec.