3D Environment Design: From Concept to Game-Ready World
-

Written byDenys Zadoienyi
-

Updated on18.06.2026
-

Time to read20 min

- What Is 3D Environment Design?
- Why the First Blockout Determines Everything Downstream
- The 3D Environment Art Pipeline: Stage by Stage
- Modular Design: How Reusability Changes Production Math
- Texture and Material Workflows: PBR, Tileables, and Trim Sheets
- The Optimization Decision: LOD, Nanite, and What Changes in UE5
- The Technical Environment Design Matrix
- Stylized vs. Realistic: Choosing the Visual Language Before Production Begins
- How We Work at Nasty Rodent
- Environment Design Approaches: Comparison by Scale and Production Context
- Conclusion: The Gap Between Beautiful and Game-Ready
3D environment design is the discipline that transforms a concept or reference sheet into a fully realized, engine-ready game world — and the gap between those two states is where most production problems live.
“Editorial illustration created for visual reference purposes. It does not represent a real project, client work, or official software screenshot unless stated otherwise.”
AAA art directors know this gap well. The environment looks stunning in ZBrush. Then it lands in the engine and suddenly pushes thousands of draw calls per frame, tanks performance on console, and the lighting team spends a week compensating for geometry that was never built to accept Lumen’s global illumination. The world still looks beautiful in screenshots. It just doesn’t run.
This guide covers the complete 3D environment art pipeline — from the first blockout through modular system design, PBR texturing, optimization, and engine delivery. The focus is on production-grade execution for mid-core and AAA projects targeting PC, console, and platforms running Unreal Engine 5 or Unity HDRP.
What Is 3D Environment Design?
3D environment design is the process of building the physical spaces in which games take place — terrain, architecture, props, lighting, and atmospheric elements — as optimized, engine-ready assets that serve both visual and gameplay functions simultaneously.
It is not background decoration. A well-built environment guides player movement through sight lines and light placement, communicates narrative through object arrangement and surface wear, and performs reliably at 60fps on the target hardware. All three goals must be met by the same set of assets.
The discipline combines three distinct skill sets: spatial design (composition, player flow, visual storytelling), technical modeling (high-poly sculpting, retopology, UV mapping, texture baking), and engine integration (performance optimization, LOD configuration, material setup, shader workflows). In studio pipelines, these responsibilities are often distributed across specialized roles — environment artists, technical artists, and lighting artists — working from a shared style guide.
Why the First Blockout Determines Everything Downstream
The blockout stage is where most AAA environment pipelines either gain or lose two to four weeks of production time — and it’s rarely discussed with the weight it deserves.
A blockout is a rough, placeholder geometry pass built entirely from primitive shapes: boxes, cylinders, planes. Its purpose is to validate three things before a single hero asset enters production: spatial proportion (does the space feel right at player scale?), level design logic (does the layout support the intended gameplay flow?), and visual composition (do sight lines, focal points, and camera angles work?).
This is also where modular system planning begins. An environment artist building blockout geometry for a UE5 project needs to think in terms of grid alignment from the first session. Modular pieces should follow a consistent grid and snapping convention — typically based on power-of-two increments — so that level designers can assemble kits without gaps, overlaps, or scale drift. Establishing this discipline during blockout prevents a painful rework cycle when the modular kit goes into production.
Why Skipping Blockout Review Costs More Than the Blockout Takes
Art directors who allow the pipeline to advance from blockout to hero asset production without a formal review gate consistently report the same outcome: significant geometry rework in the final third of production, when the cost of changes is highest. At Nasty Rodent, we treat blockout sign-off as a hard gate — no modeling pass begins on a location until the blockout has been reviewed against three criteria: player scale validation, camera angle confirmation, and modular grid compliance.
The typical blockout review cycle for a mid-size environment location (one interior with adjacents, or a 200×200m outdoor area) runs three to five working days including revision. In our production experience, this investment often eliminates two to three rework rounds on finished hero assets.
Reading the Blockout: What to Check Before Approval
Before a blockout advances to the detailed production phase, an art director should verify:
- Player scale proportion. Walk the space in-engine with a character controller. Low ceilings, narrow corridors, and oversized props are invisible on a top-down reference but immediately obvious at eye level.
- Primary sight lines. Every major area should have a clear visual focal point that draws the eye — a hero prop, an architectural landmark, a lighting source. If the blockout has no focal hierarchy, the finished environment won’t either.
- Modular grid compliance. If the environment will use a modular kit, all blocking geometry must already respect grid dimensions. A structural wall placed off-grid at blockout creates assembly gaps in the final kit.
- Gameplay readiness. Level designers should walk the blockout alongside environment artists. Gameplay flow problems found at blockout cost a day to fix; found after textured assets are in place, they cost a week.
Did you know that…?
The logic behind blockout mirrors film and theatre previsualization: establish composition cheaply before committing to expensive production work. A rough proxy environment built in an afternoon reveals spatial proportion and sight-line problems that detailed geometry would take weeks to expose — and weeks more to fix.
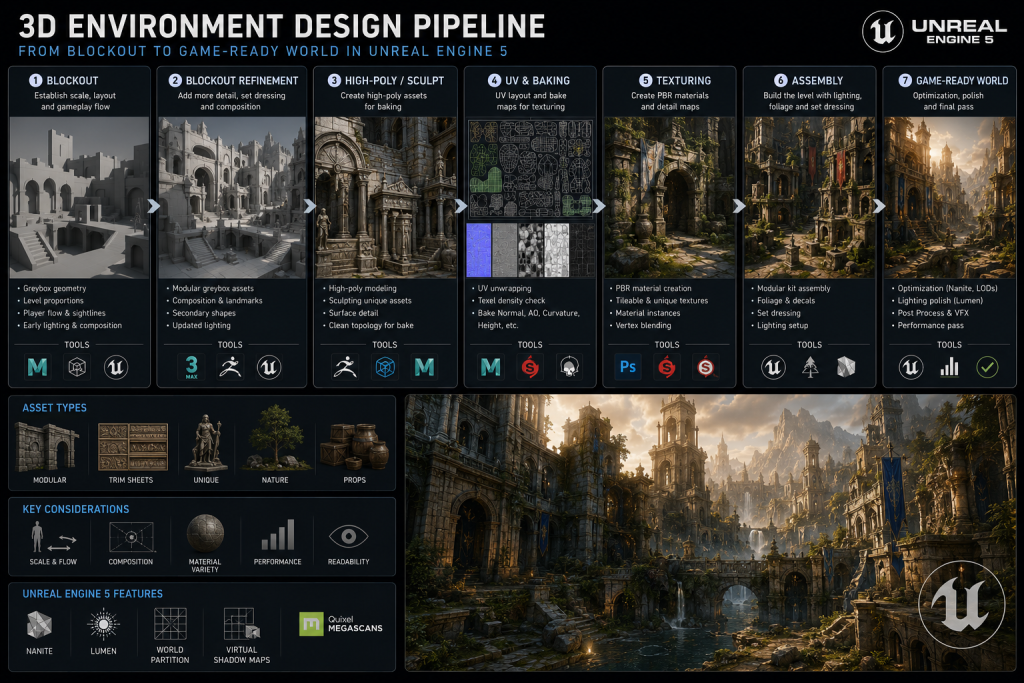
The 3D Environment Art Pipeline: Stage by Stage
A production-grade environment pipeline doesn’t happen organically. It is a structured sequence of stages with defined input criteria, output specs, and approval gates — a framework documented by senior environment artists across AAA studios. Here is how a complete pipeline runs for a mid-core or AAA location.
Stage 1 — Reference and Art Direction Brief
Before any geometry is created, the environment team receives a level brief: a description of the location’s narrative role, gameplay function, visual reference package, and technical targets. Strong level briefs include mood board imagery, material references, lighting references, and explicit performance targets (target polycount for the scene, texture budget, draw call target).
An art director should specify at this stage whether the location follows a realistic, stylized, or semi-realistic visual language. This decision affects every downstream technical choice — PBR workflow density, normal map baking strategy, Nanite candidacy of the assets, and LOD aggressiveness.
Stage 2 — Blockout and Layout Validation
Covered above in detail. Output: an approved blockout file with confirmed grid dimensions, player scale validation, and gameplay sign-off from the level design team.
Stage 3 — Modular Kit Design and High-Poly Sculpting
With approved blockout in hand, the modular system architecture is defined. Which elements will be modular (walls, floors, ceilings, arch transitions)? Which will be unique hero assets (a distinctive entrance arch, a damaged structural column, a key story prop)? Which will be trim sheet candidates?
The ratio typically breaks down as: 60–70% modular pieces, 20–25% hero assets, 10–15% tileable surface materials. Getting this ratio wrong in either direction creates either a sterile, repetitive environment (too much modularity) or an over-budget production that misses milestones (too many unique pieces).
High-poly sculpting in ZBrush or Maya follows the modular architecture definition. The high-poly serves one purpose: to generate baked detail for normal maps. Its polycount is irrelevant to the final game asset — artists routinely work with 5–20 million polygon sculpts to produce normal maps that will be applied to assets running at 2,000–8,000 triangles.
Stage 4 — Retopology and Low-Poly Production
Retopology converts the high-poly sculpt into a game-ready low-poly mesh with optimized edge flow, clean UV-friendly topology, and a controlled polygon budget. This is where technical discipline separates production-grade environment art from portfolio-grade work.
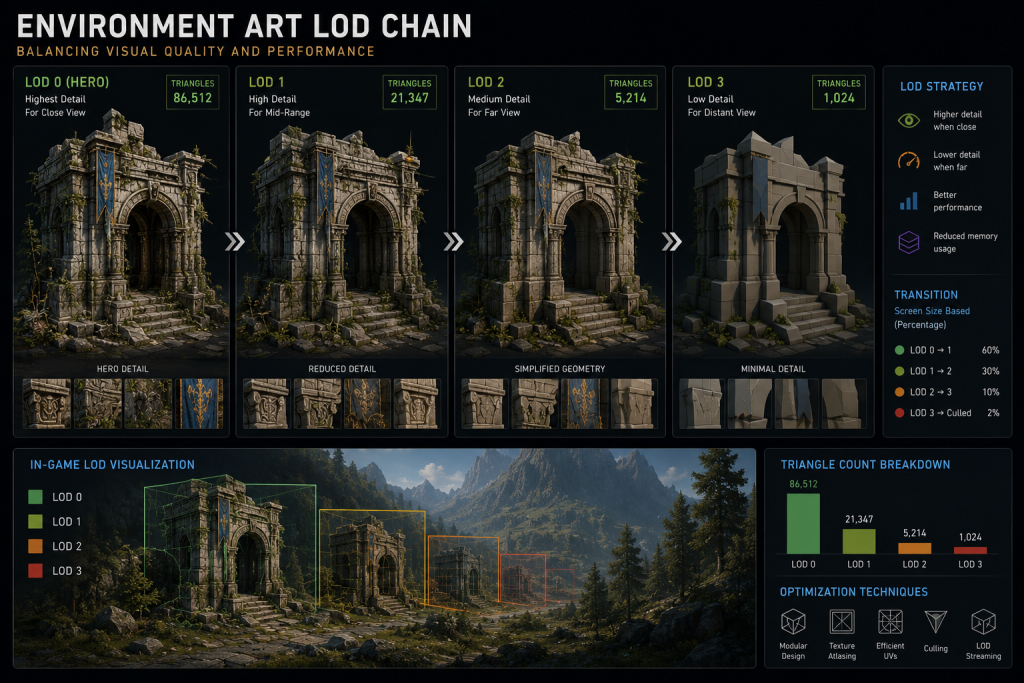
For a mid-core/AAA environment, typical triangle budgets follow established production ranges:
| Asset Category | Triangle Budget (typical AAA/mid-core) |
| Small prop (rock, debris, crate) | 200–800 triangles |
| Medium modular piece (wall section, floor tile) | 500–2,500 triangles |
| Architectural hero asset (doorway, arch, column) | 1,500–6,000 triangles |
| Complex hero asset (vehicle wreck, damaged structure) | 8,000–25,000 triangles |
| Terrain tile (4×4m section) | 1,000–4,000 triangles |
These are working ranges, not hard caps. The meaningful constraint isn’t per-asset triangle count — it’s the total triangle budget for the scene on screen simultaneously, which varies by target platform and rendering budget.
Stage 5 — UV Mapping, Baking, and PBR Texturing
UV mapping determines how the 2D texture space maps onto the 3D surface. For game environments, three UV approaches are in common use:
Unique UVs — each asset receives its own dedicated texture space. Used for hero assets with highly specific surface detail. Produces the best per-asset quality at the cost of texture memory.
Tiled UVs — surface materials repeat across the mesh. Used for large, architecturally consistent surfaces (floors, plain walls). Maximizes texture memory efficiency but limits surface uniqueness.
Trim sheet UVs — assets are mapped to shared texture atlases containing strips of varied surface detail. A single 2048×2048 trim sheet can texture dozens of modular pieces, improving texture memory efficiency and reducing material fragmentation when used with shared materials. Trim sheets are a core tool of AAA environment production pipelines and one of the primary differentiators between junior-level and production-grade environment art work.
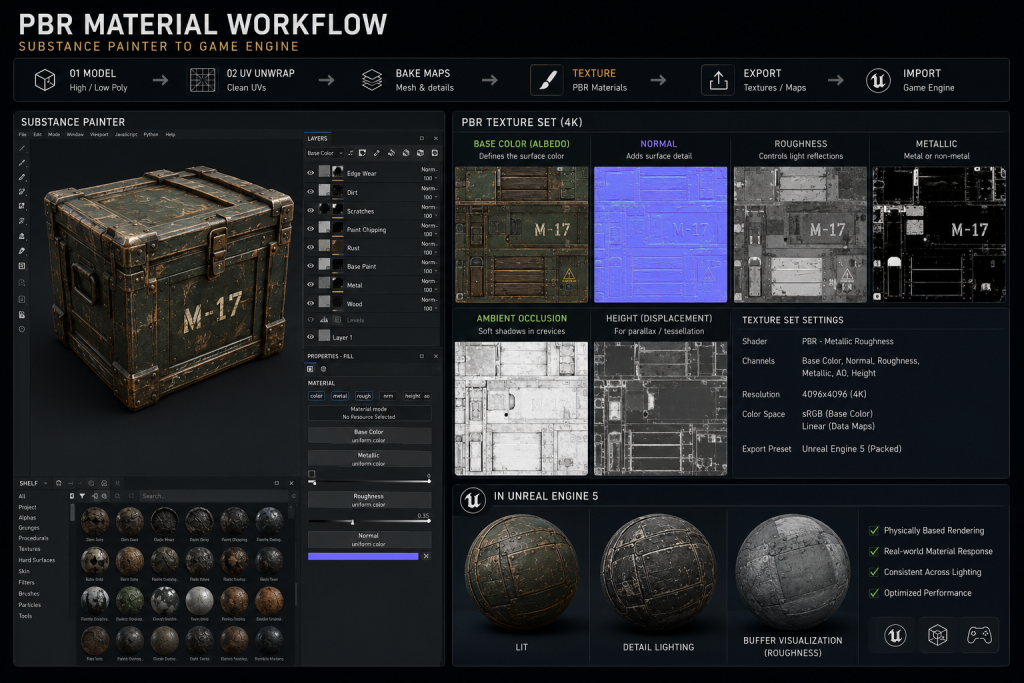
Baking transfers the surface detail of the high-poly sculpt onto normal maps, ambient occlusion maps, and curvature maps — all of which feed the PBR material workflow in Substance Painter or Substance Designer. A correctly baked normal map can make a 2,000-triangle asset appear to have 200,000 triangles of surface detail. An incorrectly baked normal map introduces visible seams, shading errors, and projection artifacts that propagate through the entire texture set.
Stage 6 — Engine Integration and Scene Assembly
Game-ready assets are exported as FBX or USD files and imported into the target engine — Unreal Engine 5, Unity HDRP, or a proprietary engine. At this stage, material instances are created from master materials, LOD chains are configured, collision geometry is generated or authored, and assets are assembled into the scene using the modular kit logic defined in Stage 3.
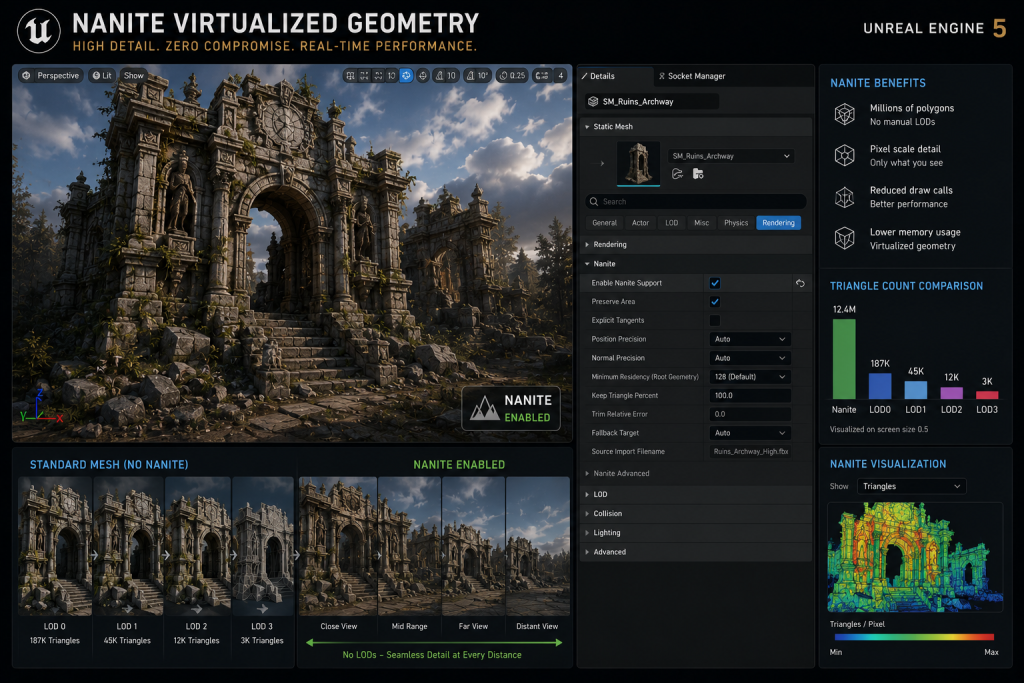
For UE5 productions, static opaque environment assets are the strongest Nanite candidates — architectural elements, rock formations, structural props — and are enabled through the asset editor’s Details panel. According to Epic’s Unreal Engine documentation, Nanite represents geometry as hierarchical clusters of triangles and dynamically scales detail based on an allowed projected screen error rate, eliminating the need for traditional manual LOD chains on compatible assets. While Nanite now officially supports masked materials and foliage, heavy vegetation density frequently causes severe overdraw and overshading, so opaque geometry remains the reliable path while foliage demands rigorous per-project profiling before skipping traditional LOD or alpha-card strategies. This changes the optimization conversation for environment production significantly: assets that previously required four manually authored LOD levels can be enabled with a single checkbox for the right geometry types, while the optimization focus shifts to draw call management, material complexity, and lighting budget.
Stage 7 — Optimization and Performance Profiling
Optimization is not a final-pass task. It is a discipline that runs parallel to production from Stage 3 onward. By the time a scene reaches formal optimization review, most of the meaningful decisions are already locked in geometry, UV layout, and material setup.
Key optimization levers for game environments:
- LOD chains: For non-Nanite assets, three to four LOD levels are standard. LOD0 is the full-detail mesh; LOD3 or LOD4 retains only silhouette-preserving geometry for distant rendering. Each LOD transition should be tuned to match the camera distances at which the asset is typically viewed, avoiding visible “popping.”
- Draw call reduction: Instanced Static Meshes (ISM in UE5) batch identical geometry into a single draw call. Per Epic’s documentation, this is particularly effective for repeated environmental elements — a primitive component uses roughly ten times more memory than an instanced equivalent. Environments with heavy use of repeated props should prioritize ISM setup.
- Occlusion culling: Geometry that isn’t visible from the player camera should not render. Proper collision and occluder geometry placement is an environment art responsibility, not purely a tech art task.
- Texture atlasing: Combining multiple prop textures into a single atlas reduces draw calls and improves cache coherency, particularly effective for scenes with high-density small-prop populations.
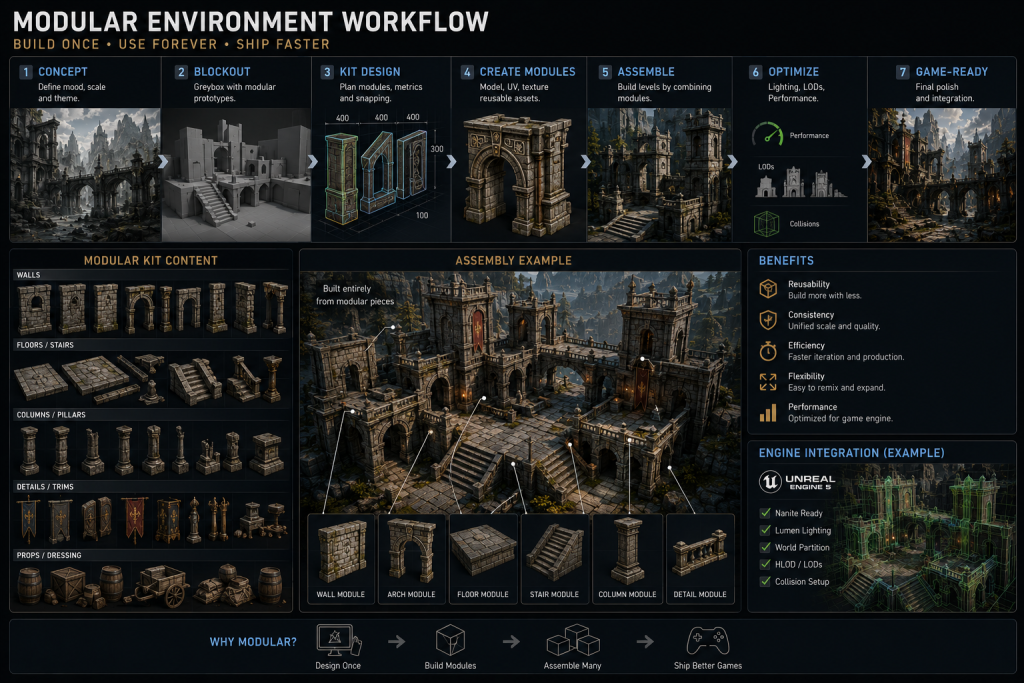
Modular Design: How Reusability Changes Production Math
The modular approach to environment construction — building scenes from a library of interchangeable, grid-aligned pieces — is the most impactful production efficiency decision an art director makes on an environment-heavy project.
A well-designed modular kit of 30–50 unique pieces can produce dozens of visually distinct locations without producing additional unique assets. A poorly designed modular kit of 80 pieces produces repetitive environments that players identify immediately as “the same corridor with different lighting.”
“Editorial illustration created for visual reference purposes. It does not represent a real project, client work, or official software screenshot unless stated otherwise.”
The difference is in design intention at the planning stage. Modular pieces need to be designed as a system, not as individual assets. Specifically:
Grid discipline. Every piece must share a common dimensional unit — 200cm, 400cm, 800cm grid sizes are typical for architectural environments. Assets that don’t share grid dimensions can’t be assembled without gaps or overlaps.
Transitional pieces. A modular kit without cornering pieces, T-junction variants, and height transition modules will produce environments that look like a grid. Budget 30–40% of the modular kit’s asset count for transitional geometry.
Trim sheet integration. Modular pieces are the primary beneficiaries of trim sheet workflows. A single trim sheet covering edge wear, material transitions, and surface variation can apply to dozens of modular pieces, improving texture memory efficiency and material consistency across the kit.
Assembly testing in-engine, not in DCC. Modular kits look very different assembled in the engine than they do in Maya or 3ds Max. Every kit should undergo an assembly test pass — building a representative sample environment with the full kit — before the kit enters the production pipeline. Problems found during assembly testing cost hours to fix; problems found at scene assembly stage cost weeks.
Texture and Material Workflows: PBR, Tileables, and Trim Sheets
PBR (Physically Based Rendering) materials are the production standard for environments targeting real-time engines in 2026 and beyond. A PBR material set for a game environment asset typically consists of:
“Editorial illustration created for visual reference purposes. It does not represent a real project, client work, or official software screenshot unless stated otherwise.”
- Albedo (Base Color): The raw surface color without baked lighting information. A common mistake is baking ambient occlusion into the albedo — this creates lighting inconsistencies when dynamic lighting changes are applied in-engine.
- Normal Map: Surface detail encoded as directional lighting information. Generated from the high-poly bake. The single most impactful texture map for perceived geometric complexity.
- Roughness: Controls the micro-surface scattering of light. A concrete floor has high roughness (0.8–0.95); polished metal has very low roughness (0.05–0.15). Roughness consistency across an environment’s material palette determines whether the world feels visually coherent.
- Metallic: Binary flag (or very low values) indicating whether a surface is a conductor material. Most environment surfaces are non-metallic; incorrect metallic values are one of the most visible PBR errors in production environments.
Physically incorrect PBR values produce environments that look wrong without being obviously broken. Surfaces appear inconsistent — materials that should look the same in different lighting conditions don’t. This is why art directors conducting lookdev review should always test environment materials under multiple lighting scenarios (direct sunlight, overcast sky, interior artificial light, night) before approving assets.
The polycount.com community — the longest-running technical art forum in the industry — has documented extensively that draw call management is often a more meaningful optimization target than raw polygon reduction in modern real-time engines. A scene with 300 unique material instances may perform worse than a scene with twice the triangle count but 40 material instances, because GPU state changes for materials are expensive regardless of geometric complexity.
The Optimization Decision: LOD, Nanite, and What Changes in UE5
Optimization strategy for game environments has changed substantially with Unreal Engine 5’s introduction of Nanite and Lumen. Understanding what changed — and more importantly, what didn’t — is essential for any art director managing a UE5 pipeline in 2025.
“Editorial illustration created for visual reference purposes. It does not represent a real project, client work, or official software screenshot unless stated otherwise.”
What Nanite changes: For static mesh environment assets without transparency or masked material requirements, Nanite eliminates the manual LOD chain. The system streams virtualized geometry at pixel-accurate detail automatically. Architectural elements, rocks, ruins, terrain details — any non-animated, non-transparent static geometry is a strong Nanite candidate. As a result, environment artists on UE5 projects can work at significantly higher initial mesh density without the traditional per-asset LOD penalty. The full scope of technical implications for AAA productions is covered in our UE5 environment art pipeline breakdown.
“Editorial illustration created for visual reference purposes. It does not represent a real project, client work, or official software screenshot unless stated otherwise.”
What Nanite doesn’t change: Draw call management remains critical. Lighting complexity — the number of dynamic lights touching a single surface — remains a performance concern regardless of Nanite status. Material complexity (shader instruction count, multi-layer blending) is not addressed by Nanite. Foliage, masked materials, World Position Offset deformation, and animated vegetation require additional profiling and should not be treated as automatic Nanite wins: while UE5 includes dedicated Nanite Foliage support, its behavior under heavy vegetation density still demands careful per-project testing before committing the environment to that path.
A frequent production error is treating “Nanite-enabled” as synonymous with “optimization complete.” An environment with Nanite-enabled static meshes and 800 unique material instances per scene will still exhibit poor GPU performance. The optimization discipline shifts — it doesn’t disappear.
Lumen’s impact on environment art: Lumen provides fully dynamic global illumination, which means environment artists no longer need to generate secondary UV channels for lightmap baking as a production standard. This shifts the lookdev discipline: Base Color (Albedo) must remain strictly clean of any baked lighting information — which was always the PBR requirement but previously enforced through the baked lightmap workflow — while Ambient Occlusion is used purely for micro-occlusion rather than compensating for missing directional light data. Materials must now be evaluated under dynamic light conditions at every lookdev review stage, rather than in a pre-baked scene where lighting is frozen. And the architectural design brief changes: Lumen rewards environments with complex indoor/outdoor light transitions and penalizes flat, uniform spaces where global illumination adds nothing visually.
The Technical Environment Design Matrix
“Editorial illustration created for visual reference purposes. It does not represent a real project, client work, or official software screenshot unless stated otherwise.”
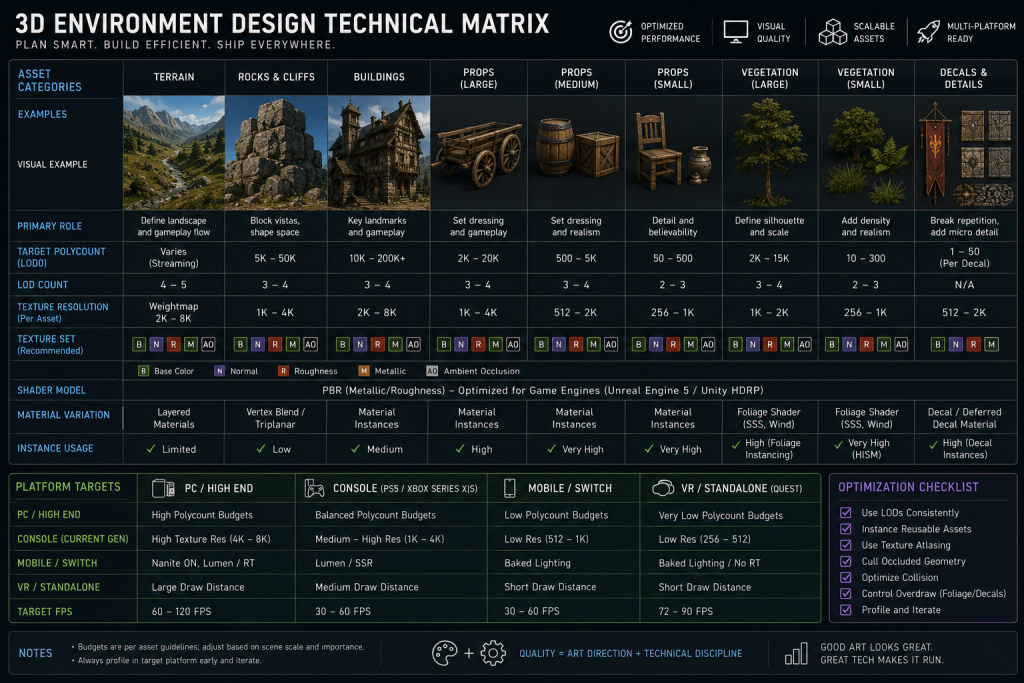
| Element | AAA PC Target | AAA Console Target | Mid-Core Mobile | Common Red Flags |
| Hero asset triangles | 8,000–25,000 | 6,000–15,000 | 800–3,000 | Over-tessellated curves on non-hero props |
| Modular piece triangles | 500–2,500 | 400–1,800 | 100–600 | Redundant geometry on non-visible faces |
| Texture resolution (hero) | 2K–4K per set | 2K per set | 512–1K per set | 4K textures on background fill props |
| LOD chain depth | LOD0–LOD3 | LOD0–LOD3 | LOD0–LOD1 | No LODs on medium-distance props |
| Draw call target (scene) | 1,000–3,000 | 800–2,000 | 100–500 | Excessive unique material slots increase draw-call and state-change pressure |
| Nanite candidacy (UE5) | Static, opaque, non-animated geometry | Same | Not applicable | Masked foliage and WPO assets enabled for Nanite without per-project profiling |
Stylized vs. Realistic: Choosing the Visual Language Before Production Begins
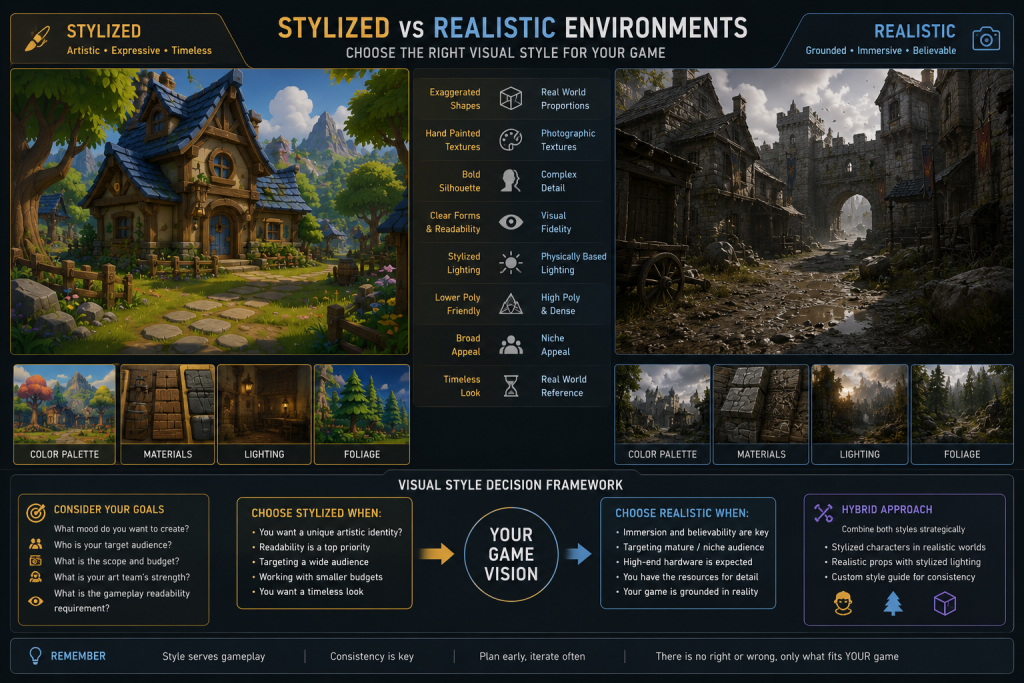
The choice between stylized and realistic visual language is not an aesthetic preference — it is a technical production decision that affects every subsequent pipeline choice.
“Editorial illustration created for visual reference purposes. It does not represent a real project, client work, or official software screenshot unless stated otherwise.”
Realistic environments target photorealism: high-resolution scan-based or physically accurate PBR materials, subtle surface variation, natural lighting behavior. They require a larger texture budget per asset, more time in lookdev to achieve consistent material behavior, and heavier post-processing pipelines. They also tend toward larger polycount targets because silhouette accuracy matters more at photorealistic fidelity levels.
Stylized environments emphasize readability, clarity, and emotional accessibility over physical accuracy. Shapes are exaggerated, color palettes are deliberately controlled, and surface detail is reduced to what reads clearly at game camera distance. Stylized work requires its own form of discipline: consistent application of a style guide across hundreds of assets, because style inconsistency is more visible in stylized worlds than in realistic ones. A realistic environment can absorb some variation in surface detail; a stylized environment falls apart visually if edge chamfer widths are inconsistent across the modular kit.
Semi-realistic (or “stylized realism”) occupies the space between both poles — the dominant visual language of mid-core titles including Ready Or Not, Mutant Year Zero: Road to Eden, and Miasma Chronicles. Assets have physically plausible material values but are built to stylized proportions, with deliberately chosen surface simplifications that reduce production cost while retaining visual credibility. This is the most technically demanding style to maintain consistently at scale, because the rules are less absolute than either extreme.
For art directors defining visual language at the start of an environment project, the decision should be codified in a style guide before any assets enter production. A style guide should specify: edge beveling conventions, surface complexity tier (how many layers of detail a modular piece carries), material palette (approved material IDs with target roughness/metallic values), and a reference set of approved and rejected examples.
How We Work at Nasty Rodent
Creating a game-ready environment requires more than attractive visuals. It demands a production pipeline that connects concept art, modular asset creation, optimization, and engine integration. At Nasty Rodent, our environment artists build immersive worlds for PC, console, and mobile projects, delivering production-ready assets optimized for real-time performance. From stylized locations to realistic AAA environments, we help studios scale environment production without sacrificing quality or consistency. We also produce 3D character art for teams that need consistent visual language across both environments and characters within a single production pipeline.
Our work spans projects including Squad (Offworld Industries), Ready Or Not, Mutant Year Zero: Road to Eden, Starship Troopers: Extermination, Miasma Chronicles, and La Quimera. Every environment we deliver starts with a technical brief review and ends with a profiled, engine-ready scene — not a collection of isolated assets that your team has to reassemble.
When we take on environment outsourcing, we assign a dedicated art lead to each project, providing style guide compliance review on every asset batch before delivery. Our pipeline integrates directly with Unreal Engine 5 and Unity HDRP. We work under NDA from day one, and IP transfer is formalized at MSA signing.
For mid-core and AAA studios managing multi-location environment production, our standard engagement delivers environment assets with LOD chains, collision geometry, material instances, and Nanite-readiness flags documented in a delivery spec. You receive engine-integrated scenes, not raw FBX packages.
Environment Design Approaches: Comparison by Scale and Production Context
| Approach | Best For | Team Size Required | Production Timeline | Key Risk |
| Full in-house production | 1–3 locations, tight visual control | 3–5 senior env artists | 3–6 months per location | Limited scalability for multi-location projects |
| Partial outsource (hero assets in-house) | 6–15 locations, mixed complexity | 1–2 in-house lead artists | 4–8 months per 10 locations | Style consistency requires strong style guide |
| Full outsource with in-house art direction | 15+ locations, scale production | 1 art director + vendor manager | 6–12 months for full world | First-pass approval rate depends on brief quality |
| Modular kit outsource | Open world, procedural environments | 1 art director, 1 tech artist | 2–4 months kit + assembly | Grid compliance issues surface at assembly stage |
Conclusion: The Gap Between Beautiful and Game-Ready
3D environment design is a discipline where artistic vision and technical constraint converge — and where the most common failures happen not because of insufficient talent, but because of pipeline decisions made before a single hero asset was modeled.
The blockout tells you if the space works before production investment begins. The modular system determines whether expanding from 15 locations to 150 remains economically viable. The optimization strategy determines whether a beautiful environment ships or gets cut for performance. And the style guide determines whether the world feels cohesive or like a collection of individually impressive assets that don’t belong in the same game.
If your production pipeline has environment milestones on the calendar and your senior bandwidth is committed elsewhere, a visual style match call with our art lead takes 30 minutes and tells you exactly where the risk points are between your style guide and our production capacity. We’ll tell you what we can match, what needs clarification, and where we’ve solved similar technical problems before. No obligation — just a direct professional conversation.
Talk to us about your environment production → | Schedule a call or send your brief directly.