3D Character Pipeline for Unreal Engine 5: Best Practices and Common Pitfalls
-

Written byDenys Zadoienyi
-

Updated on18.05.2026
-

Time to read13 min

- Stage 1: Concept Lock and Technical Brief
- Stage 2: High-Poly Sculpt and Art Direction Review
- Stage 3: Retopology and Low-Poly Modeling
- Stage 4: Normal Map Baking
- Stage 5: Texturing and Material Setup
- Stage 6: Rigging and Skinning
- Stage 7: LOD Setup, Physics Assets, and Import Validation
- The Three Pitfalls That Consistently Break AAA Character Pipelines
- Pipeline Efficiency Starts Before the First Polygon
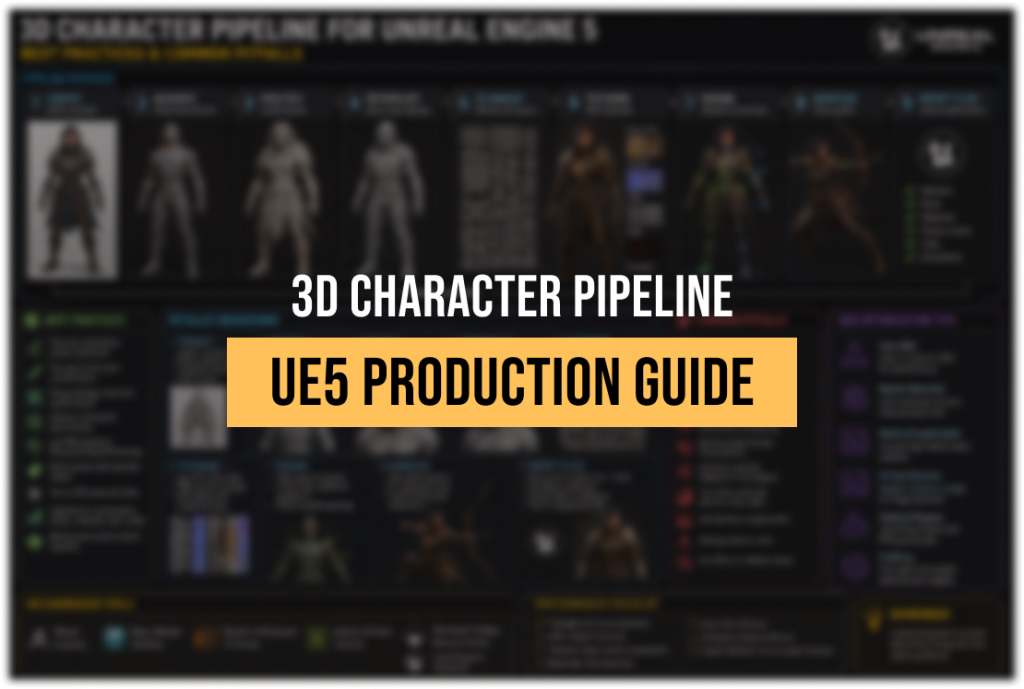
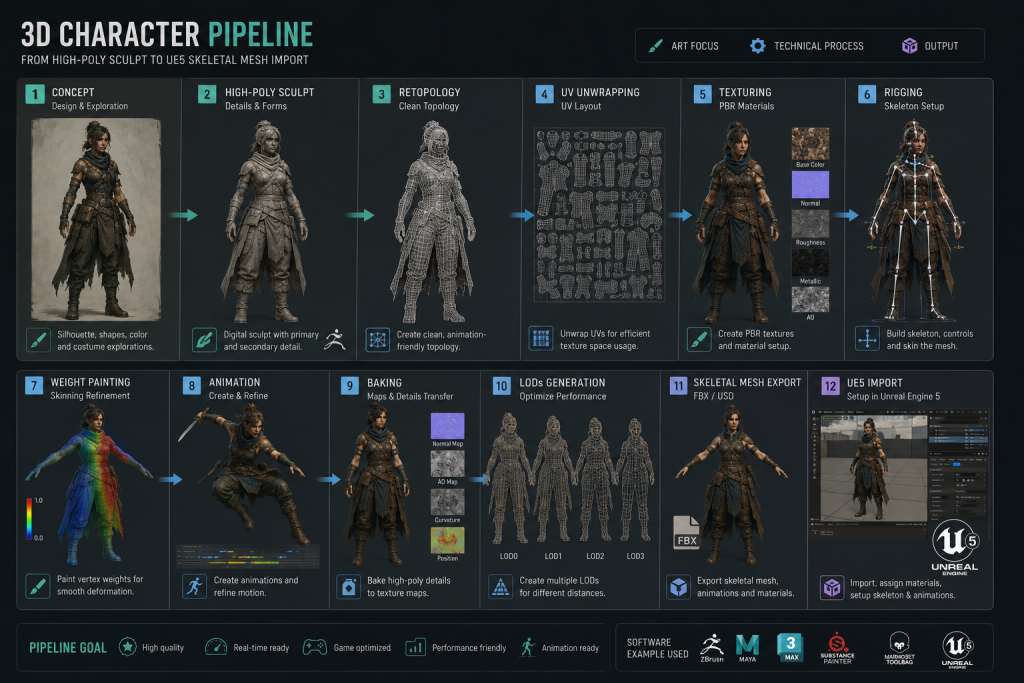
A 3D character pipeline is the structured sequence of production stages that takes a character from concept approval to a game-ready skeletal mesh inside Unreal Engine 5. In AAA production, the pipeline is a delivery contract: every stage has defined inputs, defined outputs, and defined quality gates. When those gates are skipped or compressed, the cost doesn’t disappear — it accumulates downstream, surfacing as rework at the worst possible point in the schedule.
This guide walks through the full 3D character creation pipeline for UE5, stage by stage, with the decisions that matter at each step and the failure modes that consistently break milestone reviews on mid-core and AAA projects.
“Editorial illustration created for visual reference purposes. It does not represent a real project, client work, or official software screenshot unless stated otherwise.”
Stage 1: Concept Lock and Technical Brief
The pipeline doesn’t start in ZBrush. It starts when the concept is locked and a technical brief exists.
A locked concept means the art director has signed off on silhouette, proportions, surface complexity, and visual target. “Mostly approved” is not locked. The gap between mostly approved and fully approved is exactly the rework budget you’ll spend in Stage 4.
The technical brief defines the production constraints the 3D team needs before modeling begins: polycount budget by LOD, texture resolution and count, material slot limit, skeleton type (biped, quadruped, custom), rig complexity target (IK, FK, blend shapes count), target platforms, and the project’s animation retargeting requirements. Without these numbers up front, artists make assumptions — and assumption-driven assets fail technical review.
For UE5 specifically, the brief should also specify whether the character will use Unreal’s built-in Control Rig or a DCC-side rig (Maya, 3ds Max), whether MetaHuman compatibility is required, and whether the skeleton needs to match an existing project skeleton for animation retargeting. These decisions affect every downstream stage. Discovering them at import is expensive.
Stage 2: High-Poly Sculpt and Art Direction Review
High-poly sculpting establishes the surface detail library the low-poly will bake from. On a structured pipeline, the high-poly is not a creative exploration — it’s an execution of the locked concept, with the art direction review at the end confirming that fidelity, proportions, and surface language match the visual target.
The art direction review at this stage has a specific, narrow scope: does the high-poly match the concept in silhouette, mass distribution, and surface complexity? It’s not a materials review. It’s not a proportional approximation. A signed-off high-poly is the bake source — changing it after Stage 3 is expensive.
Common pitfall: Starting the high-poly before the concept is fully locked. The sculpt becomes the concept revision process, which is fine for pre-production but destructive in production. On a production pipeline, high-poly sculpting begins after concept lock, not during it.
Stage 3: Retopology and Low-Poly Modeling
Retopology produces the game-ready mesh — the low-poly that will be rigged, LOD’d, and imported into UE5 as the skeletal mesh. For characters, retopology is not a mechanical reduction pass; it’s a craft decision with consequences for every downstream system.
Edge flow for deformation. Character meshes deform. The edge flow around joints — shoulders, elbows, knees, facial features — determines how the mesh reads under animation. Incorrect edge flow at the shoulder produces pinching at 90 degrees that no rig can compensate for. Catching this during retopology costs one revision. Catching it after skinning costs three to five.
Polycount budget by LOD. UE5’s skeletal mesh system supports up to eight LOD levels. For a mid-core AAA hero character, typical targets run from 80,000–120,000 triangles at LOD-0 down to 8,000–15,000 at LOD-3 for distant/background usage. These are not universal figures — they depend on the project’s performance budget and target platform. What matters is that LOD targets are defined in the technical brief (Stage 1), not improvised during retopology.
Modular vs. monolithic topology. UE5 supports modular character assembly — separate skeletal mesh components (head, body, hands, legs) sharing a single skeleton, combined at runtime. As Epic’s official skeletal mesh documentation notes, using multiple meshes skinned to the same skeleton allows individual parts to LOD independently and be exported separately for use in modular character systems, with no performance penalty when combined at import. The decision between modular and monolithic topology should be made in Stage 1, not during retopology.
UV unwrapping. UVs for characters should be laid out with consistent texel density, seams placed in non-visible or animation-covered areas, and sufficient padding between islands to prevent bleeding at lower mip levels. For UE5 projects, UV channel 0 is the diffuse/PBR channel; UV channel 1 is reserved for lightmap UVs if static lighting is used. Mixing these or ignoring channel 1 generates import warnings that turn into rendering artifacts in-engine.
Stage 4: Normal Map Baking
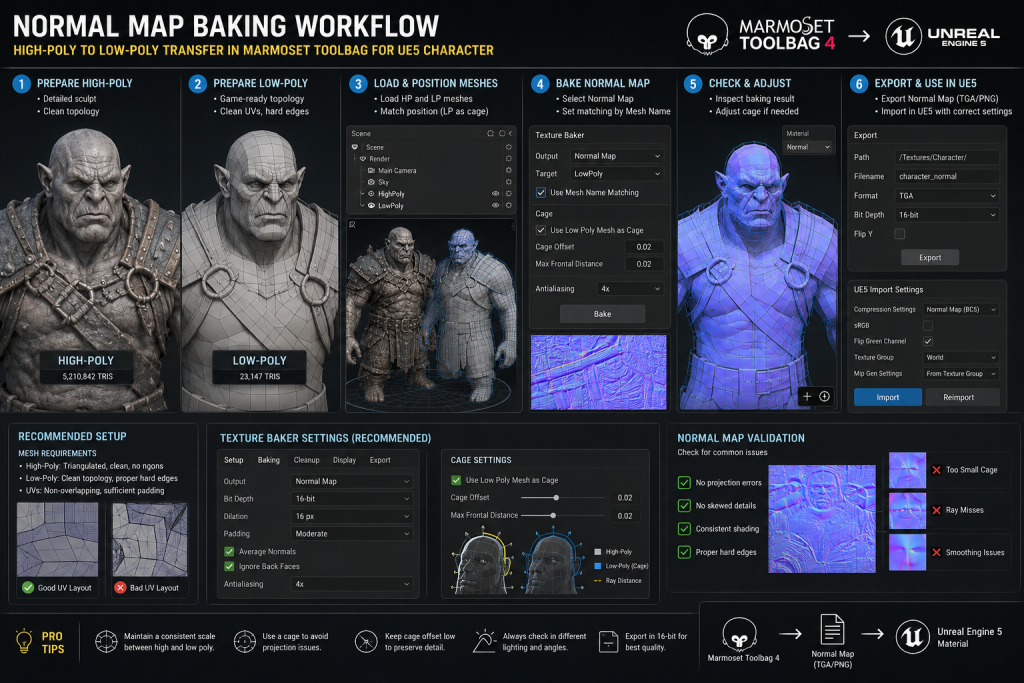
Normal map baking transfers the surface detail from the high-poly to the low-poly through a projection step. The quality of the bake determines how much of the sculpt’s detail survives in the game-ready asset. Baking is not a background task — it requires careful setup and validation before the results are handed to the texturing artist.
Cage setup. The cage is the inflated version of the low-poly used to control the bake projection. A poorly configured cage produces projection errors: floating detail, seam artifacts at UV islands, incorrect surface normal direction at concave areas. For characters, cage setup is particularly sensitive at high-curvature areas — fingers, ears, armor edges, clothing folds.
Baking environment. Production baking for UE5 character assets is typically done in Marmoset Toolbag or Substance Painter. Marmoset offers per-material cage control and real-time bake preview, which makes it the preferred tool for complex character bakes with mixed hard-surface and organic elements. Regardless of tool, the bake output should be validated in the target engine with the target lighting before being handed off to texturing — a clean bake in Marmoset can show artifacts under UE5’s directional lighting that weren’t visible in the bake preview.
“Editorial illustration created for visual reference purposes. It does not represent a real project, client work, or official software screenshot unless stated otherwise.”
Tangent space consistency. UE5 uses MikkTSpace tangent space by default. Exporting baked normal maps from a DCC that uses a different tangent space convention — and not correcting for it — produces visible seam artifacts at UV borders in-engine. This is one of the most common import-time surprises on projects that move between DCCs. The fix is inexpensive if caught at baking validation; it’s expensive if caught during engine-side QA.
Common pitfall: Treating baking as a one-pass operation. In practice, hero characters require at least two bake validation rounds — one against the neutral pose mesh in the bake tool, one in-engine under actual lighting conditions — before the normal map is approved for texturing.
Stage 5: Texturing and Material Setup
With an approved bake, texturing establishes the character’s surface materials in the PBR workflow: albedo, roughness, metalness, cavity, ambient occlusion. For UE5, the material setup in-engine — not just the textures — is part of the character pipeline.
Texel density consistency. A character with inconsistent texel density across body parts reads as visually incoherent in close-camera shots. For hero characters, texel density should be defined in the technical brief and enforced during UV layout (Stage 3). Catching it during texturing requires UV re-layout on the affected parts — not a small correction.

Material slot budget. UE5 renders each material slot as a separate draw call on the skeletal mesh. A character with twelve material slots contributes twelve draw calls per frame, per instance. For hero characters with one or two on-screen, this is typically acceptable. For characters that spawn in large numbers — enemies, crowd NPCs — the material slot count directly affects framerate. The brief should specify the material slot limit, and the texturing pipeline should respect it.
Master material workflow. Production-scale character pipelines in UE5 use parameterized master materials with material instances per character, rather than unique materials. This allows global shader changes (quality tiers, platform switches, lighting model updates) to propagate across all characters simultaneously. Building unique materials per character eliminates this flexibility and creates technical debt that surfaces during platform optimization.
Stage 6: Rigging and Skinning
Rigging is the stage where 3D character creation and animation production intersect. For the 3D artist, the output of rigging is a correctly skinned skeletal mesh that deforms cleanly and imports into UE5 without errors. For the art director, it’s the stage where style drift most commonly occurs post-approval — deformation issues that weren’t visible in static review surfaces only under animation.
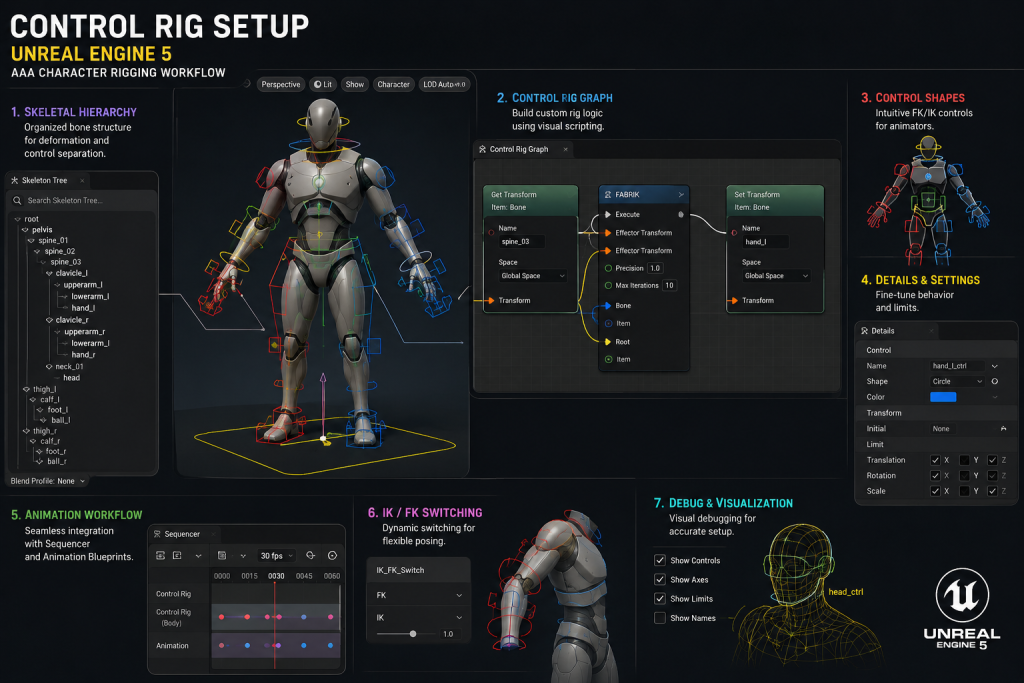
Skeleton requirements for UE5. UE5’s skeletal mesh system expects a specific hierarchy structure. The root bone should be at the world origin, with the pelvis or hips as the first locomotion bone above it. Bone naming conventions matter for animation retargeting — if the project uses UE5’s animation retargeting system to share animations across character variants, the skeleton must match the source skeleton’s hierarchy or use a compatible IK Rig retargeting setup.
Control Rig vs. DCC rigging. UE5’s Control Rig system allows procedural rigging and animation directly inside the engine — no round-trip to Maya or 3ds Max required. As Epic’s animation team noted in their UE5.5 breakdown with 80.lv, the Skeletal Editor in UE5.5 can now edit mesh LOD weights directly, which previously required back-and-forth between DCCs. For new projects starting on UE5.3 or later, evaluating Control Rig as the primary rigging workflow is worth the investment in setup time. For projects migrating from UE4 or with established Maya pipelines, DCC-side rigging with FBX export remains the standard path.
“Editorial illustration created for visual reference purposes. It does not represent a real project, client work, or official software screenshot unless stated otherwise.”
Skinning quality. Skinning assigns vertices to bones with weight values that control deformation. Poor skinning at joints — too few influences, incorrect weight distribution, hard edges at skin seams — produces deformation artifacts that are only visible in animation. The standard validation pass for skinning is a pose test covering the full range of motion the character will use in gameplay: crouch, run, aim, reload, death. A character that passes static review and fails animation review is a Stage 6 failure that escaped Stage 6 validation.
Blend shapes / morph targets. Characters requiring facial animation or clothing simulation need blend shapes (called morph targets in UE5) authored as part of the rigging stage. Blend shapes must be exported with the skeletal mesh and validated at import — UE5’s FBX import pipeline supports multiple morph targets per file. Missing blend shapes discovered at animation production are a full-round correction.
Stage 7: LOD Setup, Physics Assets, and Import Validation
The final stage before delivery is in-engine setup: LOD configuration, physics asset creation, and import validation.
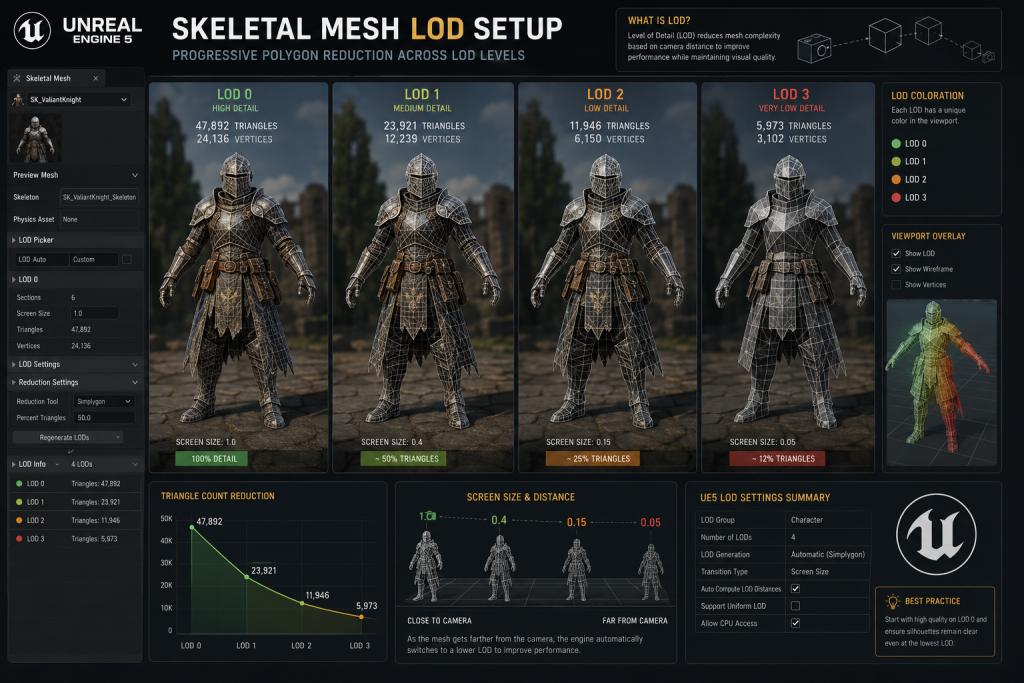
LOD setup in UE5. Skeletal meshes can use UE5’s auto-LOD generation (Skeletal Reduction) or manually authored LOD meshes. For hero characters, manual LOD authoring is standard — auto-reduction degrades silhouette quality at LODs 1 and 2 in ways that are visible on-screen. For background characters or NPCs with limited screen presence, auto-LOD is acceptable. LOD transitions should be validated in-engine under actual gameplay camera distances, not estimated from desktop viewport.
“Editorial illustration created for visual reference purposes. It does not represent a real project, client work, or official software screenshot unless stated otherwise.”
Physics asset. Every character that uses physics-based collision (ragdoll, cloth simulation, capsule-based hit detection) requires a Physics Asset in UE5. The physics asset defines the collision bodies and constraints that govern physical behaviour. For characters with cloth — capes, loose fabric, secondary motion elements — the physics asset complexity directly affects performance. A physics asset with forty-plus bodies on a character that spawns twenty times simultaneously is a performance bottleneck the art team creates and the engineers inherit.
Import validation checklist. Before a character is delivered as production-ready, it should pass the following in-engine checks:
- Skeletal mesh imports without errors or warnings in the Output Log
- All LOD levels render correctly at appropriate screen distances
- Normal maps display without seam artifacts under directional lighting
- Material instances apply correctly to all material slots
- Physics asset simulates without explosive behaviour in the asset editor
- Morph targets (if any) respond correctly in the morph target preview panel
- Animation retargeting (if applicable) produces acceptable results with the source animation set
Any item on this checklist that fails at delivery means it will fail at the milestone gate. Delivering a character that passes visual review but fails import validation is not delivery — it’s deferred rework.
The Three Pitfalls That Consistently Break AAA Character Pipelines
Across mid-core and AAA productions, the same failure modes surface repeatedly — not because teams lack skill, but because the pipeline conditions that produce them are predictable.
Pitfall 1: Technical brief arrives after modeling begins. The polycount budget, LOD targets, material slot limit, and skeleton requirements are the load-bearing parameters of the entire pipeline. When they arrive after modeling begins — or are revised after Stage 3 — every downstream stage has to absorb the change. The cost is not a single correction; it cascades through baking (cage must be rebuilt), texturing (UV density may need revision), rigging (skeleton may need restructuring), and import. A one-week delay in the technical brief at Stage 1 becomes a three-to-four week correction window at Stage 5. This is also why production teams need clear ownership structure, pipeline coordination, and outsourcing strategy from the start of development.
Pitfall 2: Baking and texturing treated as a single continuous pass. On compressed timelines, teams sometimes move the character from baking to texturing without a formal bake validation round. The baking artifacts — tangent space seams, cage projection errors, mip-level bleeding — get painted over during texturing, becoming invisible in the texturing tool but surfacing in-engine under real lighting. Correcting a bake artifact after texturing requires rebuilding the texture maps from the corrected bake, not touching up the existing maps.
Pitfall 3: In-engine validation deferred to QA. Import validation, LOD review, physics asset testing, and animation retargeting checks are treated as QA steps rather than pipeline steps. This means the first time the character runs in-engine under real conditions is during QA — when the correction window is at its shortest and the cost of rework is at its highest. Production-grade pipelines run in-engine validation at every stage gate, not at QA entry.
Pipeline Efficiency Starts Before the First Polygon
The most expensive characters in AAA production are not the technically complex ones. They’re the ones that moved through the pipeline without a locked brief, without stage-gate validation, and without in-engine testing until QA. The work is not harder — the schedule doesn’t compress the problem away; it amplifies it.
A 3D character pipeline for UE5 that works under production pressure is one that treats every stage output as a deliverable, not a draft. The technical brief is a deliverable. The bake validation is a deliverable. The in-engine import check is a deliverable. When each stage gate holds, the character that reaches the milestone review is the character that was spec’d, not a version of it.
The skeletal mesh optimization, the polycount budget, the LOD configuration — these are not polish steps. They’re the production contract between the 3D team and every team downstream.
At Nasty Rodent, we’ve built and shipped 3D character pipelines across mid-core and AAA productions — from concept lock through final in-engine delivery. Based in Tallinn, Estonia, our team of 40+ artists works within existing production frameworks or brings our own pipeline structure to projects where it’s needed. Our portfolio includes characters and assets for Squad, Ready Or Not, Mutant Year Zero, Starship Troopers: Extermination, and Miasma Chronicles. If your character pipeline has a stage that’s consistently producing rework — or if you’re building one from scratch — we can help.