The Production PBR Texturing Workflow in Substance Painter
-

Written byDenys Zadoienyi
-

Updated on06.07.2026
-

Time to read14 min

- Why a generic texturing pass falls apart by the third asset
- What a production PBR texturing workflow actually looks like, stage by stage
- The map set: what each PBR channel controls and where it breaks
- Where the trap hides in cross-engine PBR texturing
- Why you can’t cut corners on PBR consistency
- Stylized or photoreal: the workflow doesn’t change, the calibration does
- How to keep texturing efficient without losing fidelity
- Three ways to texture a game asset, compared
- How to choose a texturing workflow — and a team — that holds up
A PBR texturing workflow is the part of production where a model stops being geometry and becomes a material — and it is also where a scene quietly falls apart if the discipline isn’t there. A rifle that looks flawless on its own turntable, a character who reads perfectly in a portfolio shot, an environment prop that nails its reference photo: put all three in the same frame under the same light, and if their materials were authored to different rules, the shot looks wrong in a way nobody on the call can immediately name. For an art director signing off a visual target, that unnamed “wrong” is the entire job.
“Editorial illustration created for visual reference purposes. It does not represent a real project, client work, or official software screenshot unless stated otherwise.”
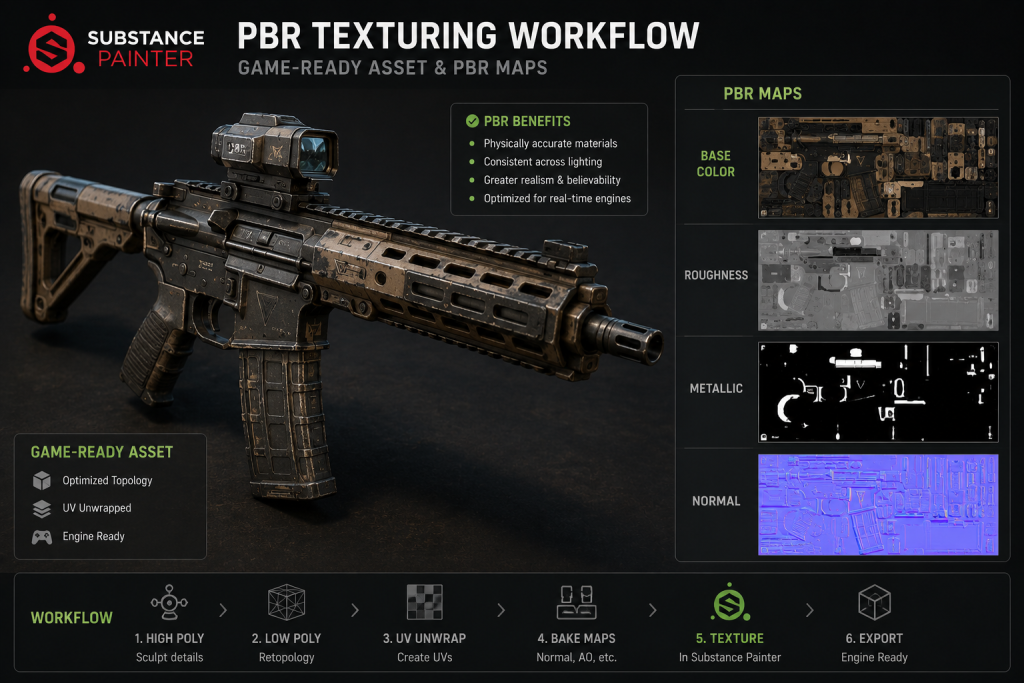
Definition. A PBR texturing workflow is the sequence that turns a game-ready mesh into physically based materials — base color, roughness, metallic, normal and supporting maps authored to real-world light behaviour. In game art it runs from UVs and baking through material authoring in Substance Painter to engine-ready export, so surfaces stay believable across lighting and platforms.
Why a generic texturing pass falls apart by the third asset
The first asset always looks fine. A skilled artist can hand-tune one prop until it sings, adjusting values by eye against a single skybox until the beauty shot lands. The problem is that a game is never one asset. It is a content plan of dozens or hundreds, textured over months, often by more than one pair of hands — and “tuned by eye against a single sky” does not survive that.
Here is what actually happens without a shared PBR texturing workflow. The second artist reads roughness slightly brighter than the first. A metal on one weapon sits at a reflectance the base color never accounts for. By the third asset in a set, an art director looking at a lineup sees the thing they most dread: characters and environment reading like they came from two different games. That is style drift, and it starts exactly there — at the third asset, when there was no hard rule to hold the line.
The cost of that is not abstract. On the projects we’ve textured, a set that drifts doesn’t fail loudly — it fails in review, one polish pass at a time. A lead flags PBR consistency on a lineup, the assets go back, roughness ranges get re-authored, and a milestone that should have closed on a first-pass approval instead spends its slack on rework. For an art director, that reads as lost lookdev cycles and a visual target that keeps slipping. For a producer sitting in the same review, the same problem reads as milestone risk and re-texture days that were never in the schedule — in our experience, days and sometimes weeks of unplanned re-authoring once a full character’s material set has to be reworked late, depending on how many assets already passed first review. The two roles are watching the same failure from two chairs, and both of them trace it back to a texturing stage that was treated as decoration instead of infrastructure.
What a production PBR texturing workflow actually looks like, stage by stage
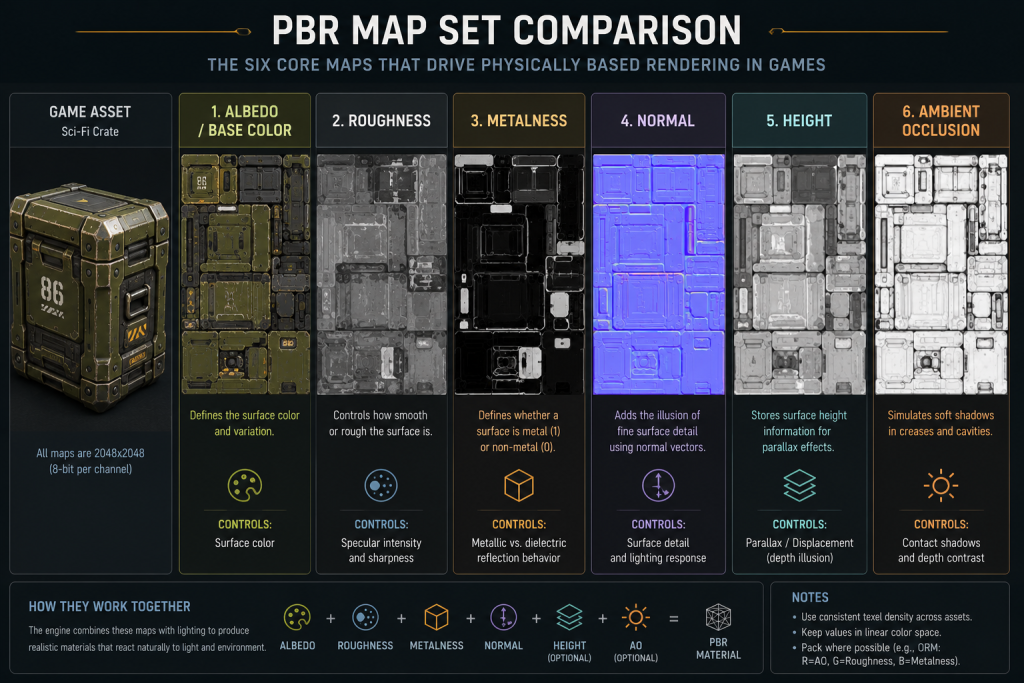
A texturing pipeline for games is not “open Substance Painter and paint.” It is a fixed sequence where every stage feeds the next, and skipping the boring early stages is what causes the expensive late failures. Six stages carry an asset from mesh to engine.
“Editorial illustration created for visual reference purposes. It does not represent a real project, client work, or official software screenshot unless stated otherwise.”
- UV layout and texel density. Textures are only as good as the UVs under them. Seams go where curvature or occlusion hides them; islands get even texel density so a face doesn’t read sharper than a boot; padding prevents mip bleed. Get this wrong and no amount of painting saves it — a clean UV layout is the real foundation of everything downstream.
- Baking. High-poly detail is transferred onto the low-poly mesh — baking high-poly detail into normal and ambient occlusion (AO) maps, plus curvature and thickness that generators will lean on later. A broken bake here poisons every mask above it.
- Base materials. A fill layer establishes the underlying material — the plastic, the steel, the leather — with its albedo, roughness and metallic values set before a single detail goes on top.
- Masks and generators. Edge wear, grime, scratches and dirt are driven procedurally off the baked curvature and AO through masks and generators, and referenced non-destructively with anchor points so a change low in the stack updates everything above it.
- Channel packing. Grayscale maps are combined to cut texture memory, texture bindings and shader sampling cost before they ever reach the engine.
- Engine export. The right preset writes the maps in the format the target engine expects — and this is the step most likely to look correct in the viewport and wrong in-engine.
The reason this ordering matters is signal integrity: a mistake at stage one doesn’t announce itself until stage six, inside Substance Painter or the engine, after the low-poly is locked and the high-poly was signed off. That is why we treat the early stages as gates, not suggestions.
Production note. In Substance Painter every layer can carry values for all channels at once — base color, roughness, metallic, normal and height — not just colour. That is why one well-built smart material can re-skin an entire asset in a click, and also why a single sloppy fill layer can quietly wreck five maps at the same time.
The map set: what each PBR channel controls and where it breaks
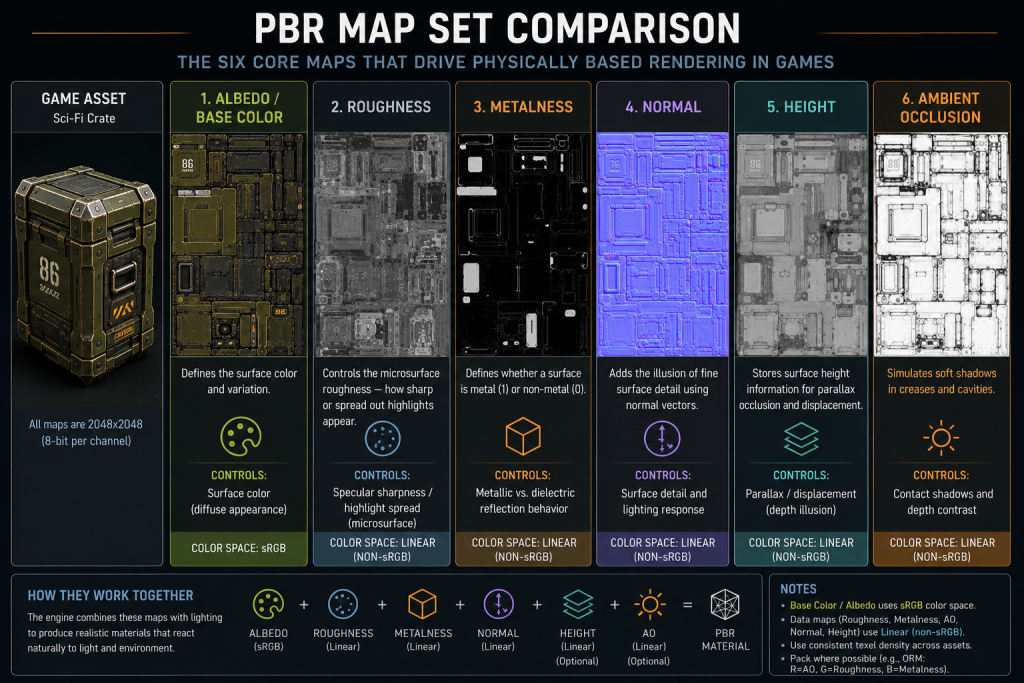
Under the whole albedo, roughness, metalness workflow sits one idea worth stating plainly: a surface can’t reflect and scatter more light than it receives. That is energy conservation, and as Marmoset’s primer on physically based rendering lays out, it is what lets an artist author believable materials without breaking the laws of physics — a highly reflective surface shows little diffuse colour, and a bright diffuse surface can’t be very reflective. Metals and non-metals distribute that energy differently. In the metallic/roughness model a pure metal has zero diffuse — its base color becomes the reflected (specular) colour, and metals reflect roughly 60–90% of light. Non-metals keep a diffuse colour plus a smaller, near-neutral specular response and reflect only a few percent. That is also the single most common calibration mistake — authoring a metal’s base color as if it were a painted plastic, so the surface reads wrong under every sky.
“Editorial illustration created for visual reference purposes. It does not represent a real project, client work, or official software screenshot unless stated otherwise.”
Each channel does one job, and each has a signature failure mode.
| PBR channel | What it controls | Common mistake | Red flag on review |
| Base color / Albedo | Diffuse colour for non-metals, reflected tint for metals; no baked lighting | Painting AO or highlights into it | Dirt that doesn’t move when the light does |
| Roughness | Microsurface — matte vs glossy | Flat, single-value roughness | Everything reads like the same plastic |
| Metallic | Metal vs non-metal (near 0 or 1) | Grey midtones “to be safe” | Muddy, half-metal surfaces |
| Normal | Faked surface detail from the bake | Wrong OpenGL/DirectX handedness slipping through a vendor’s export | Inverted lighting caught at integration — rework after sign-off |
| Height / AO | Depth cues and contact shadow | AO too strong, killing form | Painted-on shadows that fight the engine |
The rule that ties the table together: variation lives in roughness, not in faked highlights. Scratches, polish, abrasion — those are authored into the roughness map, and a correct PBR system shows both the change in reflection shape and its intensity for free. When we review a set, a flat roughness map is the first thing we send back, because it is the clearest sign someone was painting the look instead of authoring the material.
Where the trap hides in cross-engine PBR texturing
Two assets can be textured to identical values and still look like different games once they hit different engines. That is not an art problem — it is a workflow-and-export problem, and it is where PBR texturing game art most often breaks after everyone thought the hard part was done.
Metallic/roughness vs specular/glossiness
There are two PBR workflows, and only one is the modern default. Metallic/Roughness is the production default in Substance Painter and Unreal; Unity supports it too, but works in smoothness rather than roughness and packs it differently depending on shader and render pipeline. Specular/Glossiness is the older approach — still valid, but rarely the right call for a new game pipeline. Roughness and glossiness are the same information inverted — glossiness equals one minus roughness — so mixing them up doesn’t crash anything; it just makes every surface read backwards. The Polycount PBR reference collects the calibration charts that keep a team on the same values, which matters far more than which workflow you pick.
Normals, smoothness and packing
Three specific traps account for most of the “why does it look wrong in-engine” tickets. First, normal map handedness: OpenGL and DirectX flip the green channel, so a normal baked for one and imported as the other lights every dent inside-out. Second, Unity reads smoothness, the inverse of roughness — the same map, packed and interpreted differently. Third, channel packing: by combining occlusion, roughness and metallic into one RGB texture (ORM), the shader samples one map instead of three — cutting texture fetches from three to one, loading one texture into memory rather than three, and letting block compression (BC7) work more efficiently on a single RGB than on three separate textures. That, not any raw byte count, is where the memory and runtime savings come from. Get the packing order or the colour-space flag wrong, though, and the shader quietly reads garbage.
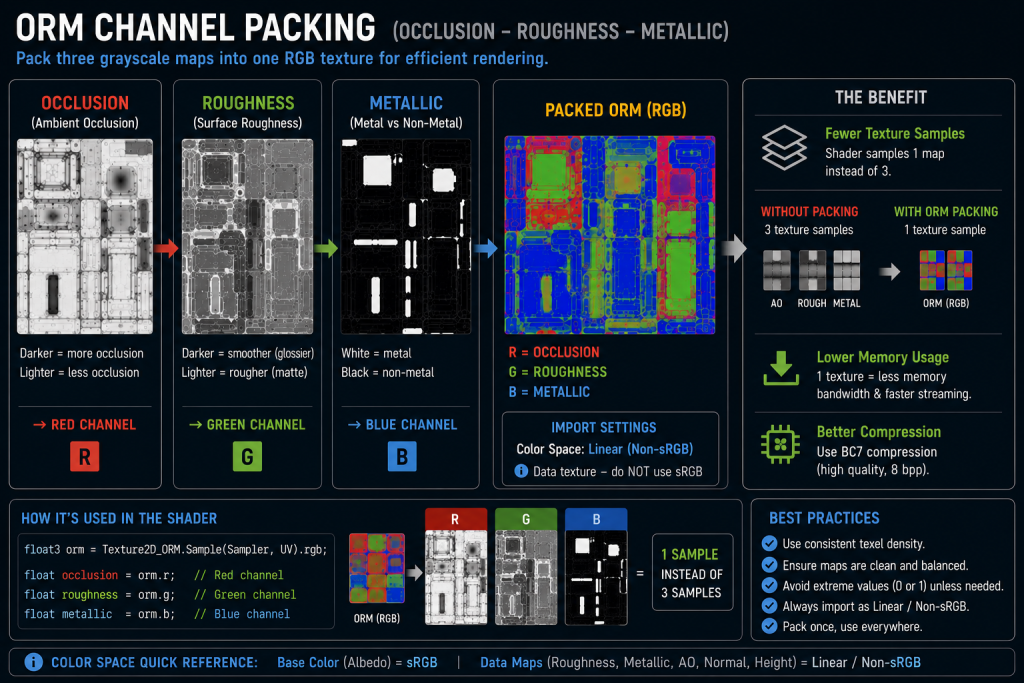
“Editorial illustration created for visual reference purposes. It does not represent a real project, client work, or official software screenshot unless stated otherwise.”

This is exactly why export isn’t the finish line. We validate a textured asset inside the target engine, under standard lighting, before it counts as delivered — because the same maps can behave differently across Unity and Unreal, and catching a handedness or packing flip at authoring costs minutes while catching it at integration costs a milestone.
Why you can’t cut corners on PBR consistency
Style drift starts at the third asset if there is no hard style guide — and PBR material authoring is where that guide either lives or doesn’t. This is the point where the whole thing can go sideways, so it’s worth being blunt about the failure.
When a set is textured without a shared reference for values, each asset is individually defensible and the group is a mess. A character passes on its own. An environment passes on its own. Together, under one light on a beauty shot, the character’s metals sit hotter than the world’s, the roughness ranges don’t agree, and the silhouette readability that survived on a turntable dissolves the moment the two share a frame. Nobody authored that clash on purpose; it is the sum of a dozen small, reasonable decisions made without a rule. And it surfaces at the worst possible time — a lookdev review with the art director in the room, late enough that fixing it means re-opening assets that were already signed off.
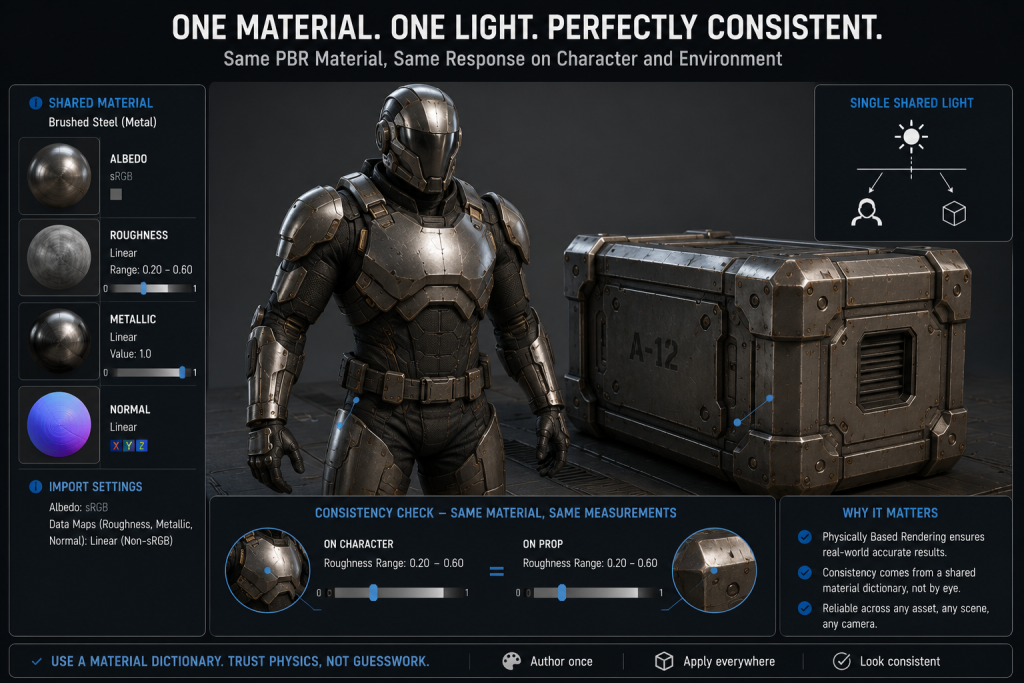
“Editorial illustration created for visual reference purposes. It does not represent a real project, client work, or official software screenshot unless stated otherwise.”
The way out is not more talent. It is a material dictionary: locked value ranges for the metals, the plastics, the fabrics and the skin that everyone on the set authors against, so PBR consistency is a property of the pipeline rather than a heroic act by whoever textures last. On our 3D character modeling work, that dictionary is what lets a set stay coherent across artists — the character and the world hold the same visual target because they were never allowed to drift from it in the first place.
Stylized or photoreal: the workflow doesn’t change, the calibration does
A common misread is that stylized games skip PBR. Most don’t. A stylized project usually runs the same physically based map set — energy conservation still applies, metals still read as metals — it just calibrates toward exaggerated value separation and cleaner reads instead of grime and micro-detail. There are deliberately hand-painted pipelines that minimise or bypass PBR, but even those keep the same production discipline; more often the pipeline is identical and only the target moves.
Where it genuinely diverges is asset type, not art style. Hard-surface work leans on crisp bakes, tight edge wear and precise metal/non-metal separation, which is why PBR-textured hard-surface weapons live and die on their curvature and roughness maps. Organic work leans harder on subtle albedo variation and softer roughness gradients. Same six stages, different emphasis — and treating a creature and a rifle as the same texturing job is how one of them ends up under-authored.
How to keep texturing efficient without losing fidelity
Efficiency in a Substance Painter game production pipeline does not come from painting faster. It comes from not re-doing work. Four disciplines do most of that.
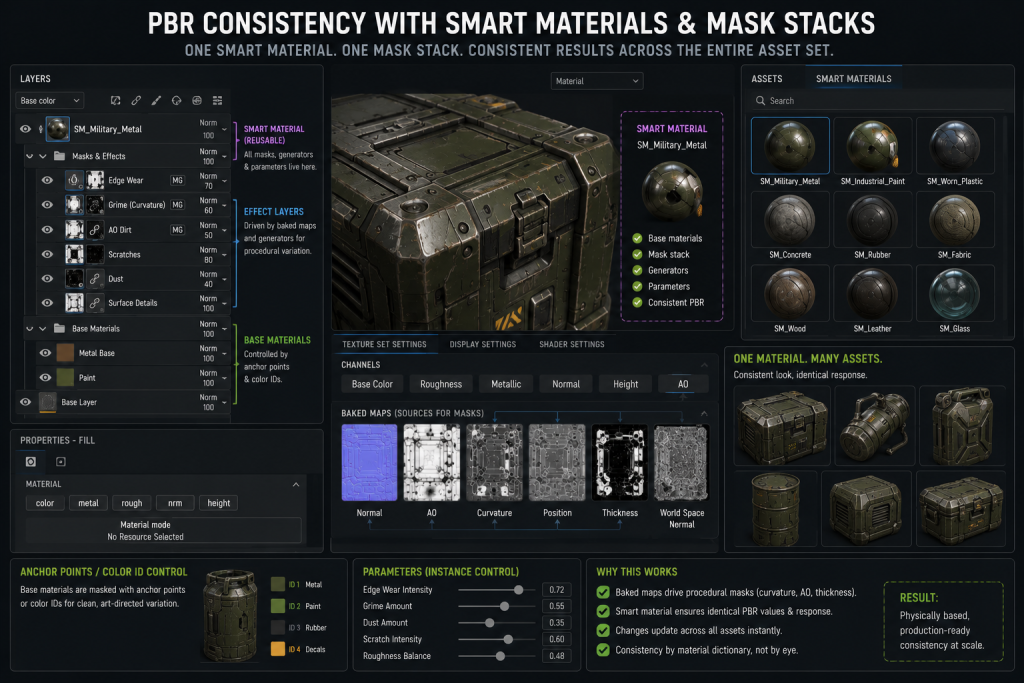
“Editorial illustration created for visual reference purposes. It does not represent a real project, client work, or official software screenshot unless stated otherwise.”
- Smart materials and shared masks. Author a material once, reuse it across the set, and the second asset costs a fraction of the first — and fewer unique materials on screen also means fewer material instances and fewer draw calls, which is where real-time cost actually accrues.
- Texel density targets. Many teams standardize around 512–1024 px/m depending on camera distance, checked with a checker pattern before the bake — so nothing gets re-textured later just because it was authored at the wrong resolution.
- Channel packing, compression and streaming. ORM packing plus modern block compression (BC7 on desktop, ASTC on mobile) reclaims memory and sampler cost. For an everyday prop set, standard mipmapping and texture streaming keep VRAM in check; Unreal’s Streaming Virtual Texturing is a heavier tool aimed at landscapes and a handful of uniquely huge, high-resolution meshes — powerful there, but it carries its own setup and lookup cost, so it isn’t the default for normal props.
- Author to the texture budget. Tie working resolution to the final budget and camera distance. For hero assets, authoring at a higher resolution and downscaling can preserve cleaner masks and reduce aliasing; for background props, painting near ship resolution is usually the better trade.
None of this is exotic. It is the difference between a texturing stage that scales to a content plan and one that quietly consumes the schedule one re-do at a time.
Our approach
The failure I described — a set that drifts because texturing was treated as polish, not infrastructure — is the one we build against. At Nasty Rodent we texture against locked material dictionaries and validate every asset in the target engine before it’s called done, so a set stays consistent from the first prop to the last hero. If that consistency is your bottleneck, it’s exactly what Nasty Rodent’s game-ready 3D prop production is built for. More on the studio, the team and how we work is in the banner below.
[BANNER: about-us-bottom]
Three ways to texture a game asset, compared
| Approach | Core maps | Best for | Engine support | Main gotcha |
| Metallic / Roughness | Base color, roughness, metallic, normal | Most game art, PBR pipelines | Native in UE5; Unity via smoothness packing | Grey metallic midtones |
| Specular / Glossiness | Diffuse, specular, glossiness, normal | Legacy assets, some VFX | Supported, not default | Inverted vs roughness |
| Hand-painted / stylized | Base color-led, light PBR support | Stylized & mobile titles | Both, with care | Skipping PBR entirely |
Takeaway: for a new game production, Metallic/Roughness is the default worth standardizing on — it’s what the major engines expect, and it keeps the whole set on one set of rules.
How to choose a texturing workflow — and a team — that holds up
The decision that actually protects your visual target isn’t which map format you pick; it’s whether the whole set is authored against one set of rules. Standardize on Metallic/Roughness, lock a material dictionary before the first asset, validate in-engine before anything is called done — and treat texturing as pipeline infrastructure, not a final polish.
If you want a fast read on whether an external team can hold that line for you, we’ll set up an art style alignment call with a senior art lead — thirty minutes on your style guide and PBR consistency target, an honest read on where our texturing would fit, and the risk points flagged before any commitment. A full production brief isn’t required to start — a style guide, reference board or target asset is enough for the first conversation.
Send your target and reference to business@nastyrodent.com, or book the call directly from the banner above.