Modular Prop Kits for Games: Grid Systems, Snapping, and Reuse
-

Written byDenys Zadoienyi
-

Updated on17.07.2026
-

Time to read17 min

- What Makes a Prop Kit “Modular” — the LEGO-Block Logic
- Grid Systems: The Snap Grid vs the World Partition Grid
- Snapping Strategy: Pivot Placement and Alignment Rules
- Naming Conventions for Modular Kit Families
- Trim Sheets and Texture Atlas Planning for Kits
- Kit Optimization and Reuse Economics
- World Partition and Modular Kits at Scale
- Production Patterns from Large Modular Worlds
- Our Approach at Nasty Rodent
- Snap Grid vs World Partition Grid at a Glance
- Scoping a Kit That Actually Scales
Modular prop kits for games are the backbone of every AAA open world built on a production schedule instead of a blank check — a small set of interlocking pieces, reused hundreds or thousands of times, standing in for the impossible task of hand-modeling every wall, floor, and corner a player will ever see. In production use, “modular prop kit” covers the full range of reusable, snap-together environment-building pieces — walls, floors, corners, doorways, façade modules, trims, and the dressing props that populate them — not just standalone set-dressing objects; this guide focuses on the architectural end of that range, since that’s where grid, snap, and connection-matrix planning matter most. Done well, a kit disappears: players never notice the same three wall segments repeating across a district. Done poorly, the grid shows, the world reads as a tileset instead of a place, and the team that built it usually discovers the problem only after the kit is already deep into production.
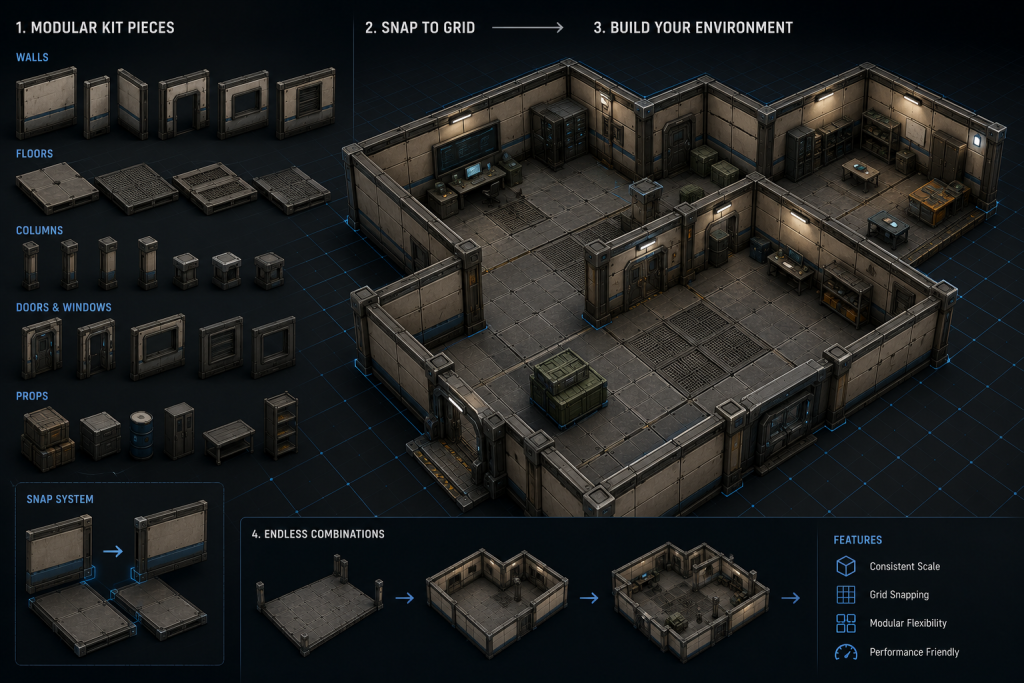
“Editorial illustration created for visual reference purposes. It does not represent a real project, client work, or official software screenshot unless stated otherwise.”
This guide covers the grid-and-snap mechanics that make a modular kit actually function — not just the concept of “build reusable pieces,” but the specific systems that separate a kit that assembles cleanly from one that fights the level designer at every placement. Getting modular prop kits for games right is a planning discipline as much as a modeling one, and most of the failure modes covered below trace back to a decision skipped at the kit-planning stage, not a mistake made in the modeling software. This guide also covers a distinction that gets flattened in most explainers: the grid an artist snaps pieces to during authoring is not the same grid Unreal Engine 5’s World Partition uses to stream the world at runtime, and conflating the two causes real production problems once a kit scales past a demo scene.
What Makes a Prop Kit “Modular” — the LEGO-Block Logic
A modular kit is a constrained set of interlocking pieces designed to a shared scale and connection logic, so that any piece can attach to any compatible piece without gaps, overlaps, or visible seams. The LEGO comparison is accurate at the structural level: every piece shares a base unit, every connection point is predictable, and the creative work happens in how pieces combine, not in modeling each combination from scratch.
The discipline that separates a working kit from a frustrating one is defined before a single mesh exists, at the kit-planning stage — deciding the base unit, the connection rules, and which pieces the kit needs to cover every configuration a level designer will actually ask for. Skip that planning and the symptoms show up predictably during assembly: gaps at connection points, pieces that only combine in specific rotations, or a level designer requesting a transition piece that was never scoped because nobody mapped the full connection matrix up front.
A connection matrix, in practice, is a simple table: every piece type listed against every other piece type it needs to meet, with the specific transition geometry that connection requires. A straight wall meeting a straight wall needs no transition piece at all. A straight wall meeting a corner needs a corner piece. A wall meeting a doorway needs a doorway frame piece sized to the kit’s base unit. Building this matrix before modeling starts is what prevents the mid-production discovery that the kit has no way to turn a corner at a height transition — a gap that’s cheap to catch on paper and expensive to catch after twenty pieces are already built around an incomplete assumption.
Grid Systems: The Snap Grid vs the World Partition Grid
The word “grid” gets used for two genuinely different systems in a UE5 production, and treating them as one thing is where a lot of kit-planning confusion starts.
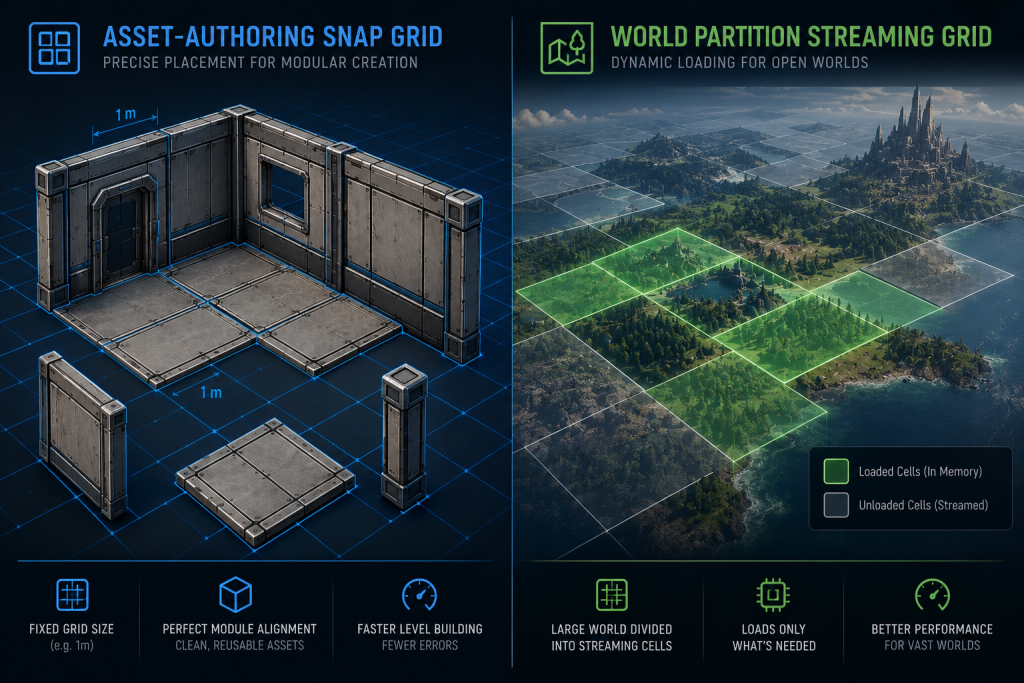
“Editorial illustration created for visual reference purposes. It does not represent a real project, client work, or official software screenshot unless stated otherwise.”
The asset-authoring snap grid is the small-scale grid an artist works to when modeling and placing kit pieces — commonly a 1×1×1 meter base unit for architectural kits, though the right unit depends on what the kit needs to represent (a doorway kit might use a finer sub-grid than a terrain-scale prop kit). Every piece’s dimensions are multiples of this base unit, so a wall segment, a floor tile, and a doorway all snap together without manual adjustment. This grid exists purely to keep kit pieces mathematically compatible with each other; it has nothing to do with how the engine streams the world at runtime.
The World Partition runtime grid is a completely different system: an automatic, distance-based level-streaming mechanism that divides the persistent world into grid cells and loads or unloads them based on distance from the player. According to Epic’s own documentation on World Partition, the system removes the older need to hand-divide large levels into sublevels, replacing that manual process with automatic streaming driven by runtime grid cell size — a setting configured in World Settings through runtime grid settings, chosen for streaming behavior and world scale rather than to match the dimensions of any individual kit piece. A modular kit built on a clean 1-meter authoring grid still needs its individual pieces correctly flagged for spatial loading so World Partition can stream them sensibly — but the kit’s authoring grid and the world’s streaming grid are unrelated numbers solving unrelated problems, and briefs that ask an artist to “match the kit to the World Partition grid” are asking for something that doesn’t map onto how the two systems actually relate.
Snapping Strategy: Pivot Placement and Alignment Rules
Snapping only works if every piece in the kit follows the same pivot convention — and this is the single most common source of a kit that looks fine individually but fails to assemble. A wall piece with its pivot at the geometric center behaves differently under snap-to-grid than one pivoted at a corner, and mixing conventions within one kit means every placement needs manual correction instead of a clean snap.
The convention that holds up in production: pivot at a consistent corner or edge of the piece’s bounding box — typically the bottom-front-left corner for architectural pieces — so that snapping one piece against another aligns both position and orientation without the level designer nudging values by hand. Floor pieces need their pivot at the same height reference as wall base pieces, or floor-to-wall connections develop a visible gap or overlap that’s tedious to catch in isolation and obvious the moment the kit is assembled at scale.
Rotation snapping needs the same discipline. If the kit’s connection logic depends on 90-degree rotations lining up cleanly, every piece needs geometry that’s actually symmetric or intentionally asymmetric at those rotation points — a piece with a stray decorative element that only reads correctly in one orientation breaks the kit’s promise that any piece works in any valid rotation.
Scale consistency matters just as much as pivot and rotation, and it’s the error that’s hardest to catch by eye. A kit piece exported at 0.98x or 1.02x of the intended scale still looks correct in isolation, but compounds visibly once dozens of pieces chain together — a corridor built from twenty wall segments at a 2% scale error each ends up meaningfully off from the level’s intended dimensions by the far end, and the level designer usually discovers this as “the corridor doesn’t line up” rather than tracing it back to a scale mismatch in the source kit. Validating every piece against the kit’s base unit before it enters the shared asset library — not after a level designer reports a mysterious gap three rooms into an assembled corridor — is the check that catches this before it compounds.
Naming Conventions for Modular Kit Families
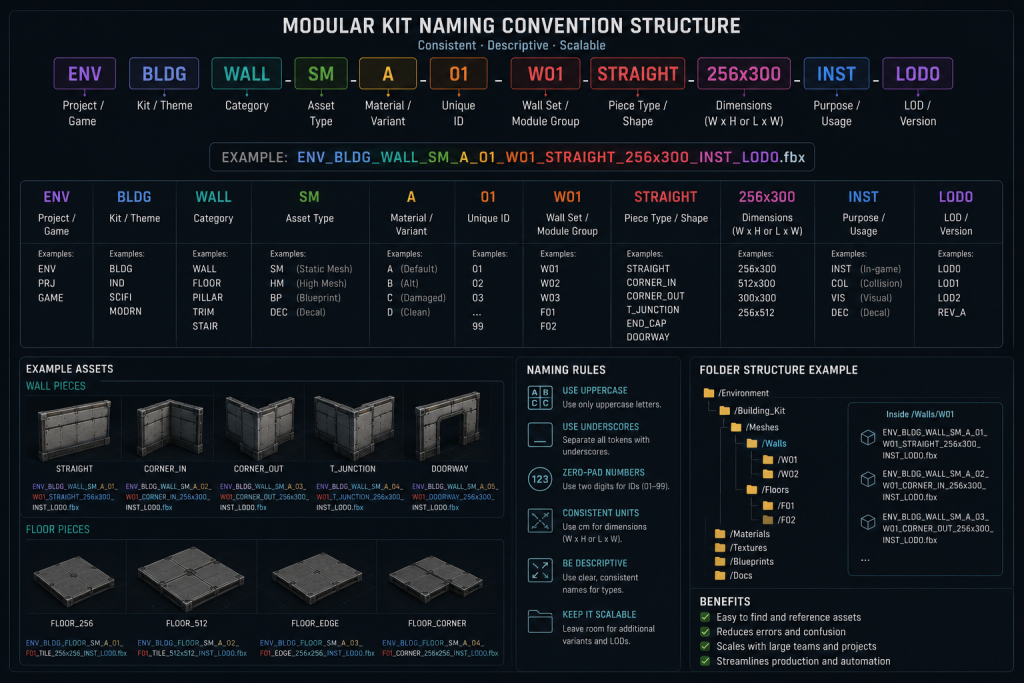
Naming discipline matters more for a modular kit than for almost any other asset category, because a kit’s value depends entirely on a level designer being able to find and combine the right pieces quickly. Our 3D props production pipeline guide covers general prop naming at library scale; modular kits need one additional layer on top of that baseline — a naming scheme that encodes the kit family and the connection type, not just the object.
A workable pattern: SM_Kit[KitName]_[PieceType]_[Variant] — for example SM_KitWarehouse_WallStraight_01, SM_KitWarehouse_WallCorner90_01, SM_KitWarehouse_FloorTile_02. The piece-type segment should describe the connection role, not just the visual content, so a level designer scanning a content browser full of kit pieces can immediately tell which pieces are straight runs, which are corners, and which are transitions — without opening each asset to check.
“Editorial illustration created for visual reference purposes. It does not represent a real project, client work, or official software screenshot unless stated otherwise.”
Trim Sheets and Texture Atlas Planning for Kits
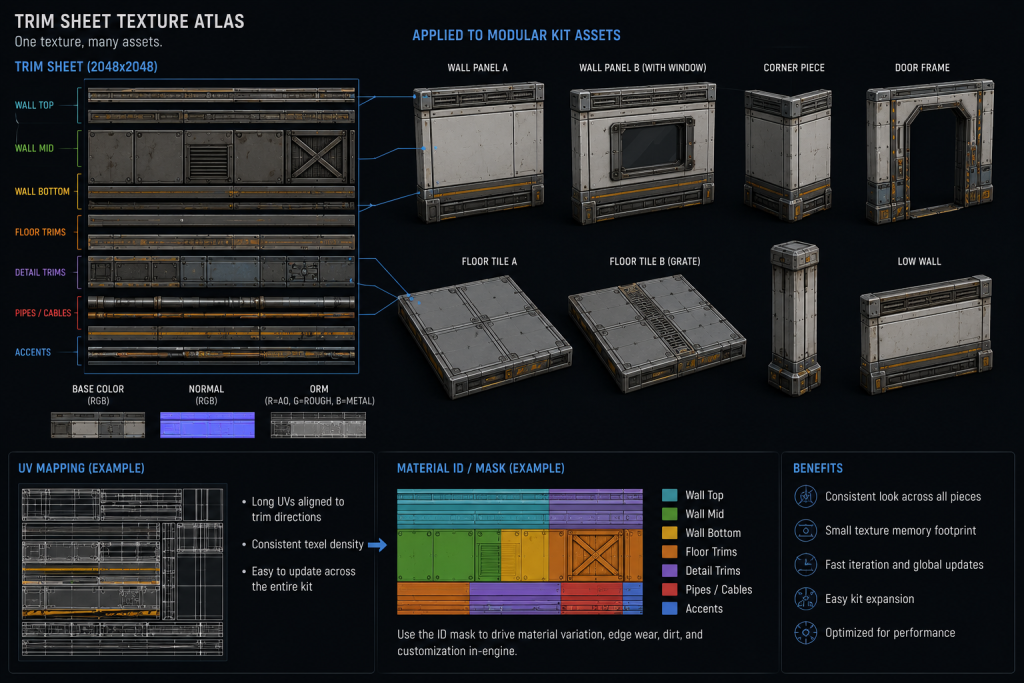
Trim sheet workflow and modular-piece ratio planning are covered in depth in our 3D environment production guide, including the practical split between modular pieces, hero assets, and tileable surface materials that a typical environment budget needs. The kit-specific addition worth flagging here: a trim sheet’s layout should be planned against the kit’s actual piece list, not built generically and hoped to fit. If the kit’s connection logic produces a predictable set of edge conditions — a corner always meets a straight run at 90 degrees, a doorway always interrupts a wall at a fixed height — the trim sheet can be laid out to match those specific transitions, which is what makes one compact texture atlas cover dozens of kit pieces without visible seams at the connection points.

“Editorial illustration created for visual reference purposes. It does not represent a real project, client work, or official software screenshot unless stated otherwise.”
The UV strategy that makes this work follows the same hard-edge-to-UV-seam discipline covered in our high-poly to low-poly baking guide: every kit piece needs a UV layout planned around the trim sheet’s fixed strips rather than unwrapped independently and fit to the atlas afterward. Planning UVs against a known trim layout during the kit’s blockout stage, before any piece goes to high-poly, is significantly cheaper than re-unwrapping a finished kit because the atlas didn’t anticipate a connection type the level design team actually needed.
Kit Optimization and Reuse Economics
The economic case for a modular kit is straightforward once a project reaches any meaningful scale: a well-scoped kit of 40–60 pieces can assemble hundreds of unique-feeling rooms and corridors, where the same production budget spent on unique, non-reusable geometry might cover a tenth of that footprint. The trade-off is real, though, and it shows up in two places if the kit is underplanned.
Draw call and instancing cost. Kit pieces are prime instancing candidates — the same wall segment repeated across a level should be instanced rather than duplicated as unique static meshes, for the same memory reasons that apply to any repeated prop at scale. A kit that isn’t planned with instancing in mind from the start tends to accumulate small per-piece variations (a slightly rotated UV here, a manually adjusted vertex there) that quietly break instancing eligibility across what should be identical, batchable geometry.
The “shows the grid” problem. A kit used exactly as designed, with no variation strategy, reads as repetitive once assembled at scale — the failure mode every experienced modular-kit designer references. The fix isn’t more unique geometry; it’s planned variation within the kit’s existing budget: material instance parameter shifts (color, roughness variation per placement), a handful of decorative “break” pieces that interrupt the pattern without breaking the connection logic, and decal or vertex-paint layers that add per-instance visual difference on top of shared geometry. A widely cited breakdown of building huge open worlds with modular kits frames avoiding this kind of “art fatigue” — where the same kit pieces read as visibly repetitive — as one of the central skills that separates a functional kit from a genuinely successful one, and it’s a planning problem, not a modeling one.
Two more advanced techniques handle the cases plain variation strategy doesn’t reach. Spline-based placement replaces hand-placing repetitive linear elements — fences, pipes, corridors — with a spline the kit system samples automatically, selecting straight segments, corner pieces, and end caps from the kit based on the spline’s shape rather than a level designer placing and rotating each piece by hand; this speeds up placement and, done well, produces cleaner connections than manual placement because the system enforces the kit’s own snapping rules instead of relying on a human eye to catch a misaligned joint. World Aligned Textures, driven by triplanar mapping in the material, project a texture based on world position rather than each mesh’s individual UVs — which means dirt, grime, or weathering layered on top of a kit assembly reads continuously across the seams between separate meshes instead of stopping at each piece’s UV boundary. Combined with an RGB mask painted or generated per instance to control where that weathering shows up, this is what erases the last visual evidence that a wall was actually built from six separate pieces rather than one continuous surface — a level of polish that reads as genuine technical depth rather than a basic kit assembled competently.
World Partition and Modular Kits at Scale
In practice, level designers rarely place individual kit pieces one at a time directly into a large World Partition level — a raw wall segment placed and duplicated hundreds of times across an open world is unwieldy to manage and doesn’t give Unreal Engine any way to recognize that dozens of walls belong to the same reusable assembly. In many UE5 open-world or large-environment pipelines, the intermediate step is packing logical groups of kit pieces — a full room, a building façade, a repeating street segment — into Level Instances or Packed Level Actors, Blueprint assemblies, or procedural placement tooling, depending on the studio’s pipeline. Level Instances and Packed Level Actors are worth understanding regardless of which specific tool a given production settles on: a Level Instance bundles a set of actors into a reusable sublevel that can be placed repeatedly across the world, with edits to the source propagating to every placed copy; a Packed Level Actor does the same for static-mesh-only content, using instanced and hierarchical instanced static mesh components to batch identical geometry and cut draw calls, and it’s built to work with World Partition’s streaming and One File Per Actor systems rather than around them. For a kit-based production, this is the layer that actually sits between “a wall piece and a floor piece” and “a fully streamed open world”: kit pieces get assembled into packed, reusable groups first, and it’s the groups — not the raw pieces — that get placed at world scale.
Once individual kit pieces are packaged this way, the same spatial-loading considerations apply at the group level: static, background assemblies should generally stream with their World Partition cell rather than persist regardless of player distance, and a packed assembly with hard references reaching into a neighboring cell can still force unwanted chain-loading, the same failure mode that applies to unpacked pieces.
For UE5 productions specifically, many static, opaque or masked kit pieces are strong Nanite candidates. Packed Level Actors are commonly useful for dense static assemblies, while Nanite can reduce manual LOD authoring for the meshes inside those assemblies when material compatibility, deformation, collision, fallback, and platform constraints allow it — the same considerations covered in our guide to Nanite in Unreal Engine 5.
Production Patterns from Large Modular Worlds
Kit-based world building isn’t a shortcut studios reach for out of necessity — it’s the standard production approach behind some of the most well-regarded open worlds in the industry, and public GDC-style breakdowns of large RPG and open-world production repeatedly show the same underlying pattern. Modular kits aren’t just a workaround for smaller teams with limited budgets; they’re how large studios keep architectural variety, streaming performance, and production throughput under control at world scale, and the largest, most memorable open worlds in the industry are built this way rather than from unique, hand-modeled geometry. The specific asset names, kit sizes, and toolchains differ by studio and aren’t something we’ll attribute to any particular title without a direct, citable source — but the planning problems those studios solve are consistent across the industry: a defined base unit, a connection matrix that covers every configuration a level actually needs, a transition-piece budget, a variation strategy that prevents the kit from reading as repetitive, and clear rules for when a piece graduates from kit-standard geometry to a one-off hero asset.
Large-scale live-service and battle-royale titles built around player-facing construction systems are a related but distinct case: a building system players interact with directly imposes additional constraints — snap behavior has to work in real time, under gameplay pressure, not just for a level designer working carefully in an editor — that a purely artist-authored environment kit doesn’t need to solve. The underlying grid-and-snap logic is the same discipline either way, just with a different audience for the snapping behavior: an editor-side kit is validated by an artist doing an assembly pass before it ships, while a player-facing building system has to validate every possible connection in real time, with no artist in the loop to catch an edge case before a player finds it.
Our Approach at Nasty Rodent
Across our work for teams such as Offworld Industries, The Bearded Ladies Consulting, Reburn, Whimsy Games, Galaxy 4 Games, and Benner Games, we’ve seen the same pattern hold: a modular kit that’s planned properly at the connection-matrix and naming stage saves far more production time than it costs, and a kit that skips that planning ends up patched together with one-off exception pieces that quietly undermine the whole system. We scope kit planning — base unit, connection logic, naming, and trim sheet layout — before a single piece goes into production, specifically so the level design team gets a kit that assembles the way they expect rather than one that needs constant workarounds.
If your team is planning a modular kit for an upcoming UE5 or Unity production, our 3D props production work covers kit design end to end, from connection-matrix planning through engine-ready delivery.
Snap Grid vs World Partition Grid at a Glance
| Aspect | Asset-Authoring Snap Grid | World Partition Runtime Grid |
| Purpose | Keeps kit pieces mathematically compatible | Streams world content by player distance |
| Typical scale | Centimeters to a few meters per unit | Streaming cell size set for world scale and loading behavior, typically far larger than any individual kit piece |
| Set by | Artist, at kit design stage | World Settings, at level/streaming design stage |
| Failure mode if wrong | Pieces don’t snap cleanly, visible gaps or overlaps | Memory spikes, chain-loading, poor streaming performance |
| Who owns it | 3D artist / tech artist | Level designer / technical producer |
Scoping a Kit That Actually Scales
Modular prop kits for games earn their production value through planning done before modeling starts, not through cleverness applied after the fact: a clear base unit, a consistent pivot convention, a naming scheme that encodes connection type, and a trim sheet planned against the kit’s real piece list rather than built generically. Treat the asset-authoring snap grid and the World Partition streaming grid as the two separate systems they are, and the kit scales from a demo room to a full open-world level without the grid “showing” or the streaming system fighting the content built on top of it.
The teams that get the most reuse value out of a modular kit are the ones that treat the connection matrix, naming convention, and variation strategy as production deliverables in their own right — documented before modeling starts, not reverse-engineered from a finished kit after a level designer hits its limits. That documentation is also what makes a kit maintainable months later, when a new environment needs three additional transition pieces and nobody on the current team was there for the original planning conversation.
If your team is scoping a modular kit for an upcoming production and wants a second read on connection-matrix planning before modeling starts, we can set up a short call with our senior 3D lead — bring your current kit list or a rough piece breakdown, and we’ll give you a concrete read on where the assembly risks sit before they reach a level-design milestone.