3D Props Production Pipeline for AAA Games: Hero vs Environmental Props
-

Written byDenys Zadoienyi
-

Updated on16.07.2026
-

Time to read17 min

- Hero Props vs Environmental Props: Why the Distinction Changes Your Budget
- The Production Pipeline: Blockout to Engine-Ready Mesh
- Polycount Budgets by Prop Class
- PBR Texturing and Baking for Props at Scale
- VFX-Ready Mesh Setup — the Step Most Pipelines Skip
- LOD Strategy for Props: Why Percentage-Based Reduction Fails
- Memory Budget at Scale: When You Have 300 Props, Not 3
- Engine Integration: What Changes for Prop Libraries
- What a Prop Handoff Package Should Include
- Our Approach at Nasty Rodent
- Hero Props vs Environmental Props at a Glance
- Scoping a Prop Pipeline That Survives Production
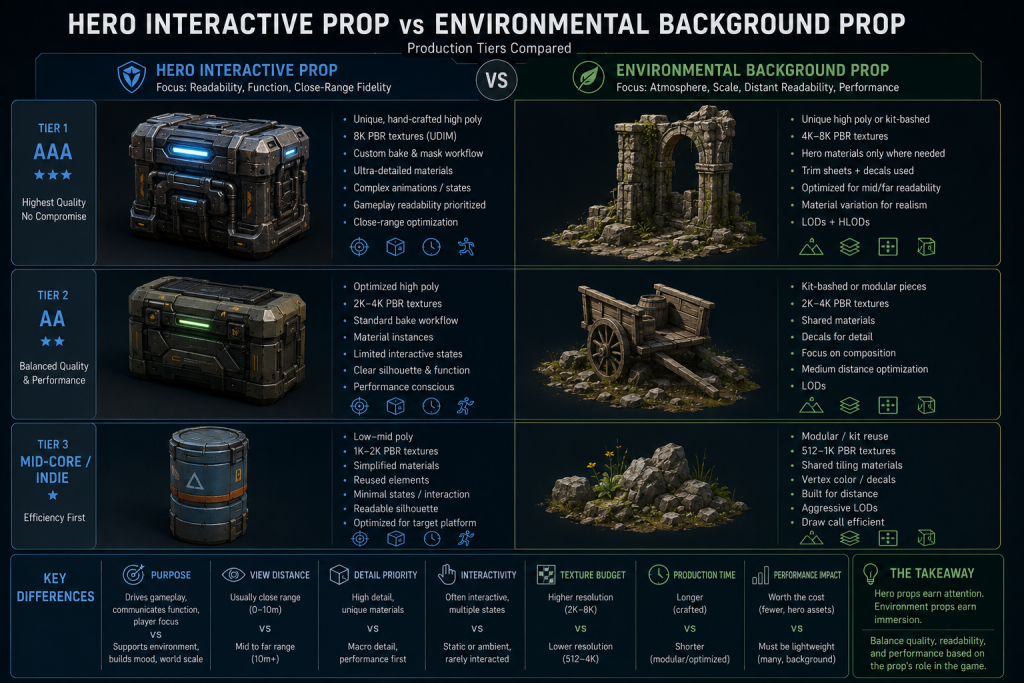
3D props production pipeline for AAA games is a phrase that hides a scoping problem: most pipelines are built once for a hero asset and then applied unchanged to the other 300 props on the level, or built once for background dressing and then stretched to cover the one prop a player picks up, examines, and carries for the entire game. Neither approach survives a full production cycle. Props aren’t a single asset category with one budget and one workflow — they’re a spectrum, and where a given prop sits on that spectrum determines its polycount target, its texture resolution, its LOD aggressiveness, and whether it needs a VFX-ready mesh setup at all.
“Editorial illustration created for visual reference purposes. It does not represent a real project, client work, or official software screenshot unless stated otherwise.”
This guide covers the full production pipeline for game props at AAA-tier — blockout through engine integration — with a specific focus on the split most explainers skip: hero, interactive gameplay props versus environmental, background props. It also covers a problem that’s rarely addressed directly: what happens to your pipeline discipline once you’re not producing one asset, but two or three hundred.
Hero Props vs Environmental Props: Why the Distinction Changes Your Budget
A hero prop is one the player interacts with directly, examines at close range, or sees repeatedly enough that its quality becomes part of the game’s perceived production value — a unique gameplay device, a key story object, an interactive terminal, a loot container the camera lingers on during a pickup animation. An environmental prop populates a scene without demanding individual attention — a crate in a warehouse stack, a pipe section along a wall, a piece of scattered debris. The player’s eye moves past it on the way to something else.
The split isn’t cosmetic — it’s a budget allocation decision made at the brief stage, before a single polygon exists. Treat every prop as a hero asset, and a 300-prop environment blows its production schedule and its memory budget before the level is a third dressed. Treat every prop as background, and the one object a player actually picks up and rotates in their hands reads as an obvious downgrade the moment the camera gets close.
This is the same allocation logic that governs weapon and vehicle art, which sit at the extreme hero end of the prop spectrum — a primary weapon the player carries for most of a session gets a fundamentally different budget than a crate. Our breakdown of the AAA weapon production pipeline covers that hero-tier extreme in detail; this guide covers the fuller spectrum a typical prop list actually spans, from that hero extreme down through the environmental bulk that makes up most of a level’s prop count.
The Production Pipeline: Blockout to Engine-Ready Mesh
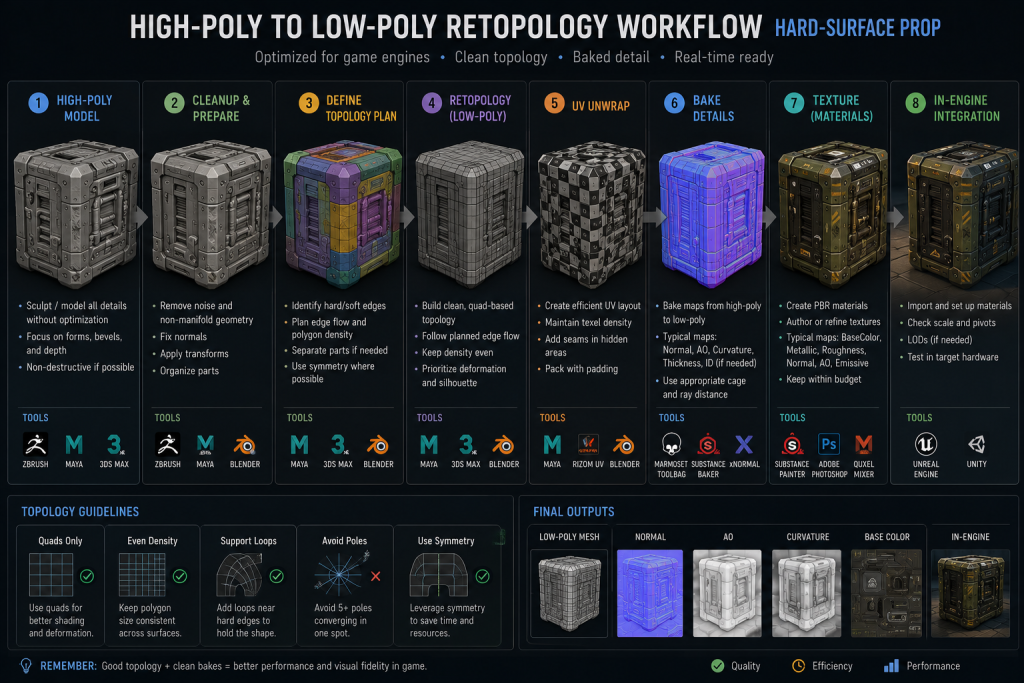
The core stages of a 3D props production pipeline are the same regardless of where a prop sits on the hero-to-background spectrum — what changes is how much time and review each stage gets.
“Editorial illustration created for visual reference purposes. It does not represent a real project, client work, or official software screenshot unless stated otherwise.”
- Briefing and reference gathering. Style guide alignment, target engine, platform budget, and — critically for props specifically — a tier assignment. A prop brief that doesn’t specify hero or environmental tier up front forces the artist to guess, and guesses tend to default toward over-building, which is where schedules quietly slip.
- Blockout. Scale and proportion validated against the player character and the scene grid before any detail work starts. For environmental props, blockout is often batched — a dozen crate variants blocked out together for silhouette variety. For hero props, blockout gets individual sign-off, sometimes against a concept art reference sheet.
- High-poly modeling. Sculpted in ZBrush for organic surface detail, or built with subdivision/hard-surface modeling in Maya, 3ds Max, or Blender for mechanical and constructed objects. This is the production’s source of surface truth — the stage where fine detail actually exists as geometry, before any of it gets baked down. The workflow splits meaningfully by prop type here: hero, hard-surface props are still hand-sculpted or hand-modeled from reference, while natural environmental props — rocks, debris, organic clutter — increasingly start from cleaned-up photogrammetry scans or scan-based libraries like Megascans rather than a sculpt built from scratch. The retopology and bake stages that follow are the same either way; what changes is whether the high-poly source is authored or captured.
- Retopology. The low-poly is built by hand for hard-surface assets, or derived from the high-poly through controlled decimation and cleanup. This stage is where the polycount budget assigned at the brief stage gets enforced — or quietly ignored, which is the single most common cause of a prop that looks fine in isolation but tanks frame rate once fifty copies are on screen.
- UV layout and baking. Normal maps, ambient occlusion, and curvature maps get baked from high-poly to low-poly. Hard-surface UV seams should generally follow hard edges to avoid shading artifacts at grazing angles — a rule that matters more for hero props viewed up close than for background props seen at a glance.
- PBR texturing. Base color, metallic, roughness, and normal maps built to match the project’s material library, with texel density matched across the prop set so nothing reads as visually “out of scale” against its neighbors.
- VFX-ready mesh setup. Covered in detail below — this stage exists for a specific subset of props and gets skipped by pipelines that don’t plan for it.
- LOD authoring. Covered in detail below.
- Engine integration. Import, material instance assignment, collision generation, and — for props specifically — decisions about instancing and batching that don’t apply the same way to unique hero assets.
For the retopology-to-bake portion specifically, our high-poly to low-poly baking breakdown goes deeper into the UV-seam and hard-edge rules that determine whether a bake holds up under close inspection — worth a look if a specific prop in your pipeline is showing seam artifacts.
Polycount Budgets by Prop Class
Triangle budgets for props vary meaningfully by tier and by target platform, and the ranges below extend the environmental-asset numbers already established in our 3D environment production guide for architectural pieces, scaled specifically for props rather than structural geometry. As a general guideline, for mid-core/AAA PC and console production: small background props (tools, loot, décor) typically fall in the 200–800 triangle range; mid-tier reusable props (furniture, crates, modular kit pieces seen at moderate distance) typically run 800–3,000 triangles; and hero interactive props — unique gameplay objects examined at close range, such as a key device or a story-critical container — typically require 8,000–25,000+ triangles on the final low-poly, depending on how much of the mesh silhouette is visible during the interaction that puts it in front of the camera. These ranges describe conventional optimized low-poly targets for non-Nanite or cross-platform production; current-gen AAA projects, first-person inspection props, cinematic close-ups, or Nanite-enabled static props may exceed these figures when the platform and rendering strategy allow it. A detailed community breakdown of a game-ready hero prop pipeline on Polycount walks through this high end of the budget in practice, from blockout through final bake.
These figures are a starting point for a 3D props production pipeline, not a spec — the exact allocation for any given prop is set during production planning based on view distance, interaction frequency, and platform target, not read off a table. A prop budget conversation that skips the tier question entirely is the most common source of mid-production rework we see: an artist builds a crate at hero-prop density because nobody told them it was set dressing, and half the render budget for that section of the level disappears into geometry nobody will ever examine closely.
PBR Texturing and Baking for Props at Scale
Individual prop texturing follows standard PBR workflow — base color, metallic, roughness, and normal maps baked from high-poly detail and refined in a texturing package. The Marmoset Toolbag documentation on baking props covers the practical bake-project setup, including cage adjustment and skew correction for props with awkward geometry — details that matter more than they should on any prop with tight interior curves or protruding elements.
The part that changes at prop-library scale is texture budget management across the set, not the individual asset. Texel density has to stay consistent across every prop that might appear in the same shot, or the inconsistency reads immediately once props are placed side by side in engine — a crate baked at a higher texel density than the pallet beside it looks like an asset from a different project. Material ID maps, baked early and used to drive smart-material assignment in the texturing package, become essential once you’re texturing dozens of variants rather than one hero piece — they’re what makes it possible to batch-apply a consistent material logic across a prop set instead of hand-painting each one from scratch.
VFX-Ready Mesh Setup — the Step Most Pipelines Skip
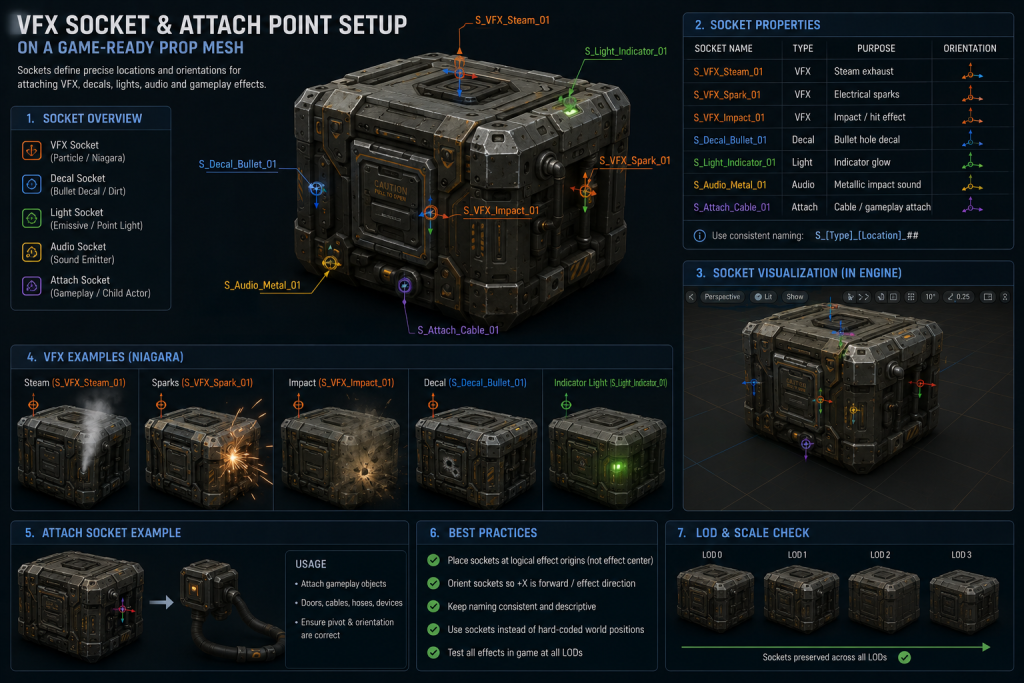
A prop that’s meant to break, emit particles, or trigger a destruction sequence needs preparation that standard game-ready delivery doesn’t include by default, and this is the stage most production briefs forget to specify.
Socket and attach points need to be placed on the mesh during the modeling stage, not added afterward — a muzzle-flash socket on a device, an impact-point socket on a breakable crate, a trail-emitter socket on a thrown object. Adding these after the mesh is already baked and delivered means either a rebuild or an approximate placement that never quite lines up with the visual silhouette.
“Editorial illustration created for visual reference purposes. It does not represent a real project, client work, or official software screenshot unless stated otherwise.”
Destruction-ready geometry — for props designed to break apart — needs pre-fractured pieces or a modular breakdown built into the source file, with each piece carrying its own clean UVs and a bake that holds up when the object is no longer whole. Retrofitting fracture geometry onto a prop that was modeled as a single sealed mesh is significantly more expensive than planning for it during blockout.
Material flags for VFX interaction — surfaces that need to support decal projection, dissolve effects, or emissive triggers need those material slots reserved during the texturing stage, because bolting an emissive channel onto a texture set that was baked without headroom for it usually means a re-bake.

None of this is difficult work in isolation. What makes it expensive is discovering the requirement late — after a prop has already gone through modeling, baking, and texturing sign-off, and the VFX team comes back asking for sockets that were never planned into the geometry. A prop brief that states which props need VFX-ready setup, and what kind, before modeling starts is the single highest-leverage line item in preventing this exact rework loop.
LOD Strategy for Props: Why Percentage-Based Reduction Fails
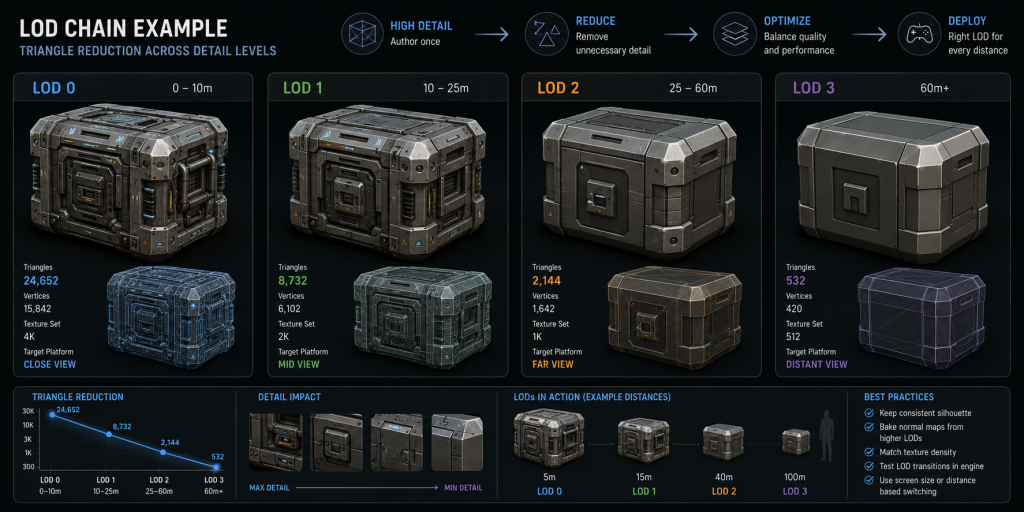
The standard approach — cut roughly 30–50% of triangles at each LOD step — works as a rough starting rule, but applied uniformly across a prop set without review, it breaks specifically at the transition most players actually notice: LOD0 to LOD1. A prop with a lot of thin geometry (handles, antenna, delicate hardware) loses exactly the features that define its silhouette at the first reduction pass, while a chunkier prop with the same triangle count might tolerate a much more aggressive first cut without any visible change.
“Editorial illustration created for visual reference purposes. It does not represent a real project, client work, or official software screenshot unless stated otherwise.”
For props specifically, the LOD strategy that holds up in production separates by prop tier rather than applying one rule to the whole set. Hero props, viewed up close and interacted with, need three to four LOD levels with the transition points manually reviewed — not just percentage-reduced — because a visible “pop” on an object the player is actively looking at reads as a bug, not an optimization. Environmental props viewed briefly and at distance can often run a more aggressive, largely automated LOD chain, since the player’s attention was never on that object’s silhouette in the first place. For UE5 productions specifically, many static, opaque or masked environmental props are strong Nanite candidates, which can remove most manual LOD authoring for that category. It doesn’t remove asset-planning work entirely: material compatibility still matters, since Nanite supports Opaque and Masked blend modes but not Translucent, so props needing mesh decals or translucent shading fall back to a traditional pipeline. Collision, UV strategy, and platform support still need the same review either way, and translucent, deforming, or special-case interactive props may still require a traditional LOD plan — our guide to Nanite in Unreal Engine 5 covers which prop categories qualify and which don’t.
Memory Budget at Scale: When You Have 300 Props, Not 3
Most prop-pipeline guidance is written around a single hero asset — a portfolio piece, a demonstration model — and the economics that hold for one prop stop applying once a level ships with hundreds. Two specific problems show up at that scale that a single-asset workflow never surfaces.
Instancing discipline. Identical or near-identical props — the same crate repeated across a warehouse, the same barrel variant scattered through a scene — should be instanced rather than duplicated as unique static meshes wherever the engine supports it. A primitive component uses meaningfully more memory than an instanced equivalent at scale, and a level dressed with hundreds of individually-authored duplicate meshes instead of instanced variants carries a real, avoidable memory cost that only becomes visible during a late-stage performance pass — well past the point where fixing it is cheap.
PCG-ready setup. Most environmental props at scale aren’t hand-placed one at a time anymore — they’re scattered algorithmically across a landscape using a procedural content generation system, which means the modeling stage has to account for that up front. Pivot point placement and a clean bounding box matter more for a PCG-scattered prop than for a hand-placed one: an off-center pivot or an oversized bounding box causes the scatter algorithm to misjudge ground contact, leaving props floating above the terrain or clipping into it across an entire scattered pass. Getting pivot and bounds right during modeling is a five-minute check per asset; catching hundreds of misaligned scattered instances after a PCG pass has already run is not.
Texture atlas strategy. Baking every prop to its own unique texture set is standard practice for hero assets, but at environmental-prop scale it multiplies draw calls and texture memory fast. Grouping compatible environmental props onto shared texture atlases — a shared material and texture set covering a family of crates, pipes, or debris pieces — keeps the memory curve manageable as the prop count climbs, at the cost of some per-prop texture uniqueness that background props rarely need anyway.
Neither of these is a problem you catch by reviewing one asset in isolation. They surface in a full-scene profiling pass, and the fix is far cheaper if the instancing and atlas strategy was decided during pipeline planning — as part of the same brief that set the polycount tier — rather than retrofitted after a hundred unique meshes are already built.
Engine Integration: What Changes for Prop Libraries
Import, material instance assignment, and collision setup follow standard practice regardless of engine, but a few decisions are specific to prop volume rather than any single asset. Naming conventions and folder structure matter more for a 300-prop library than for a handful of hero assets — a consistent naming scheme is what lets instancing and atlas grouping actually get applied in bulk instead of asset by asset. A prop named SM_Prop_Crate_Wood_01 sorts, filters, and batches correctly across a content browser with hundreds of entries; a prop named crate_final_v3 does not, and the cost of that inconsistency compounds every time someone has to manually hunt for the right variant during level dressing.
Collision geometry should default to simplified proxy shapes for environmental props — boxes, capsules, convex hulls, or a small set of custom primitives are usually sufficient, and generating it automatically from the low-poly is standard practice. Hero props that the player interacts with physically may need custom collision, but that doesn’t automatically mean per-triangle (complex) collision: for simulated or movable objects, carefully authored simple or convex collision is usually safer and cheaper — Unreal Engine’s own documentation notes that an object set to use complex collision as simple can’t be simulated at all, only used to collide with other simulated objects. Per-triangle collision should be reserved for specific static query cases where precision matters and the object never needs to move under physics.
Both Unreal Engine 5 and Unity support instancing workflows for repeated props, but the exact implementation and performance trade-off differ by renderer, material setup, and platform. In Unity specifically, GPU instancing is most relevant when repeated objects share the same mesh and material, and how much it actually helps depends on the render pipeline (URP/HDRP) and batching strategy in use — it isn’t a uniform, set-and-forget win the way the phrase “supports instancing” might imply. The meaningful prop-specific difference in UE5 is Nanite’s handling of static, opaque geometry, which changes the LOD-authoring calculus described above but doesn’t change the underlying instancing and atlas discipline either engine needs at scale.
What a Prop Handoff Package Should Include
A production-ready prop delivery is more than an FBX and a texture folder, and gaps here are what turn a finished asset into a re-open ticket during integration. At minimum, a handoff package should include: the low-poly mesh, the approved high-poly source or bake source, complete texture sets, material assignments, collision setup, the LOD chain or Nanite enablement notes, pivot and scale validation, a consistent naming convention, socket or attach-point documentation for anything VFX-relevant, and any destruction or fracture requirements already noted. For a prop library rather than a single asset, the package should also document atlas grouping, instancing assumptions, and which assets are cleared for procedural placement — the same tier decisions made at the brief stage, carried through to delivery instead of left for the receiving team to reverse-engineer.
Our Approach at Nasty Rodent
Across our work for teams such as Offworld Industries, The Bearded Ladies Consulting, Reburn, Whimsy Games, Galaxy 4 Games, and Benner Games, we’ve seen the same production pattern hold: prop pipelines need to scale from a handful of hero assets to full environment dressing passes running into the hundreds without changing assumptions halfway through. The tier assignment happens at the brief stage, before modeling starts, specifically so instancing strategy, texture atlas grouping, and VFX-readiness requirements are locked in before a single asset goes into production — not discovered during a late performance pass.
If your team is scoping a props pipeline for an upcoming production — a handful of hero interactive objects or a full environment dressing pass — our 3D props production work covers the full sequence from blockout through engine-ready delivery, tiered to match how each prop is actually used in your game.
Hero Props vs Environmental Props at a Glance
| Aspect | Hero Prop | Environmental Prop |
| Typical polycount | 8,000–25,000+ tri (low-poly) | 200–3,000 tri (low-poly) |
| Review | Individual sign-off, often against concept art | Batched review across a set |
| LOD strategy | 3–4 hand-reviewed levels | Aggressive, largely automated |
| Texture approach | Unique texture set | Shared atlas across a prop family |
| VFX-ready setup | Common (sockets, destruction geometry) | Rare |
| Instancing | Usually unique per placement | Instanced across repeated placements |
Scoping a Prop Pipeline That Survives Production
A 3D props production pipeline that works for one hero asset and one that works for three hundred environmental props are not the same pipeline wearing different budgets — they’re different planning problems, and conflating them is where most production schedules quietly bleed time. Tier every prop at the brief stage, not during modeling. Plan VFX-ready setup and destruction geometry before blockout, not after texturing sign-off. Split LOD strategy and instancing discipline by tier rather than applying one rule to the whole prop list. Get that scoping right, and the pipeline scales cleanly from a single hero object to a full environment dressing pass without either one blowing the schedule.
If your team is scoping a props pipeline for an upcoming mid-core or AAA production and wants a second read on tier allocation before modeling starts, we can set up a short call with our senior 3D lead — bring your current prop list or a rough scene breakdown, and we’ll give you a concrete read on where the budget risks sit before they reach a milestone review.