How to Vet a Character Art Vendor: Realistic and Stylized Checks
-

Written byDenys Zadoienyi
-

Updated on13.10.2026
-

Time to read17 min

- Why a Strong Character Portfolio Does Not Prove a Vendor Can Ship
- What to Check on Every Character, Realistic or Stylized
- What to Verify on Realistic Characters
- What to Verify on Stylized Characters
- Weak Evidence vs Strong Evidence: A Screening Snapshot
- How to Scope a Representative Character Test
- How to Score the Vendor Before You Sign
- How to Start a Character Test That Tells You Something
Portfolio renders can help you shortlist a character art vendor, but they do not show how the delivered mesh will deform, render or fit your cast in production. A character may look finished on a turntable and still pinch at the shoulder, lose readability at gameplay distance or require changes before it can use your animation pipeline. Those gaps are worth checking before you commit to a larger batch.
If you are an outsource manager building a vendor pool for a character-heavy production, the useful question is not whether the work is good. It is whether the vendor’s characters can meet your animation, engine and cast-consistency requirements. The answer looks different for realistic and stylized work. Our guide to vetting a game art outsourcing studio covers the studio-level questions. This one stays on characters and shows how to vet a character art vendor in three layers: checks that apply to every character, checks specific to each style, and a scoped test that can reveal relevant gaps before a larger commitment.
Vetting a character art vendor means checking whether its team can meet your visual, deformation, engine and handover requirements. It combines relevant portfolio evidence, clear deliverable definitions and style-specific technical review. Where existing evidence leaves an important risk unresolved, a scoped paid test can provide additional evidence before a larger engagement.
Why a Strong Character Portfolio Does Not Prove a Vendor Can Ship
Character vetting needs evidence from motion as well as appearance. A neutral render does not show what happens when a shoulder rotates, a face changes expression or modular clothing moves with the body. Environment assets have their own runtime and integration checks; this guide focuses on the deformation, rig and cast-consistency checks specific to characters.
Depending on the cause, correcting a deformation problem may involve skin weights, joint placement, corrective shapes or topology. If the mesh changes, downstream UV, bake and skinning work may also need revision. Catching the issue on a representative sample can reduce the risk of repeating it across a batch, helping protect the milestone schedule.
Different roles read the same gap differently:
- Producers see risk to a gate review and to animation work that waits on the character batch.
- Art directors see style drift. The hero holds the art bible, a later NPC does not, and lookdev has to be reopened.
- Outsource managers need a review record that separates vendor nonconformities from unclear inputs, changed direction and planned refinement. A falling first-pass approval rate, meaning fewer assets approved without a return, can justify investigation, but it does not identify the cause on its own. If the issue is attributable to the vendor, agree corrective action and a recheck. Repeated or unresolved failures may justify considering a replacement, with source-file access and transition responsibilities reviewed before that decision.
Choose the delivery model against the work and the review capacity you can provide. In-house specialists, a freelancer or a studio can each fit a small or large scope, depending on the skills required, continuity, coordination and integration ownership. Our comparison of in-house vs outsource game art covers that decision in more detail.
Checking these risks early can reduce downstream correction work, though the depth of screening should match the engagement. The portfolio layer has its own portfolio red flags. The rest of this guide covers what a portfolio cannot show.
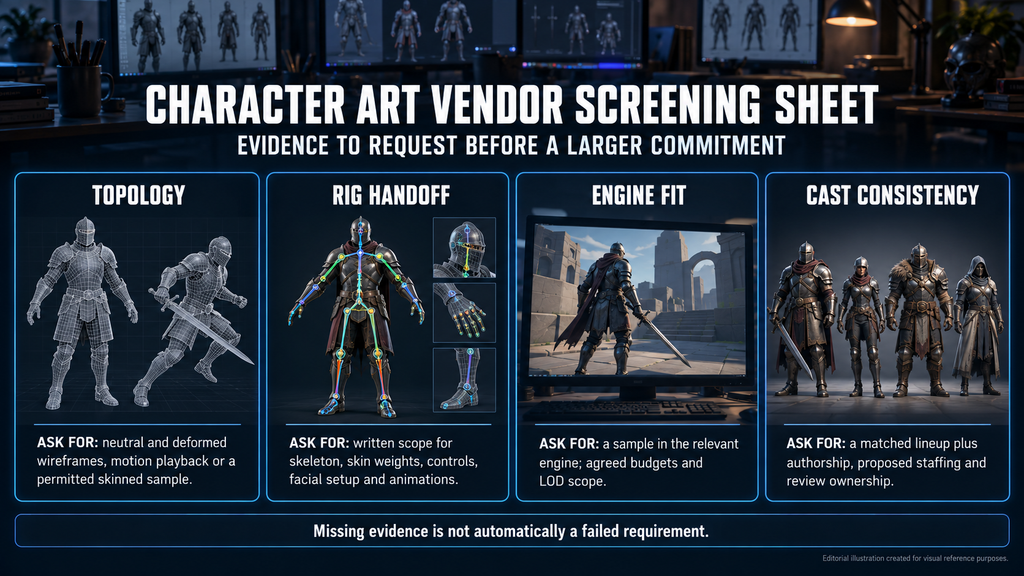
“Editorial illustration created for visual reference purposes. It does not represent a real project, client work, or official software screenshot unless stated otherwise.”
What to Check on Every Character, Realistic or Stylized
Review these four areas using available approved evidence before deciding whether a new test is needed. Record missing evidence and agree how to obtain it within the proposed scope.
Topology That Supports the Required Motion
Request the final game mesh or permitted sample files, with wireframes in a neutral pose and representative deformation views. Inspect how the topology supports the required movement, especially around shoulders, elbows, hands, hips, knees and facial features where applicable. The useful evidence is not a fixed number of edge loops: it is whether the mesh holds the intended shape when animated.
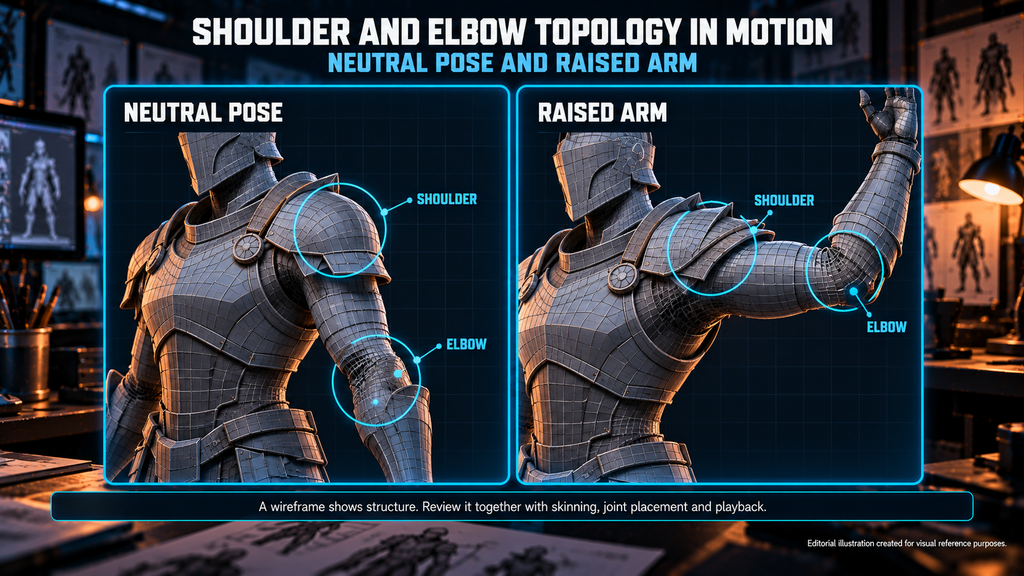
“Editorial illustration created for visual reference purposes. It does not represent a real project, client work, or official software screenshot unless stated otherwise.”
In a quad-dominant source mesh, poles are vertices connected to three, five or more edges, as the Blender manual defines them. Their placement deserves attention in deformation areas, but the presence of a pole is not a failure by itself. Ask your character technical artist or rigger to assess its behavior in the agreed motion tests.
A wireframe reveals structure; it does not prove deformation quality on its own. Review it alongside skinning, joint placement and animation playback. Some problems can be corrected through weights or corrective deformation, while others require topology changes. Our guide to deformation-aware topology and the retopology workflow provides additional context.
Client confidentiality may limit which files a vendor can share. Ask for an approved sample, anonymized breakdown or live walkthrough rather than treating the absence of unsolicited wireframes as a failure.
Rig and Skinning Handoff: Ask What Is Actually in the Package
“Rig included” can mean several different things. A runtime skeleton for the engine, skin weights, a control rig for animators in the DCC tool, blend shapes for the face and finished animations are separate deliverables. A handover that contains one does not automatically contain the others, and an FBX can carry skeleton and skinning data without preserving the controls an animator needs. Put each item on a list and ask the vendor to mark what is in scope, what is out and who owns it. Our guide to source files and the handover package walks through the distinction.
Then ask for evidence of the result. Request a skinned sample using representative motions and a range-of-motion pose set. Playback shows transitions, contacts and artifacts between poses; stills make specific problem areas easier to inspect. Together they provide better evidence than a selected beauty reel, provided the mesh, skeleton and test conditions are identified.
Where the character must use an existing skeleton or animation library, specify hierarchy, naming, reference pose, scale and retargeting requirements, then verify the agreed clips in the target engine. Matching bone names alone does not prove animation compatibility, and our note on skeletal mesh retargeting in UE5 explains how chain mapping and the rig standard affect retargeting.
If rigging sits outside the vendor’s scope by design, that is acceptable. Your rigger then needs a clear statement of what the mesh, naming and skeleton conventions must be.
Engine Readiness: Budgets, LODs and Modular Gear
Define the engine version, render pipeline, target platform, camera and animation set before comparing results. Agree the relevant geometry, material, texture, skinning and runtime budgets. In Unreal Engine, for example, bones per section and influences per vertex are separate constraints, as the skeletal mesh rendering documentation describes, so a single “bone count” figure is not a sufficient budget.
For a portfolio sample, an LOD breakdown or plan helps assess experience. For a test that includes LOD delivery, review the delivered LODs, their transitions and deformation in the agreed environment. Record test conditions and known limitations; successful import alone does not establish runtime performance.
If your game swaps armor, clothing or accessories, ask which modularity method fits your pipeline, including how hidden body geometry, attachments and LODs are handled. A concrete explanation is useful screening evidence; verify the relevant gear combinations under motion in a sample or agreed test. Cutting the body under gear slots is one possible method, not a universal requirement.
Consistency Across a Cast, Not One Hero
One excellent hero demonstrates the quality of one piece, not the consistency or capacity of the team proposed for your project. Ask for several characters from the same project, shown in one lineup under the same lighting. For the art director on your side, a matched lineup can reveal existing inconsistencies and gives you a basis for discussing how the proposed team will control them.
Ask who made the relevant samples, who will perform the test and who is proposed for the production batch. A successful sample does not establish roster throughput or repeatability across different artists. If the studio works with a team, find out how a lead artist reviews each batch against the style guide before it reaches you.

What to Verify on Realistic Characters
Review realistic characters against the approved design, the intended fidelity and how the camera will show them. Anatomy, material response and motion need to support that target; the same checks apply to invented creatures through their approved forms and movement requirements.
- Anatomy and proportion. Where anatomy is relevant and the scope allows it, request approved sculpt or neutral views that expose the underlying forms. Clothing can conceal problems, but not every rigged or modular asset requires a complete unclothed body.
- Material response. Compare material response under neutral and representative project lighting, with exposure and shading settings recorded. If the character only works in one beauty setup, investigate whether the issue is in the asset, materials, lighting or post-processing.
- Face and facial animation. If facial animation is in scope, define whether the setup uses blend shapes, joints or a hybrid. Review eyelid and mouth behavior, expression combinations and playback in the target pipeline. Surface detail does not replace the required deformation system.
- Hair and cloth approach. Ask which method the vendor proposes for hair (cards, strands or another approach) and how it fits your target platform. The right answer depends on your engine and budget, not on what looks best in a close-up. For clothing, distinguish skinned garments from simulated cloth and confirm which setup is in scope. Review the required poses and, where simulation is included, collision behavior and stability in the target engine.
- Creatures and non-human anatomy. Joint logic differs from a human skeleton. Ask how deformation was planned for limbs, spines or tails, not only how the creature looks.
On Mutant Year Zero: Road to Eden, we delivered characters and creatures. The range is easier to judge when realistic work is seen side by side, as in Nasty Rodent’s realistic character portfolio.
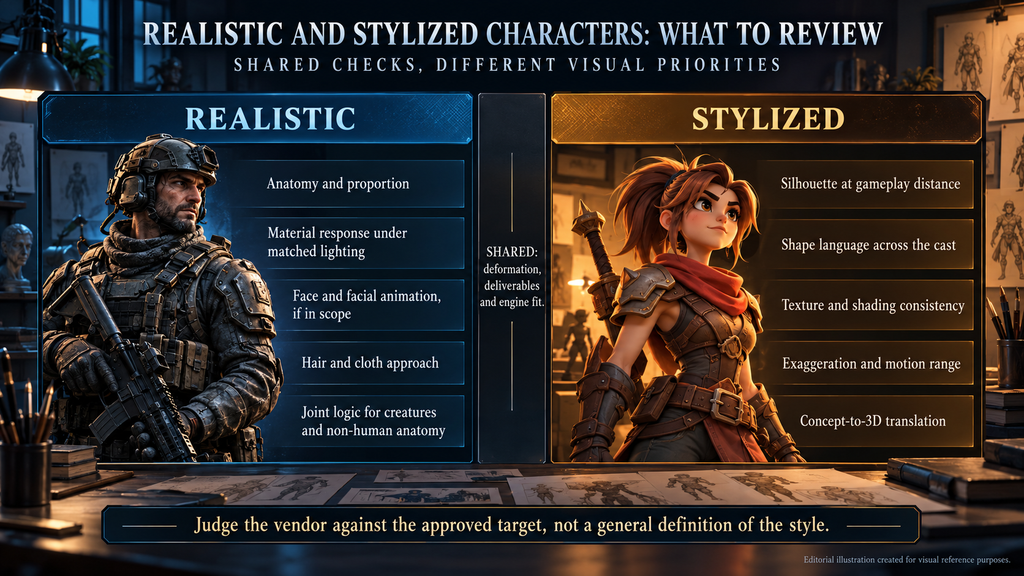
“Editorial illustration created for visual reference purposes. It does not represent a real project, client work, or official software screenshot unless stated otherwise.”
What to Verify on Stylized Characters
Review stylized characters against explicit proportion, silhouette, shape and palette rules, using approved concepts and existing cast members as references. The visual target may use hand-painted textures, PBR, NPR or a hybrid approach. Judge the vendor against that target rather than a general definition of stylization.
- Silhouette. Review the character through the gameplay camera at representative distances and poses. Where the design uses silhouettes to distinguish roles, check that those distinctions remain readable.
- Shape language. Check the project’s rules for proportions and shape language across the cast. Rounded, angular or heavy forms may communicate roles, but the intended associations should come from the art direction.
- Texture and shading consistency. For hand-painted or unlit assets, inspect the authored value structure and compare it with approved references. For stylized PBR, NPR or hybrid assets, review the agreed materials, outlines or shading behavior under representative project conditions.
- Exaggeration and motion. Exaggerated proportions and poses can create distinct deformation challenges. Review the required motion range for the design rather than assuming that stylization always makes skinning harder.
- Concept-to-3D translation. A 2D concept does not automatically become a good 3D character, because drawings can hide geometry. Ask how concept decisions are clarified and approved between the concept artist, modeler and art director. Our note on art direction principles for stylized 3D characters explains why these decisions are best settled before modeling starts.
Our portfolio documents rigged character work for Wild Rage and Bubble Quest of Vikings, with 2D and 3D character and animation work also listed for Bubble Quest of Vikings. Review the specific pieces closest to your visual target in our stylized character portfolio, then ask which stages and deliverables were included.
Weak Evidence vs Strong Evidence: A Screening Snapshot
Use this as a screening sheet. The stronger-evidence column describes what helps verify the requirement; the last column identifies what still needs clarification or testing. Missing evidence is not automatically a failed requirement.
| Check | Weak evidence | Stronger evidence | Red flag or open concern |
| Topology | Shaded render of a neutral pose | Neutral and deformed wireframes, with motion playback or a permitted skinned sample | No verifiable deformation evidence, or unexplained artifacts under required motion |
| Rig handoff | “Rig included” | Written scope for skeleton, skin weights, controls, facial setup and animations | Deliverables or integration responsibilities remain undefined |
| Skinning | A selected beauty reel with no identified mesh or skeleton | Identified mesh and skeleton, representative playback and extreme-pose views | Relevant motion cannot be checked, or artifacts remain unresolved |
| Engine readiness | DCC viewport renders | Sample in the relevant engine configuration; agreed budgets and LOD scope; delivered LOD review if included in the test | No evidence for the claimed engine or platform scope, or a demonstrated budget miss |
| Cast consistency | The three best pieces | Matched lineup plus authorship, proposed staffing and review ownership | Unexplained deviations from the approved target |
| Realistic: materials | A single-light render | Matched-condition review against approved materials and project references | A mismatch remains unexplained under the agreed setup |
| Stylized: silhouette | Close-up beauty render | Representative camera, distance and pose checks against the approved design | Required distinctions are lost under the actual gameplay conditions |
Stronger evidence identifies the asset, requirements and test conditions well enough for the buyer to inspect or reproduce the relevant check. A screenshot or a plan still leaves some behavior untested.
How to Scope a Representative Character Test
A scoped paid test can help when an important style or pipeline risk remains unresolved after initial screening. Use it to verify specific requirements under agreed conditions, not as proof of the vendor’s overall production floor or capacity. Depending on the risk, the sample may be a complete character, a facial setup, a deformation sample or a style-matching pass. A character art test is not necessary for every engagement: approved sample files, directly comparable work or a live pipeline walkthrough may provide enough evidence. If the test is limited to one part of the pipeline, record which parts it does not validate.
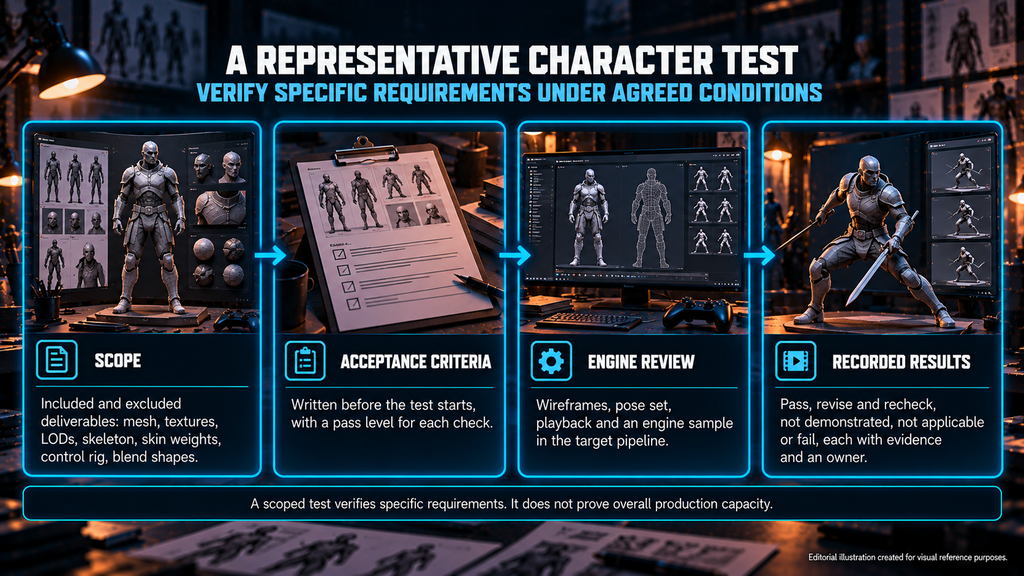
“Editorial illustration created for visual reference purposes. It does not represent a real project, client work, or official software screenshot unless stated otherwise.”
- Choose a sample that covers the decisive risk. Define why it is representative of the planned work. A mid-complexity character may be suitable, but facial, creature or modularity risks may require a different sample.
- Send the inputs a production vendor would receive. That means the concept, art bible and style guide, target platform and engine, budget notes, and naming and import conventions.
- Write the scope down. List each deliverable – game-resolution mesh, textures, LODs, skeleton, skin weights, control rig, blend shapes – and mark it in or out.
- Write the acceptance criteria before the test starts. Use the checks in this guide, with a pass level for each. Scoring written after delivery tends to drift toward how much you liked the render.
- Agree turnaround and a feedback round up front. How a vendor handles a first return tells you something that the first delivery cannot. Note what changed on return and whether the same issue came back.
- Review in the target pipeline. Use wireframes, the pose set, playback and the engine sample. Have your technical artist or rigger score the technical items, and your art director score style.
- Settle ownership or permitted use. The agreement defines whether the test asset is transferred, licensed or only reviewed, and whether it can enter production. That right needs to be agreed separately.
A pre-selection test informs the vendor decision. After selection, onboarding or a calibration milestone aligns the team with production conventions. Keep the purpose and acceptance criteria clear, even if one asset contributes evidence to both stages. Our vendor onboarding protocol shows what to agree before work begins.
A compact test brief keeps the points above in one place:
| Brief field | Agree before work starts |
| Decision and sample | The risk being tested, the representative asset and the coverage limits |
| Inputs | Concept status, approved cast and style references, skeleton and animation samples where applicable |
| Test environment | Engine version, render pipeline, target platform, camera, lighting and recorded test conditions |
| Scope | Included and excluded modeling, textures, rigging, facial, hair or cloth, LOD and integration work |
| Budgets | Project-specific geometry, materials, textures, skinning and runtime constraints |
| Delivery | Agreed editable sources, exports, dependencies, engine sample and known limitations |
| Acceptance | Mandatory checks, reviewers, evidence and the conditions for a recheck |
| Review and terms | Schedule, feedback handling, payment, confidentiality, ownership or permitted use |
For the delivery row, open the agreed sources and import the exports on your side where access permits. Verify that the stated result can be reproduced with the documented dependencies.
Use the same review-log structure in production, but keep test and production results separate unless their scope and review conditions are comparable. Our art rework rate guide shows how to define what counts as rework before you compare numbers.
How to Score the Vendor Before You Sign
Separate mandatory acceptance gates from weighted preferences. Record each check as Pass, Revise and recheck, Not demonstrated, Not applicable or Fail, with its evidence and an owner for the next action. A strong overall score must not average out an unresolved blocker in a required animation, runtime or handover requirement.
Character art vendor evaluation works best when it plugs into a structure you already use. Our RFP and SOW guide describes a weighted framework with six criteria (portfolio quality, production process and QA, technical pipeline alignment, revision and communication clarity, team structure, and price and payment terms) whose weights total 100%. The character checks belong inside the portfolio, process and pipeline criteria rather than replacing them.
Weight the checks by what your project puts at risk:
- Animation-heavy game: weight skinning, range-of-motion results and rig handoff most.
- Close-up or fidelity-critical characters: weight material response, lookdev consistency and the art bible match.
- Large cast: weight cast consistency and the lead-artist review process.
Compare vendors against the same agreed scope and conditions. Attribute a return against the requirement that applied when the work was submitted; unclear inputs, changed direction and planned refinement should not automatically reduce the vendor’s score.
Read the contract as part of the vetting. Check the exit terms, source-file access and transition responsibilities. For critical or long-running work, agree what support is available for transferring the work to another team. Depending on continuity needs, retaining alternative suppliers on a shortlist may also be useful.
At Nasty Rodent, each batch is checked by the lead artist against the client’s style guide and art bible before delivery, and milestones have a defined revision path. A small paid pilot is a step we use before scaling up. If you want to see the character work behind this guide in one place, our character art outsourcing studio page lists the services and examples.
How to Start a Character Test That Tells You Something
Use relevant portfolio work to shortlist, then request evidence for the visual, deformation, engine and handover requirements your project actually has. Where an important gap remains, agree a representative paid test and review it against predefined acceptance criteria. Record both the result and its limits before committing to a larger batch.
If you are scoping a character test and want a second opinion on the brief before it goes out, that conversation is worth having before the test starts, not after.
Run your character test with us – send the brief to sales@nastyrodent.com.