3D Weapons & Vehicles for Tactical Games (Squad/RoN-tier)
-

Written byDenys Zadoienyi
-

Updated on22.05.2026
-

Time to read21 min

- Why Generic Weapon Briefs Fail Before Modeling Even Starts
- 5 Technical Checks Before You Approve Any 3D Weapon Model
- Did you know that…?
- The Hard-Surface Modeling Pipeline for Military Weapons and Vehicles
- Where 3D Weapon Art Pipelines Break Down on Outsourcing
- Why You Can’t Optimize Weapon Art Cost Without Understanding What You’re Paying For
- How We Approach 3D Weapon Art at Nasty Rodent
- Weapon vs. Vehicle Art: What’s Different in Production
- How to Choose the Right Partner for 3D Weapon Art Production
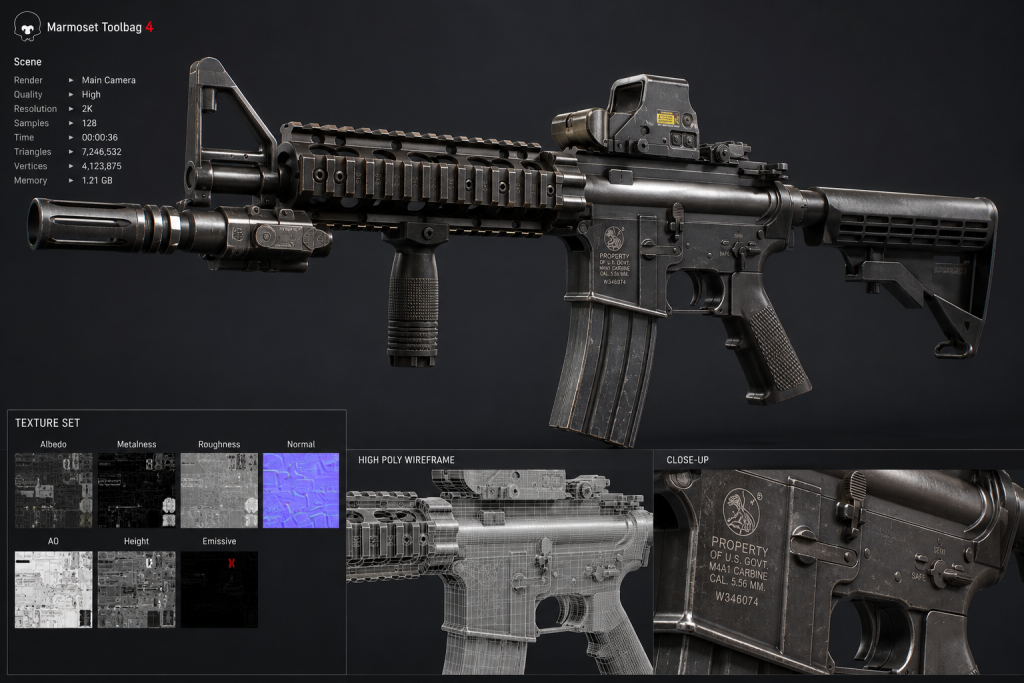
There’s a moment every art director knows. The weapon looks perfect in Marmoset. Clean normals, solid PBR response, the kind of beauty shot you’d pin to your reference board. Then it goes into Unreal, the player picks it up in first person — and the whole thing falls apart. The silhouette reads wrong at 45°. The trigger area is a blurry smear at FPP camera distance. The magazine doesn’t seat visually. Three rounds of revision later, you’re four weeks behind schedule and asking yourself where the brief went wrong.
It didn’t go wrong in production. It went wrong in how the weapon was conceived. As an AAA art director, you’ve probably seen this pattern more than once: 3D weapon art for games gets treated as a visual design task when it’s actually a mechanical engineering task with a rendering constraint on top. Get that inversion wrong, and every downstream decision — polycount budget, UV layout, bake resolution, LOD setup, rig preparation — compounds the error.
This guide covers the full production pipeline for game weapon and vehicle art at AAA-tier, what actually fails on most outsourcing briefs, and the technical checks that separate a model that ships from one that costs you milestones.
Definition Block
3D weapon art for games is the process of creating real-time-optimized 3D assets — firearms, melee weapons, military vehicles — that must satisfy three simultaneous constraints: visual fidelity matching the game’s target art direction, mechanical accuracy sufficient for believability under player scrutiny, and technical readiness for engine integration (correct polycount budget, LOD strategy, PBR texturing, and animation-ready geometry). Unlike cinematic VFX assets, game weapons are viewed under variable camera angles, interaction states, and platform performance budgets. The pipeline moves from blueprint reference collection → high-poly sculpt → retopology → UV layout → baking → PBR texturing in Substance → engine integration and LOD setup.
“Editorial illustration created for visual reference purposes. It does not represent a real project, client work, or official software screenshot unless stated otherwise.”
Why Generic Weapon Briefs Fail Before Modeling Even Starts
If you’re an art director speccing out a weapon batch for a tactical title — something in the Squad or Ready or Not register — the failure mode is almost never artistic. The artists are competent. The failure is in the brief. Specifically: four things that most weapon briefs either leave ambiguous or get wrong entirely.
First: camera context isn’t specified. A third-person weapon and a first-person weapon are fundamentally different assets, not variations of the same model. For first person weapon art, silhouette readability at 45° is the primary design constraint — everything else follows from that camera angle. The polycount distribution changes. UV priority shifts. Features that matter at third person (full barrel geometry, stock detail) become secondary. Features that matter at FPP (trigger guard, iron sights, hand interaction zones) become primary. A brief that doesn’t specify “FPP primary” leaves this open, and studios fill the gap with whatever their default is.
Second: attachment logic isn’t pre-decided. A modular weapon — one with swappable scopes, suppressors, grips, barrel extensions — is not one asset. It’s a system of assets with shared UV space rules, consistent texel density, and matching PBR material groups. If attachment logic isn’t defined before modeling begins, you’ll discover mid-production that the suppressor doesn’t share the metallic roughness map with the receiver, and re-baking everything is a two-week tax. From my experience: studios that define modular attachment rules in the brief before a single vertex is placed save 30–40% of revision cycles on weapon batches.
Third: material zones aren’t mapped. The difference between polymer and CNC-machined aluminum matters more in Substance than it does in concept. If the brief doesn’t indicate which surfaces should read as different material archetypes — machined metal vs. phosphate finish vs. polymer overmold vs. rubber grip — the artist defaults to a single metallic roughness layer. The result is a weapon that looks “correct” but has no tactile hierarchy. On a close-up FPP beauty shot, it reads flat.
Fourth: animation constraints aren’t communicated. Reload animations, chamber inspections, weapon draw sequences — each places geometric constraints on the model. Slide geometry must allow rack movement without clipping. Magazine geometry must support pull-and-seat without intersection. If the animator receives a model with embedded internal geometry that was never meant to move, they’ll either hack the mesh or spend two weeks in revision with the art team. The constraint list should be in the brief, not discovered in production.
This isn’t a list of exotic requirements. It’s what separates a brief that produces a shippable weapon from one that produces a revision loop.
The Production Reality: What a AAA-Tier Weapon Actually Costs You
Before getting to the technical pipeline, a quick calibration on scope. At AAA and mid-core level, weapons and vehicles are not “prop assets” in the background sense.
A hero FPP weapon for a military title — the primary rifle a player carries for 80% of playtime — typically requires 60,000–100,000 triangles on the high-poly before baking, a clean low-poly in the 8,000–20,000 tri range depending on platform budget, 2K–4K texture sets (base color, metallic, roughness, normal, emissive where applicable), and 3–4 LOD levels for performance scaling. That’s not counting attachment variants or cosmetic skins.
A military vehicle — APC, IFV, MRAP-class — scales the problem significantly: 150,000–400,000 tris high-poly, multiple material IDs, interior geometry if crew compartments are visible, destruction state variants in some titles, and 4–8K texture atlasing to manage draw call budget.
At current market rates (Logical Inference — based on publicly available industry pricing data as of 2025): AAA-quality weapons run $3,500–$8,000 per asset for standard realistic production models; hero weapons with cinematic-grade close-up presentation push to $8,000–$15,000. Vehicles at mid-core level start around $5,000 and scale with complexity and interior requirements.
Understaffed or underfunded weapon production doesn’t produce cheaper weapons. It produces rework. And rework at milestone boundary costs significantly more than the original delta.
5 Technical Checks Before You Approve Any 3D Weapon Model
Every art director has a gut sense for when a weapon reads wrong. But “reads wrong” isn’t a revision note — it’s a symptom. These five checks turn the gut sense into actionable criteria.
1. Silhouette Readability at Target Camera FOV
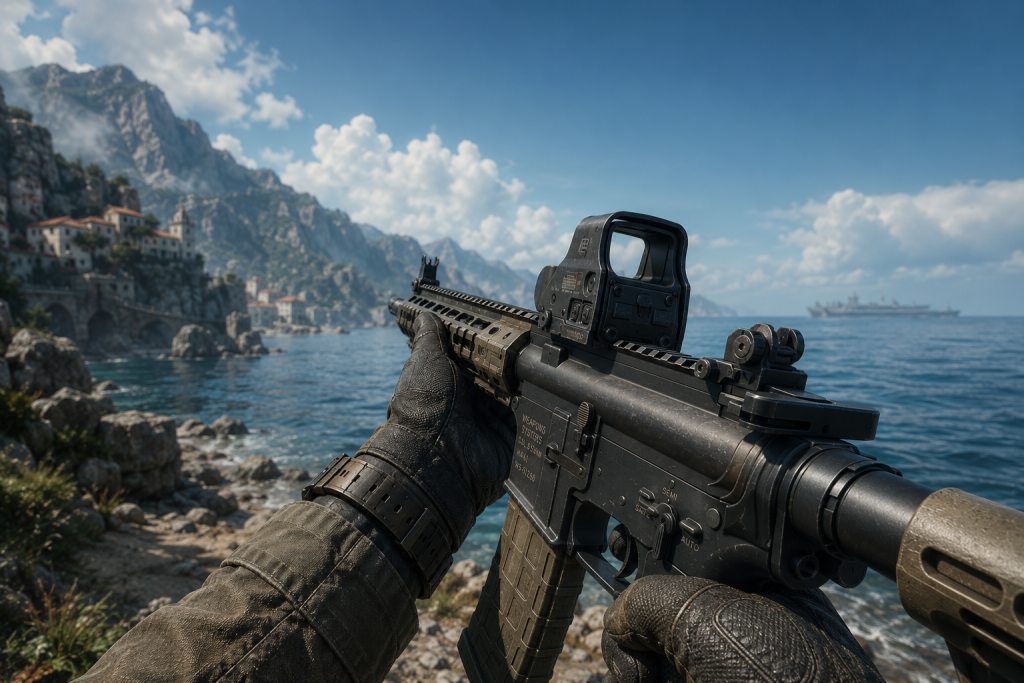
For first-person titles, the effective camera FOV range is typically 35°–55°. At the low end (close, immersive), weapon mass reads clearly but you lose peripheral context. At the high end (wider field), the weapon must maintain shape language and not compress into a visual noise blob.
Test: render the weapon at your game’s target FOV setting. Place it in the bottom-right quadrant of the frame (the standard FPP position). Do the iron sights read clearly? Does the trigger guard silhouette cleanly separate from the receiver? Does the magazine shape communicate what it is?
“Editorial illustration created for visual reference purposes. It does not represent a real project, client work, or official software screenshot unless stated otherwise.”
If any of these fail at target FOV — not at 90° art preview FOV — the model needs proportional adjustment, not texturing. This is a modeling issue, not a rendering issue.
2. Normal Map Fidelity at 2K vs. 4K
Your normal map resolution determines how surface micro-detail reads at close range. For FPP weapons viewed at arm-distance in 4K renders, a 2K normal map will show banding artifacts on long flat surfaces (barrel, stock, scope body). For TPP or at mid-distance, 2K is often sufficient.
The check: bake at 4K, deliver at 2K or 4K depending on platform budget. Never bake at final delivery resolution — bake one step above, then compress. This is standard practice per the Polycount community’s established FPP weapon modeling guidelines, where baking at double resolution before downsampling is recommended for preserving micro-surface accuracy.
Also: for FPP geometry, avoid mirrored UVs on scopes, triggers, and the upper receiver. These elements face the camera directly in FPP view and mirrored bakes will produce symmetry artifacts that read immediately to players.
3. PBR Material Consistency Under Engine Lighting
The most common failure mode after import: the weapon doesn’t match the environment’s lighting system. This happens when the PBR values are calibrated for Marmoset’s default HDRI, not for the game’s specific lighting setup.
Standard reference: metallic surfaces should have metallic values of 0.9–1.0 with roughness in the 0.2–0.5 range for machined metal; phosphate-treated surfaces sit at 0.8–0.9 metallic with 0.5–0.7 roughness; polymer components drop metallic to 0.0 and roughness to 0.6–0.8. These are industry-standard PBR calibration ranges (Logical Inference from Substance Designer’s official PBR material reference charts).
If the art director hasn’t defined a PBR material reference chart per material zone before the weapon goes to Substance — this is the calibration the outsourced artist will guess at. And guesses compound across a 30-weapon batch.
4. Polycount Budget vs. Animation Bone Count
Here’s where weapon art and vehicle art diverge from environment art: animated parts carry vert costs that non-animated props don’t. A sliding bolt carrier group. A rotating barrel. A folding stock. Each animated element needs a clean joint boundary in the geometry — enough polys to deform cleanly, few enough to stay within budget.
The check: review the model’s edge flow at anticipated joint locations before signing off on the high-poly. If the geometry is dense everywhere uniformly — the artist is thinking like a prop artist, not a weapon rigger. Weapons need poly density where the silhouette is most visible and where animation boundaries exist. Background areas (interior of barrel, bottom of grip) can run sparse.
5. LOD Transition Fidelity
In a tactical multiplayer title, you’re viewing opponents’ weapons at 10m, 50m, 200m+. LOD1 (first reduction, typically ~50% of LOD0 tri count) is viewed at ranges where shape language and material contrast still matter. LOD2 is a thumbnail. LOD3 is a blur.
The failure: studios that build LOD by percentage reduction without reviewing LOD0 → LOD1 transition. At 50% reduction, the weapon often loses critical silhouette features — the magazine silhouette collapses, the barrel becomes a cylinder stub, the stock geometry loses its characteristic shape.
Review LOD1 in isolation at the target camera distance and performance budget. It should remain recognizable as that specific weapon, not a generic gun shape.
Did you know that…?
The Squad tactical shooter (Offworld Industries) uses a weapon system with 30+ interchangeable attachments per primary weapon class — scopes, foregrips, suppressors, barrel extensions — each modeled and textured as a discrete asset with consistent UV islands and shared material groups. Managing attachment consistency at that scale requires an asset spec sheet per weapon family, written before the first model goes into production. Without it, the scope from one rifle won’t share a material slot with the scope from another — and you’re running redundant draw calls per match instance. This is part of what makes military vehicle 3D art and weapon systems in tactical titles a systems engineering problem as much as an art problem.
The Hard-Surface Modeling Pipeline for Military Weapons and Vehicles
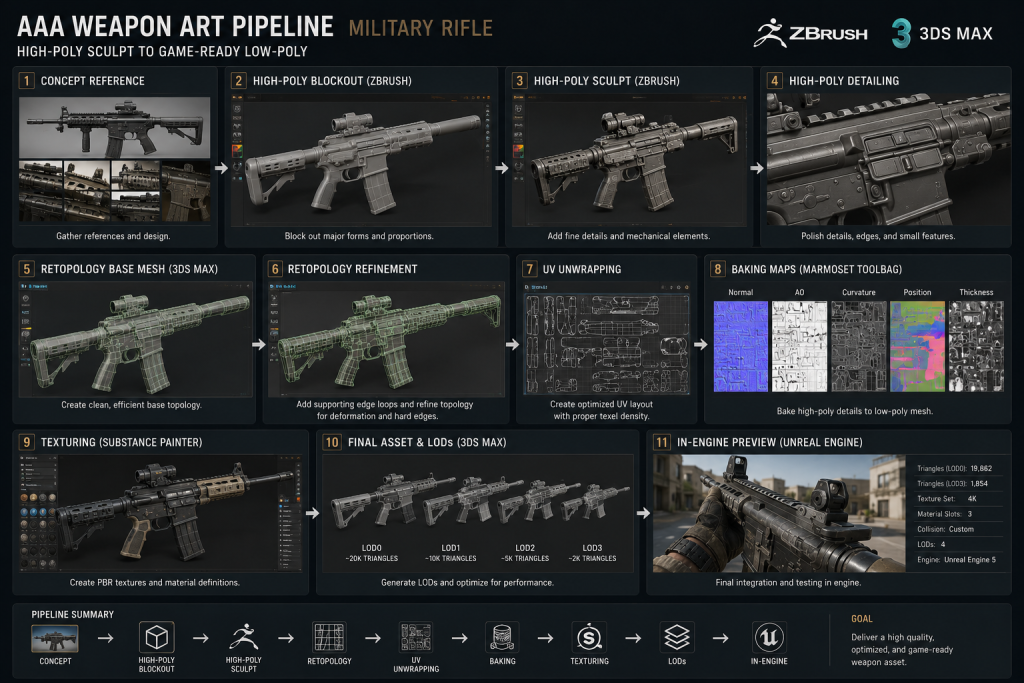
This is where most outsourcing conversations break down — not on capability, but on pipeline compatibility. A studio that produces great-looking weapons in Marmoset may produce assets that require 3 rounds of tech art intervention before they’re engine-ready. The gap is pipeline discipline.
“Editorial illustration created for visual reference purposes. It does not represent a real project, client work, or official software screenshot unless stated otherwise.”
Phase 1: Blueprint and Reference Collection
Military weapons and vehicles require engineering-grade reference, not mood board reference. The silhouette of an M4 is not arbitrary — the exact dimensions of the Picatinny rail, the profile of the gas block, the geometry of the ejection port all have real-world specifications that players who know the weapon will notice if wrong.
For 3D weapon art at Squad/Ready or Not fidelity level: start with orthographic reference (side, front, top, rear views) and manufacturer spec sheets where accessible. Then add contextual reference: in-game screenshots of the weapon in the franchise’s style guide, tactical photography showing wear patterns, material aging, and light behavior on each surface zone.
For vehicles: CAD-adjacent reference and military documentation is preferable over fan photography. The proportional relationship between a vehicle’s wheel well and its hull deck affects not just visual accuracy but weight-reading — the sense of mass the player gets from the asset’s shape language.
Phase 2: High-Poly Sculpt
The high-poly is where all surface micro-detail is captured for baking. In hard-surface weapon work, this typically uses 3ds Max or Maya as the primary DCC (sub-D or boolean workflow) with ZBrush for organic secondary detail (grip textures, rubber gaskets, wear) and Plasticity or Moi3D where CAD-adjacent precision modeling is needed.
Key rule: all bevel radii need to be defined in the high-poly. The thickness of a chamfer on a rifle receiver edge is what makes it read as machined aluminum vs. cast polymer. A 0.5mm chamfer bakes differently than a 2mm chamfer — one reads as machined, one reads as cast. If this isn’t specified in the style guide, every artist will guess independently. As Ohle Mathiebe — weapon artist on Call of Duty Black Ops 4 — notes in his production breakdown on 80.lv: the high-poly stage requires keeping the low-poly already in mind — specifically which surface details will bake cleanly and which interior geometry depths will read correctly from distance. Recessing detail too deep produces a bake artifact; angling the interior of holes slightly catches more light and reads correctly at viewing distance. This is not aesthetic preference — it’s the mechanical constraint that defines how much high-poly surface complexity actually survives into the final in-game asset.

Phase 3: Retopology
Retopology is where game weapon art separates from VFX asset work. You’re manually defining the low-poly mesh that will carry animation, perform within draw call budget, and display the baked normals cleanly.
For FPP weapons: poly density concentrates around the trigger area, iron sights, and barrel face — the zones most visible at FPP camera distance. The stock, pistol grip underside, and interior barrel geometry can run significantly sparser. A well-optimized rifle arrives at 8,000–14,000 triangles while reading at the density of a 30,000-tri model through effective normal map usage.
For vehicles: poly distribution follows a different logic. Exterior panels visible from third-person player distance carry the bulk of the budget. Wheel geometry needs to be clean enough to support rotation animation. Interior geometry (if visible) is a separate material budget.
Phase 4: UV Layout and Texel Density
UV layout for weapons has two constraints that don’t exist in the same way for static props: mirroring restrictions for FPP geometry and attachment island consistency for modular systems.
On mirroring: for elements directly in the FPP camera frame, mirrored UVs produce symmetry artifacts that a player’s eye catches immediately — particularly on milled receiver surfaces, scope bodies, and trigger groups. These islands get unique UV placement at full texel density cost.
On texel density: the industry standard for FPP weapons at 2K texture sets runs at 512–1024 px/m depending on the object’s screen real estate. Higher-density assets (hero weapons, close-inspection models) push to 1024+ px/m. Consistent texel density across a weapon batch is what prevents one rifle scope from looking photo-real while the next looks baked at half resolution.
Phase 5: Baking
Baking converts the high-poly surface detail into normal, AO, and curvature maps on the low-poly mesh. For weapon production, this is where most technical failures originate if the pipeline isn’t precise.
The standard: bake at 2× final delivery resolution (for a 2K delivery, bake at 4K, then compress). Bake in 16-bit to preserve sub-pixel detail. Use the same tangent space basis throughout the pipeline (MikkTSpace is standard for Unreal Engine). Cage baking is preferable for complex interior geometry; ray-based baking works on clean weapon exteriors.
Marmoset Toolbag is the industry standard baking tool for this asset class — its cage control and UV split handling are more precise than Substance Baker for complex hard-surface multi-material weapons.
Phase 6: PBR Texturing in Substance
Substance Painter is the primary texturing environment for production weapon assets. The workflow: base material layers per zone (machined metal, polymer, rubber, glass) → smart material application → hand-painted wear patterns → procedural scratches and edge highlights → final color grading.
Critical output: the texture set must be exportable in the target engine’s format. For Unreal Engine 5, this is the standard Packed texture convention (Metallic in R, Roughness in G, AO in B for ORM packing) plus a separate Normal map. If the artist is outputting for Unity HDRP, the channel packing is different. Miscommunication about output format is the #1 cause of day-one import failures on weapon deliveries.
Phase 7: Engine Integration and LOD Setup
The final step is import, material setup, and LOD chain creation inside the target engine. For UE5: import the static mesh, assign material instances, configure LOD groups, and verify scale against the game’s unit system (1 unit = 1 cm in most modern UE5 projects).
For animated weapons: set up sockets for attachment points (scope, foregrip, suppressor, magazine), define bone hierarchy for animated elements, and verify that the skeletal mesh’s bind pose sits at the animation rig’s T-pose equivalent.
Shading rate optimization — verifying that the weapon’s material complexity doesn’t inflate the GPU’s pixel shading cost beyond the platform budget — is a final technical art check that should be part of the delivery QA, not discovered after deployment.
Where 3D Weapon Art Pipelines Break Down on Outsourcing
The five most common outsourcing failure modes — distilled from real production experience across tactical and military titles:
Red Flag Matrix
| Failure Mode | Technical Symptom | Downstream Cost |
| No art style guide for material zones | PBR values diverge across weapon batch | 2–3 extra revision rounds per batch, inconsistent in-game look |
| FPP camera angle not specified in brief | Silhouette optimized for 3rd-person, fails at 45° FPP FOV | Full geometry rework on affected assets |
| Bake resolution undersized for delivery target | Normal map banding on barrel and receiver surfaces | Rebake + retexture — adds 3–5 days per weapon |
| Mirrored UVs on FPP-visible geometry | Symmetry artifacts on scope/receiver at close distance | UV rebuild required — disrupts texture work already completed |
| LOD transition not reviewed at runtime | LOD1 loses characteristic silhouette elements | Additional LOD pass — 1–2 days per asset after delivery |
| Modular attachment UVs not standardized | Scope from rifle A incompatible with rifle B’s material group | Texture re-export, possible UV rebuild |
| No animation constraint list in brief | Slide geometry blocks bolt rack animation | Geometry modification after delivery — disrupts baking |
| Output texture format mismatch | Day-one import failure in engine | Re-export + reimport cycle — minimum 1-day delay per asset |
Why You Can’t Optimize Weapon Art Cost Without Understanding What You’re Paying For
Style drift starts quietly. First asset in a batch looks exactly on-target. Third looks slightly different. By the tenth, you’ve got weapons that look like they belong to different games. For an art director managing a military tactical title, that’s not a cosmetic issue — it’s a brand integrity issue that affects how the game reads in trailers and screenshots.
The cost of misaligned outsourced weapon art isn’t the revision. It’s the downstream ripple: if the art director spends 2 extra rounds of revisions on a 20-weapon batch, that’s time not spent on the features that ship with the game. That’s 40 revision rounds. That’s 6–8 weeks of senior art review time consumed by correctability that should have been built into the production pipeline upfront.
From the practice of studios working at this level: a mature weapon outsourcing partnership operates on a vendor scorecard model. First-pass approval rate is the key metric. If the outsourced batch passes QA at ≥75% first-pass rate, the vendor is on the preferred vendor list and earns a long-term MSA. If first-pass approval rate drops below 60% consistently, you’re paying for the art twice — once to produce, once to fix.
A studio that delivers at 85%+ first-pass approval rate on a 20-weapon batch is saving you approximately 30–40 hours of art director review time per quarter compared to a studio at 55% first-pass rate. At the senior art lead day rate, that’s a meaningful financial difference — one that doesn’t show up on the line-item invoice but absolutely shows up in your production velocity.
How We Approach 3D Weapon Art at Nasty Rodent
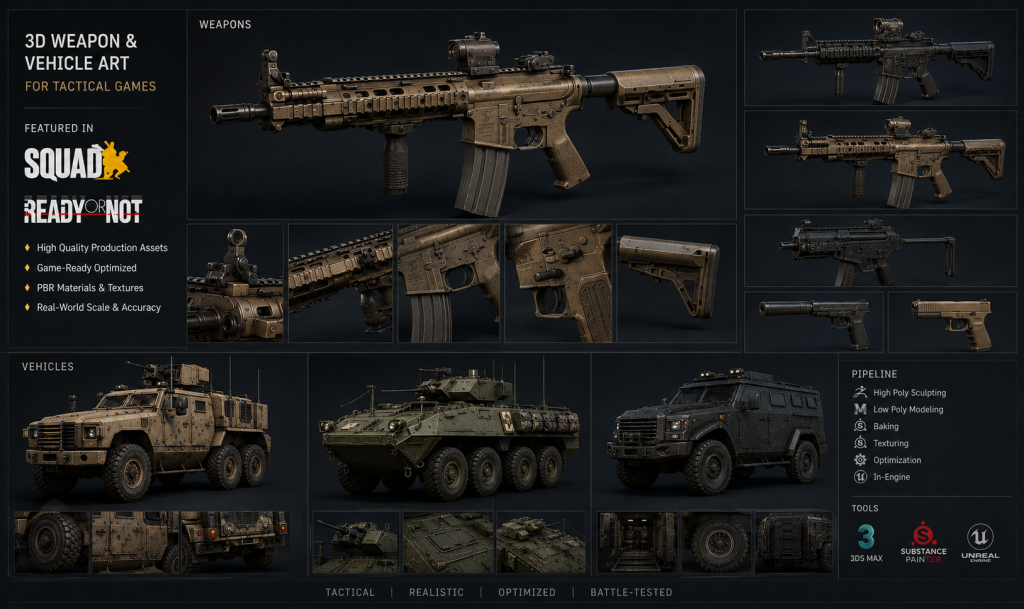
Nasty Rodent is a full-cycle game art outsourcing studio registered in Tallinn, Estonia, with over a decade of production experience delivering hard-surface assets for mid-core and AAA titles. Our weapon and vehicle work spans two of the benchmark titles in the tactical shooter space: Squad (Offworld Industries) and Ready or Not (VOID Interactive).
“Editorial illustration created for visual reference purposes. It does not represent a real project, client work, or official software screenshot unless stated otherwise.”
On Squad, we created realistic military content — from concept art and unique skins to final assets for vehicles and weapons — ensuring full alignment with the project’s technical requirements and the franchise’s visual style. On Ready or Not, our work focused on environment development, ensuring all assets met the game’s technical requirements and realistic visual direction.
Our approach to 3D weapon art follows the same mechanical-systems logic described in this guide:
Blueprint-first reference collection. Every weapon production starts with orthographic reference and spec-sheet research before a modeling tool is opened. We treat weapon proportions as engineering constraints, not artistic choices.
Defined material zone maps. Before Substance work begins, we define PBR calibration targets per material zone in a shared spec sheet. This eliminates inter-asset variation in material response.
FPP-first geometry decisions. For tactical titles with FPP weapon systems, our retopology is optimized for the 45° camera target — poly density is highest where the FPP camera frame sees it most, not distributed uniformly.
Animation-constraint briefing. We communicate with animation teams before modeling locked-down geometry. Attachment sockets, bone hierarchy boundaries, and animated part isolations are defined in modeling, not retrofitted after.
Engine-validated delivery. Every weapon batch is imported and validated in the target engine before delivery — material response under the game’s lighting system, LOD transition review at runtime, socket placement verification for attachment logic.
Explore our 3D Weapons production service or browse our portfolio page to see Squad and Ready or Not deliverables.
We also support adjacent production needs across 3D Vehicle art, Concept Art, and 3D Environment — services that often run in parallel on the same title.
Weapon vs. Vehicle Art: What’s Different in Production
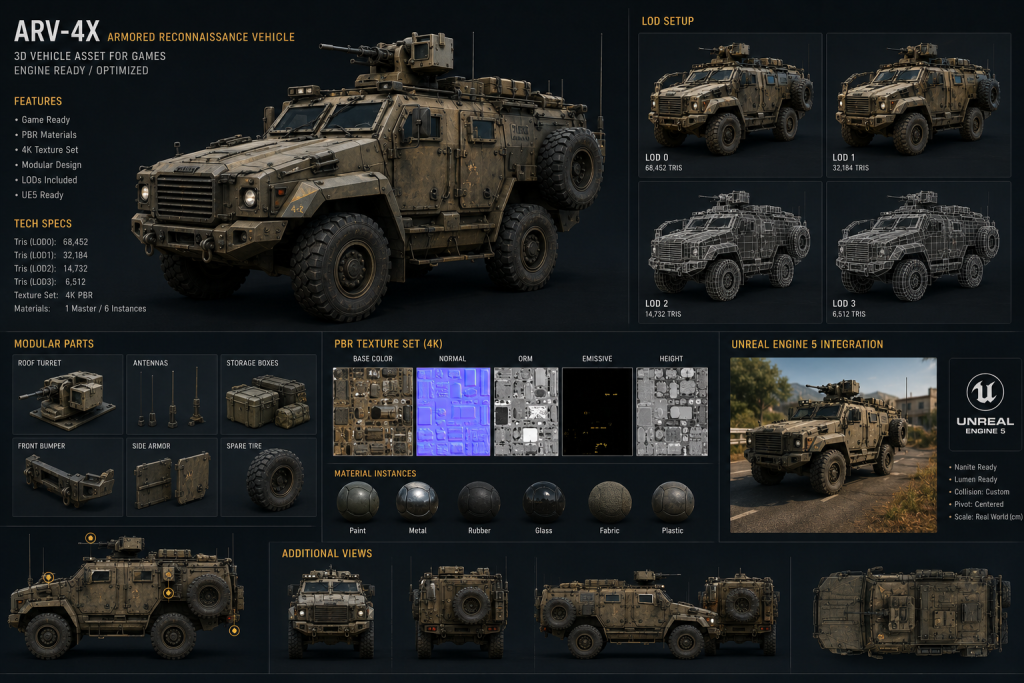
| Production Parameter | FPP Weapon (Tactical Rifle) | Ground Vehicle (APC / IFV) |
| Primary camera context | FPP, 35–55° FOV | TPP, variable distance |
| High-poly tri range | 60K–100K | 150K–400K+ |
| Low-poly delivery range | 8K–20K tris | 25K–80K tris |
| UV priority | FPP-visible surfaces (receiver, sights, trigger) | Exterior hull panels, wheel geometry |
| Texture resolution | 2K–4K per weapon | 4K–8K atlas, multiple material IDs |
| Animation complexity | Bolt, slide, magazine, barrel (modular) | Wheels, hatches, turret rotation |
| LOD levels | 3–4 LODs | 4–6 LODs |
| Art style guide requirement | Material zone map per weapon family | Material zone map + destruction state spec |
| Common failure mode | Mirrored UV on FPP geometry | LOD1 losing vehicle-class readability |
| Typical outsourcing brief gap | FPP camera angle not specified | Interior geometry scope not defined |
How to Choose the Right Partner for 3D Weapon Art Production
Outsourcing weapon and vehicle art at AAA level is a vendor relationship decision as much as an artistic one. Here’s the evaluation framework that matters:
Portfolio specificity over portfolio volume. A studio with 5 production-shipped tactical weapons is a better signal than one with 50 stylized fantasy weapons. Look specifically for: portfolio entries that show the full pipeline (high-poly → low-poly → textured → in-engine screenshot), evidence of FPP-specific optimization, and familiarity with your target engine.
Technical communication in the brief response. Send a realistic technical brief (with the parameters from the FAQ above) and evaluate the response. A studio that asks clarifying questions about camera context, attachment logic, and engine output format before quoting is operating at production level. A studio that quotes by asset count without engaging the technical parameters is operating at portfolio-sample level.
First-pass approval rate as a vendor scorecard criterion. Ask directly: what is the studio’s first-pass approval rate on weapon batches? Any studio with production experience can answer this within a range. A first-pass approval rate below 60% on weapon production is a financial risk — you’re buying rework capacity, not production capacity.
Engine compatibility and tech art bridge. A weapon that looks correct in Marmoset and fails in-engine is a weapon you paid for twice. The studio should offer in-engine validation as part of delivery QA, not as an optional add-on.
Timeline and revision structure. A realistic weapon production timeline for a hero FPP rifle at AAA quality: 3–5 business days high-poly, 2–3 days retopology and UV, 2–3 days baking, 4–6 days texturing, 1–2 days integration and QA. Total: 12–19 business days per weapon from brief to delivery-ready. Studios quoting 5 days for a full weapon are either running a simplified pipeline or planning to revise.
If your studio has an upcoming tactical or military title and needs a weapon or vehicle batch with Squad-tier accuracy and production-validated delivery, explore our 3D Weapons service and request a Visual Style Match Call with our senior art lead.
In 30 minutes, we’ll tell you specifically where your current brief needs technical tightening, how our pipeline maps to your engine setup, and whether our first-pass approval rate on comparable titles is the right fit for your milestone calendar.
You can also explore our work across 3D Vehicle art for games and our full blog for additional production guides.
Nasty Rodent is a full-cycle game art outsourcing studio where 3D weapon and vehicle art is treated as a precise mechanical system, not just a collection of static visual shells. With over a decade of production experience shipping high-fidelity assets for tactical giants like Squad and Ready or Not, we deliver hard-surface models that balance obsessive engineering-grade accuracy with flawless technical performance. From rigorous blueprint analysis and high-poly FPP modeling to optimal shading-rate optimization and articulation-ready engine integration, our team of 40+ experts ensures your assets are production-ready from day one. Explore our Weapon & Vehicle Art services and let’s equip your tactical world with unmatched mechanical realism.