
Material Editor in Unreal: PBR Materials Without Code
-

Written byDenys Zadoienyi
-

Updated on10.09.2026
-

Time to read12 min

- What the Material Editor Actually Builds
- Master Materials: The Node Graph You Build Once
- Material Instances: Reusing One Master Material Across Many Assets
- Static Switches: The Parameter Type That Still Compiles
- Material Functions: Reusable Logic Across Multiple Masters
- Material Parameter Collections: One Value, Many Materials
- Where the Node Graph Stops Being Enough
- Hiring for UE5 Material Pipeline Work
- How Nasty Rodent Approaches UE5 Material Pipelines
- Material Editor Approaches Compared
“Editorial illustration created for visual reference purposes. It does not represent a real project, client work, or official software screenshot unless stated otherwise.”
A game with two hundred props doesn’t necessarily need two hundred independently authored materials – reusable master materials and material instances can cover whole families of assets that share compatible material requirements. That distinction is where Unreal’s Material Editor earns its “no code” reputation, and also where the reputation gets oversold. The node graph really does let an artist build a physically based material without writing a line of HLSL. What it doesn’t do is make every kind of change free – ordinary instance parameters can be adjusted without recompiling the parent shader, while static parameters are resolved at compile time and can create additional shader permutations.
This guide covers how the Material Editor actually works in production: building a master material, exposing the right values as parameters, creating instances that reuse it, and the specific point where “no code” stops being literal.
What the Material Editor Actually Builds
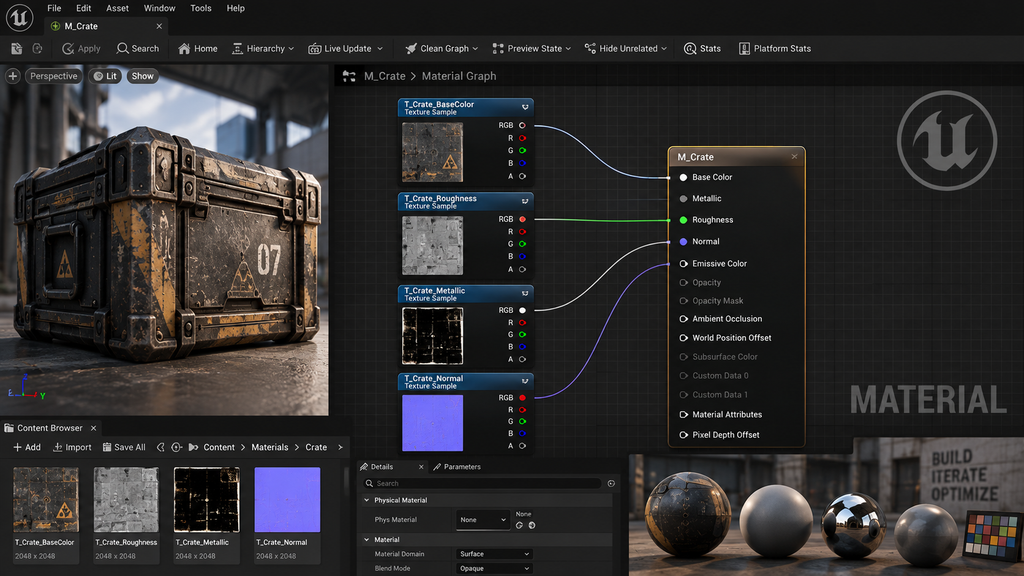
The Material Editor is Unreal’s visual node graph for authoring shaders. Instead of writing HLSL by hand, an artist connects nodes – texture samples, math operations, constants – into a set of standard inputs: Base Color, Metallic, Roughness, Normal, Emissive, and a handful of others depending on the shading model. Under the hood, Unreal compiles that graph into an actual shader; the node graph is the authoring layer, not a replacement for the shader itself.
The texture maps feeding into that graph – base color, roughness, metallic, normal – are typically authored upstream in a tool like Substance Painter, following the same channel logic covered in our PBR texturing workflow guide. In a texture-driven PBR workflow, the Material Editor takes over once those maps reach Unreal: it wires them into the shading model, combines them with procedural logic where needed, and exposes the values a team needs to vary. The graph isn’t limited to wiring up pre-baked maps, either – gradients, masks, coordinate manipulation, and generated normal detail can all be built procedurally inside the same node system.
That last part – deciding what to expose – is the design decision that separates a reusable master material from a one-off graph nobody else can safely touch.
Master Materials: The Node Graph You Build Once
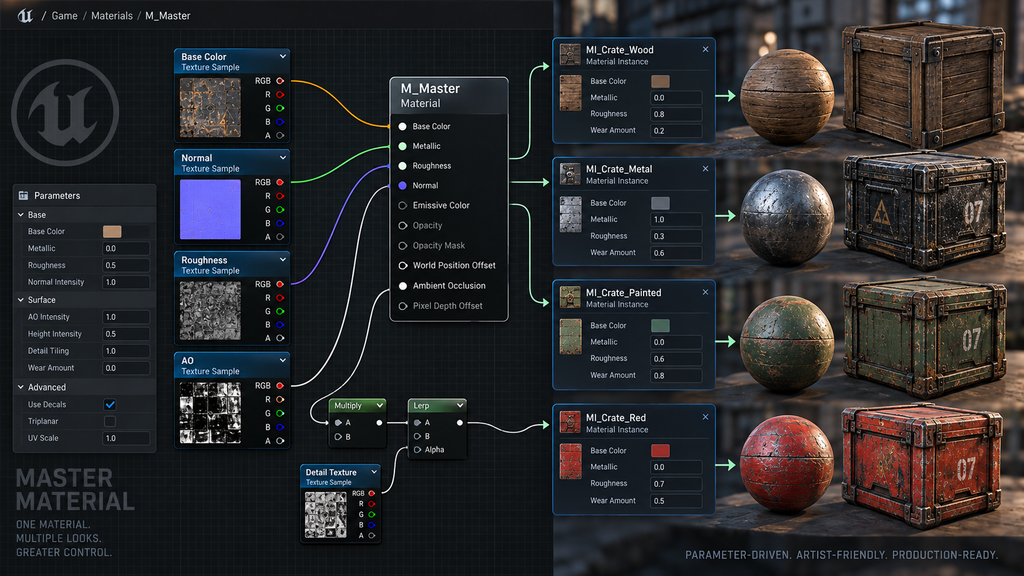
A master material – the parent, or base, Material in Unreal’s own terminology, though “master material” is the term production teams and most tutorials use in practice – is the base graph: every node, every texture sample slot, every input wired up once. On its own, a master material behaves like any other material – it has fixed values for base color, roughness, and everything else, and changing any of those values means opening the graph and editing it directly.
The moment a value gets converted from a hardcoded constant into a parameter, that value becomes something a separate asset – a material instance – can override without touching the graph at all. A Scalar Parameter replaces a single float (roughness, metallic, tiling); a Vector Parameter replaces an RGBA value (a tint color); a Texture Parameter replaces a bound texture asset, letting an instance swap in a different base color map entirely. Right-click a constant node in the graph and Convert to Parameter is the entire mechanic – there’s no separate system to learn.
Well-organized master materials group these parameters logically (Base Color group, Normal group, and so on) and set a sort priority, because the artist adjusting an instance later is working entirely from the Material Instance Editor’s parameter list, not the graph itself.
Material Instances: Reusing One Master Material Across Many Assets
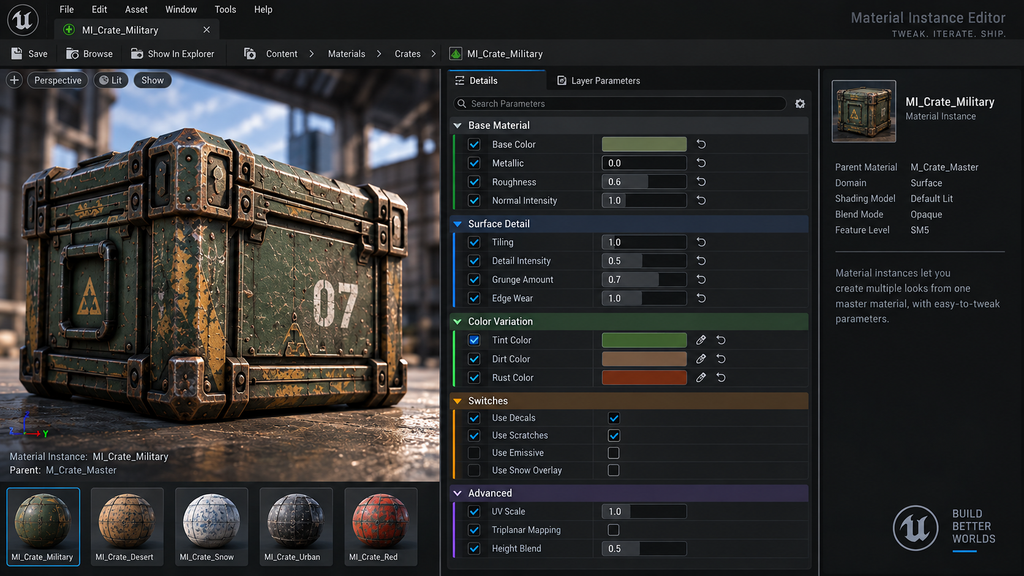
A material instance is a separate asset that references a master material and overrides some subset of its exposed parameters. Created in seconds by right-clicking a master material and selecting Create Material Instance, an instance opens in the Material Instance Editor – a panel of sliders, color pickers, and texture slots, with no node graph in sight. This is the part of the workflow that most literally matches “PBR materials without code”: an artist can produce a dozen visually distinct props from one master material by adjusting only the exposed values, never opening the underlying graph.
“Editorial illustration created for visual reference purposes. It does not represent a real project, client work, or official software screenshot unless stated otherwise.”
Two things make this more than a shortcut. First, instances carry no extra compilation cost for their non-static parameters – changing a scalar, vector, or texture value on an instance doesn’t recompile the parent shader. Second, because every instance shares the same underlying shader logic, a change made once in the master material – adjusting how roughness variation gets calculated, say – propagates to every instance built from it, without touching each one individually. That propagation is the actual production value: a studio standardizing on shared master materials is choosing one point of maintenance over dozens.
This is also where a props batch built for a UE5 production typically lives: a single parameterized master material covering a prop family, with instances handling the color, wear, and texture variation across each individual asset – on one UE5 props batch we worked on, that pattern replaced what would otherwise have been a separate material per prop.
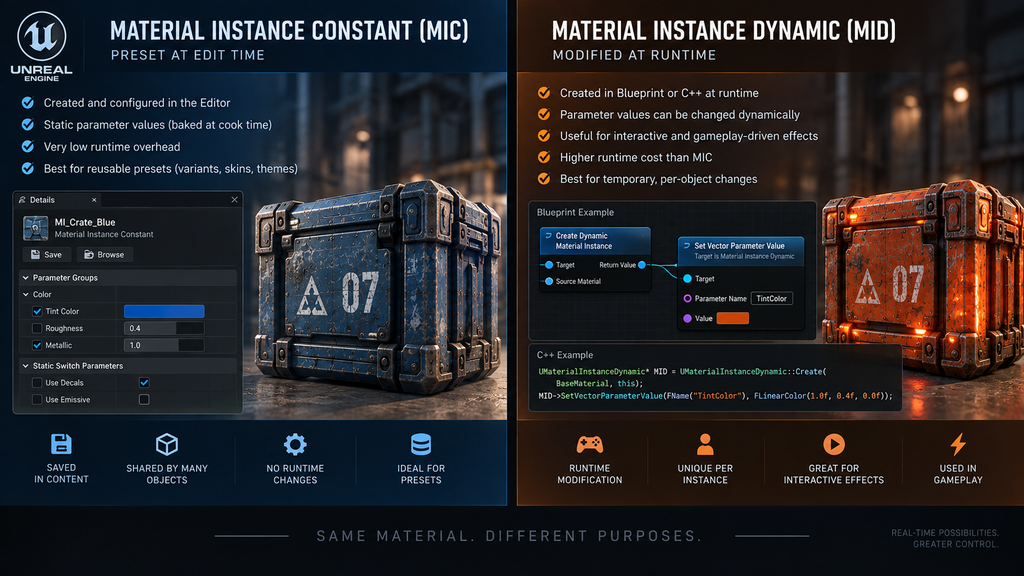
There’s a second, less visual-editor-friendly type of instance worth knowing about: a Material Instance Dynamic (MID) is created and modified through a Blueprint node or code at runtime, rather than as a saved asset in the Content Browser. A Material Instance Constant is authored and saved ahead of time, with its parameter values fixed once gameplay starts; a MID exists specifically for values that need to react to gameplay – a damage-flash effect, a dissolve transition, a health bar tint. Building the MID’s parameter hookup still means dropping a node into a Blueprint graph, which is visual scripting rather than the pure asset-panel workflow of a Constant instance – a smaller but real caveat on how far “no code” extends.
“Editorial illustration created for visual reference purposes. It does not represent a real project, client work, or official software screenshot unless stated otherwise.”

Static Switches: The Parameter Type That Still Compiles
“Editorial illustration created for visual reference purposes. It does not represent a real project, client work, or official software screenshot unless stated otherwise.”
Not every parameter type behaves the way scalar, vector, and texture parameters do. A Static Switch Parameter is a boolean that selects between two branches of the graph – and per Epic’s own documentation, static parameters are applied at compile time, not runtime: they can be set in the Material Instance Editor, but the value can’t change during gameplay, and a separate shader gets compiled for every combination of static parameters actually used across a material’s instances.
The upside is real: the branch that gets switched off is stripped from the compiled shader entirely, so the static switch itself adds no runtime branching cost. The downside is the one production teams learn about the hard way – each additional independent static switch can double the theoretical combination space, and as permutations accumulate, compile times and shader counts can grow substantially across a project. In practice, Unreal only compiles the combinations actually used by instances in the project, not every theoretical possibility, but a master material with several unrelated static switches used inconsistently across many instances can still push that number higher than anyone planned for.
The practical rule that follows: default to scalar, vector, and texture parameters for anything an artist will realistically vary per instance, and reserve static switches for structural on/off decisions – toggling an entire feature branch, not tweaking a value – where the number of actual combinations in use stays small and deliberate.
Material Functions: Reusable Logic Across Multiple Masters
“Editorial illustration created for visual reference purposes. It does not represent a real project, client work, or official software screenshot unless stated otherwise.”
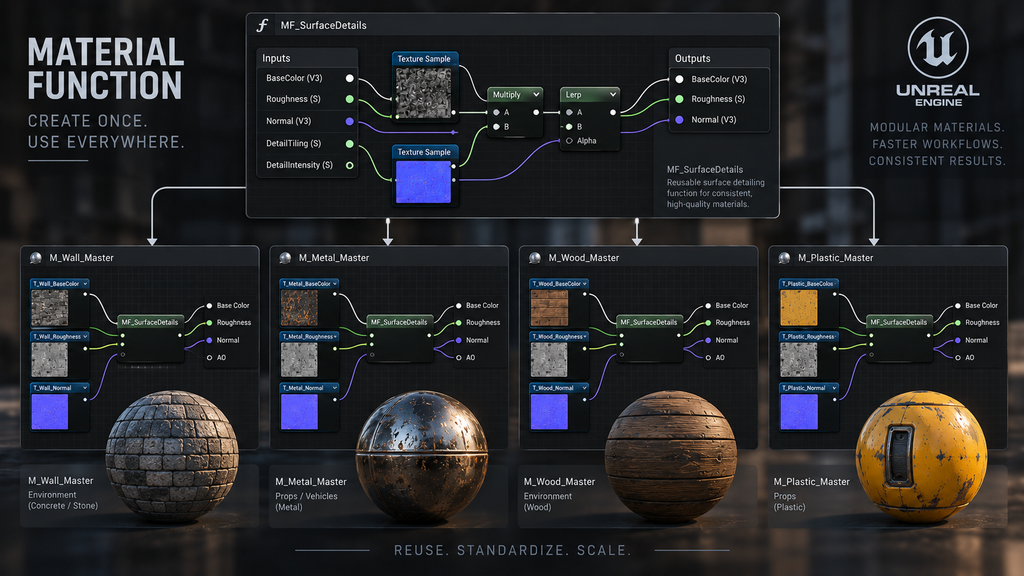
A Material Function is a self-contained node graph – its own inputs and outputs – that can be dropped into any master material as a single node, the same way a function works in written code. A studio that builds, say, a wind-sway calculation or a triplanar projection setup once as a Material Function can reuse it across every master material that needs it, rather than rebuilding the same node cluster by hand each time and risking three slightly different versions drifting apart across a project.
This is the piece of the Material Editor that scales a small team’s node-graph work: the handful of people comfortable building graphs from scratch produce a library of functions, and everyone building master materials afterward is assembling from that library rather than starting from raw nodes every time.
Material Parameter Collections: One Value, Many Materials
A Material Parameter Collection is a separate asset – not tied to any single material – that holds scalar and vector parameters any material can reference directly, without those values being exposed as per-instance overrides at all. A collection can carry up to 1024 scalar parameters and 1024 vector parameters, and any one material can reference at most two collections at once.
The typical use case is a value that needs to change globally and instantly across many unrelated materials at the same time – a time-of-day tint, a global wetness value after rain starts – where updating dozens of individual material instances one by one would be impractical. Where a material instance parameter is “this one asset, this one value,” a parameter collection is “every material that opted in, one shared value.”
Where the Node Graph Stops Being Enough
The Material Editor’s node graph covers most of what a PBR material needs, but it has real edges. A handful of situations consistently push past what’s practical to build with standard nodes alone:
- Nanite material constraints. Nanite-enabled meshes only support Opaque and Masked blend modes – translucent materials fall back to a default material with a warning, and masked materials carry a real overdraw cost on dense foliage. Building around that constraint is a graph decision as much as an art decision, and it’s covered in more depth in our Nanite technical guide.
- Custom HLSL for genuinely novel math. The Custom expression node lets an artist drop raw HLSL directly into the graph for calculations the standard node library doesn’t cover – at which point the material is no longer strictly code-free, even if it’s still built inside the visual graph. Custom HLSL should be used deliberately: Epic’s own documentation notes that Custom expressions can prevent constant folding and may compile to more shader instructions than an equivalent built-in node setup.
- Shader permutation management at scale. Once a project has dozens of master materials each carrying a few static switches, keeping the actual number of compiled permutations under control becomes an ongoing technical-art job, not a one-time setup decision.
- Import-time material assignment. A mesh that arrives in-engine with a default or unexpected grey material does not necessarily indicate a geometry-import failure. Check material-slot assignment, imported material settings, texture references, shader compilation status, and any rendering-path constraints before treating it as a mesh problem – a checklist that belongs in the asset import pipeline rather than in material authoring itself.
None of this makes the Material Editor’s premise false. It means the “without code” framing describes the day-to-day authoring experience for most parameter work, not a guarantee that nothing underneath ever compiles.
Hiring for UE5 Material Pipeline Work
A small, well-bounded material setup can often be handled in-house when the team already has someone comfortable with Unreal’s Material Editor. Outsourcing becomes more relevant once the scope expands into multiple master-material families, reusable function libraries, cross-platform constraints, and shader-permutation management across a large asset list – at that scale, the material pipeline itself becomes a piece of technical infrastructure someone has to own, not a side task fitted between other work.
Vetting for that role isn’t the same as vetting a general UE5 hire. Some engine-level checks from our technical vetting guide for UE5 developers remain relevant – particularly rendering-path constraints and performance reasoning – but a material-pipeline specialist should also be evaluated specifically on parameter architecture, shader complexity, reusable functions, and permutation control across a representative asset set.
How Nasty Rodent Approaches UE5 Material Pipelines
On a UE5 props batch, we used a parameterized master material with material instances handling per-asset variation rather than building a separate material graph for each prop – the same approach covered throughout this guide. The exact structure of a material pipeline – how many master materials, how parameters are grouped, where static switches are used versus avoided – depends on the project’s asset list and platform targets rather than a single template applied everywhere.
If your team has an asset list that’s outgrowing a one-off material per prop, our 3D environment team and broader UE5 production services can review your current material setup and scope the structure that fits your asset count and platforms.
Get an estimate for your UE5 material pipeline →
Material Editor Approaches Compared
| Approach | Best For | Main Trade-off |
| Unique material per asset | One-off hero pieces, very small asset counts | No shared maintenance point; changes must be repeated per asset |
| Master material + Material Instance Constants | Prop families, characters, most production asset variation | Requires upfront parameter planning; static switches need permutation discipline |
| Master material + Material Instance Dynamic | Runtime-driven effects (damage, dissolve, highlights) | Needs a Blueprint or code hookup; not a pure asset-panel workflow |
| Material Functions + shared library | Teams building many master materials over time | Pays off over a project, not on a single material |